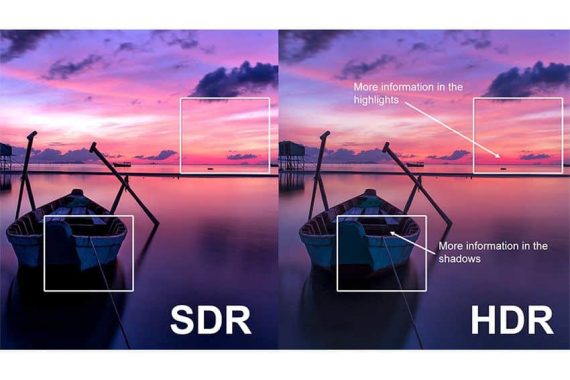
High Dynamic Range (HDR) technology has revolutionized the way we capture, process, and display images and videos. Originating in photography, HDR combines multiple exposures of the same scene to create a single image with a wider range of luminance levels than standard dynamic range (SDR) content. This means HDR can represent brighter highlights, deeper shadows, and more vibrant colors, mimicking how the human eye perceives the world. Today, HDR extends beyond photography into televisions, monitors, smartphones, and streaming services like Netflix and Disney+. Formats such as HDR10, Dolby Vision, and HLG (Hybrid Log-Gamma) have standardized its implementation, making it accessible to consumers.
Photo: blog.eavs-groupe
In simple terms, HDR is a way to visualize the widest dynamic range inherent in capturing the original content. A modern film camera or digital camera can capture a higher level of brightness (luminance) and blacks considerably deeper than a current video screen can display. However, if you can create a transfer that keeps all these luminance details and a screen is able to display it, then the resulting image will be a better representation of what the human eye is able to solve.
It is important to realize that HDR is not just about increasing the brightness of an image, although this is a common misconception. The idea is to increase the overall dynamic range between black and white making the dark parts darker and the parts brighter, keeping the details when both are in the frame. So, for example, if the image was of the interior of a room you could see the details in the dark shadows, but also make details through the illuminated window.
However, it is not only the difference between the darker and brightest elements of an image, HDR also requires greater expression and detail within the colors. Therefore, HDR will use a larger color space than the current Rec.709 standard. It has not yet been announced exactly what color space will be used, but probably the DCI standard used in cinema, although theoretically it could go as wide as Rec.2020.
Another significant advantage is improved realism in varying lighting conditions. HDR content adapts better to real-world environments, reducing issues like glare in bright rooms or loss of detail in dim settings. Technologies like Dolby Vision dynamically adjust metadata frame-by-frame, ensuring optimal playback regardless of the display’s capabilities. This is a boon for content creators, as it allows for more creative freedom; filmmakers can push boundaries with high-contrast scenes that would be impossible in SDR. In gaming, HDR reduces eye strain by providing balanced visuals, and with consoles like the PlayStation 5 and Xbox Series X supporting it natively, gamers enjoy faster response times without sacrificing quality. Environmentally, HDR can be more efficient in some cases, as brighter displays might require less backlighting power when optimized, potentially lowering energy consumption over time.
HDR also future-proofs content and devices. As more streaming platforms mandate HDR for premium tiers, investing in HDR-capable hardware ensures compatibility with emerging standards. This interoperability extends to mobile devices; smartphones like the iPhone 14 Pro capture and display HDR photos seamlessly, enhancing social media sharing and personal archiving. For educators and scientists, HDR aids in accurate simulations, such as medical imaging or astronomical photography, where subtle gradients are crucial.
Despite these benefits, HDR has notable cons. Compatibility issues remain a hurdle. Not all devices support HDR uniformly; older TVs might claim HDR but lack the peak brightness or color depth to render it properly, leading to disappointing results like dim images or color banding. This “fake HDR” phenomenon frustrates consumers who buy budget models expecting premium performance. Moreover, content availability is uneven—while major studios produce HDR versions, older libraries often stay in SDR, requiring upscaling that can introduce artifacts. Streaming services charge extra for HDR access, adding to costs.
Technical challenges abound. Producing HDR content demands more resources; cameras must handle multiple exposures, increasing file sizes and processing times. Editing software like Adobe Premiere Pro requires powerful hardware to manage the data without lag, which can be prohibitive for hobbyists. On the display side, HDR can exacerbate issues like blooming, where bright areas bleed into dark ones on LCD panels, or burn-in on OLED screens from static high-brightness elements. Power consumption is higher for achieving those peak nits, shortening battery life on portables and raising electricity bills for home theaters.
Viewing conditions matter greatly. HDR shines in controlled environments but can look overblown in brightly lit rooms without proper calibration. This necessitates additional tools like ambient light sensors or professional setup, complicating the user experience. Privacy concerns arise too; some HDR metadata includes device-specific data that could be tracked by manufacturers.
Environmentally, the push for brighter displays encourages frequent upgrades, contributing to e-waste. While HDR aims for realism, it sometimes oversaturates colors artificially, straying from naturalism and causing viewer fatigue.
HDR’s pros—enhanced quality, realism, and future-proofing—make it a game-changer for entertainment and professional work. Yet, its cons, including compatibility woes, high costs, and technical demands, suggest it’s not yet universal. As adoption grows and standards evolve, HDR could become the norm, but for now, weighing these factors is essential for informed decisions.
The current 8-bit video standard allows you to display a maximum of 256 shades of any primary color, but under the new 4K Ultra HD standards, displays will need to be able to handle colors at a depth of 10 bits, allowing 1,024 tones of each colo pr im you. Combining a wider color space and greater bit depth will result in a more natural look and detailed images than you can achieve today.
Although HDR and wider color spaces are technically separate aspects of image reproduction, the two are becoming connected by standard bodies in what is often called color volume. This is essentially a three-dimensional version of the previous chart with combined color and luminance. The greater the luminance range and the wider the color space, the greater the overall color volume and therefore the greater the impact on the perceived image. The combination of a wider dynamic range and a wider color space results in a higher color volume and a better perceived image.
Wi-Fi technology, which is how most of your home devices have access to the Internet, has grown in leaps and bound and connected over the years. It started in the 1980s as a technology designed for wireless cash registers called WaveLAN. This technology was developed and shared with the Institute of Electrical and Electronic Engineers (IEEE) network standards group, known as Committee 802.
The technology was further developed during the 1990s until the committee published the 802.11 standard in 1997. The initial Wi-Fi form of that 1997 standard only supported 2 Mbps connections.
It has also not been officially known as “Wi-Fi” from the beginning; that term was coined only a few years ago as its popularity increased. Since then a group of industry standards has continued to evolve the standard, generating a family of new versions of Wi-Fi called later 802.11b, 802.11g, 802.11n, 802.11ac and so on. The next generation of Wi-Fi will be called Wi-Fi 6, which will provide internet speeds of up to 9.6 Gbps (an increase in current Wi-Fi 5 speeds of 3.5 Gbps).
With speeds like that, networks around the world can manage more and more devices and connections. This means that each household could theoretically have an average of 50 Wi-Fi devices that work easily together, rather than a 2019 average of 9 devices. Imagine the Google Assistant in every room, the streaming devices for every TV, PC or laptop that download movies or files in a fraction of a second: this is the convenience and everything can be powered wirelessly.
The current state of wireless technology The fourth generation of wireless network (4G) standards has launched the generation of smartphones: a world where people carry small and portable computers in their pockets and bags that can not only make phone calls, but transmit phone calls, but transmit phone calls but transmit phone calls but transmit phone calls, but transmit phone calls but transmit phone calls, but transmit phone calls but transmit phone calls but broadcast phone calls movies, music and live television and get their work done using programs that, in the past, were only available on a desktop-winged computer.
Some believe the world is on the brink of a breakthrough in wireless technology that is so innovative, however, that it puts 4G to shame. Called 5G, the fifth generation of wireless network standards promises significantly faster data speeds, higher connection density, much lower latency, energy savings and the potential for humans to evolve into another world new that’s so amazing in theory that most of us can’t even imagine the possibilities. Combine this with Wi-Fi 6, and the imagination of science fiction writers inches closer to reality.
Where the wireless connection is headed Wireless service providers envision a future where this technology continues to connect us to the world around us and makes our lives easier every day. They are working hard to create a world where everyone, regardless of location, can come together to build a future that can truly leverage other technological advances, such as artificial intelligence, virtual reality and more.
An audio problem commonly experienced with Windows laptop users is a discrepancy between a computer’s audio connector (headphones) and its audio system. This issue can be caused by one of several factors, such as lack of drivers, a broken audio jack or simply a change in system audio settings. Read on to discover different solutions.
Fix Laptop Audio Jack
Before you begin, make sure your audio issues aren’t a matter of faulty or broken headphones. Try using another pair to see if it solves the problem.
If headphones aren’t the problem, the first thing you need to do is take a look at the approved audio devices to see if the system rejects the headset. Go to Control Panel and click Hardware & Sound- Sound. Then click Manage Audio Devices.
If you see the headset icon, simply set the option as the default audio option. If the icon is not present, it may be a sign that your computer is missing drivers or that the headset is not in service.
If this is simply a driver shortage problem, you can try to fix this problem by updating your operating system. This will help you identify missing drivers that need to be installed.
If you have WhatsApp conversations that are important to you, you can copy and email them to your email account. This will allow you to save them to your PC or keep a copy of them in your email account.
WhatsApp chat history allows you to do this from your Android device. You can export an individual or group chat to your email, and also attach media files. Export an individual or group WhatsApp chat from your Android To export an individual or group WhatsApp chat from your Android, start by opening the WhatsApp app on your Android device and pressing Menu > Settings >
Press the back button, then tap Chat History > Export chat
Then select accordingly whether you want to attach the files or not. Another way to do this is to press the chat you want to export for a couple of seconds, and then select Send mail chat
Then select the email application that you want to use to receive the file, or select an alternate sharing method
From your PC, enter your email and download the TXT file with the media files you’ve attached. You can also add them to OneDrive to view them online. The downloaded TXT file can be opened with Windows Notepad, although the text will be cluttered. Preferably, open it with Word or Excel, which will display a more neat layout. However, in Excel you cannot display some special characters or emoticons….
Or
To save or export your WhatsApp chats, follow these steps:
Open the WhatsApp app on your device.
Go to the chat that you want to save or export.
Tap the three dots in the top right corner of the screen to open the menu.
Select the “Export Chat” option from the menu.
Choose whether you want to include media files in the export, and then select the “Export” option.
Select where you want to save the exported chat, such as your device’s internal storage, an external SD card, or cloud storage.
Wait for the export process to complete, and then your chat will be saved in the selected location.
With free VPNs becoming so popular these days because of their vast profits, there are a lot of companies out there. Finding the right VPN service can be complicated and time-consuming, so we’ve selected the list of the best free VPN services of 2019.
CyberGhost VPN is a well-known VPN service. They offer a free and paid VPN service, however, they have limited their free service to Chrome and Firefox extensions in recent years. Therefore, you will only be able to tunnel your browser traffic over VPN and not from any other application. The Chrome extension is quite sensitive to my experience. It connects quickly, allows you to choose from 4 countries and gives you unlimited data.
TunnelBear is a popular name in recent years. The very interesting thing about TunnerBear is that you can choose from more than 22 countries without restrictions or speed reductions. They have apps for Mac, Windows, iOS and Android, as well as browser extensions. The only drawback of TunnerBear is the bandwidth. You are limited to just 500Mb/month. Tweeting about its service will give you an extra Gigabyte.
ProtonVPN-This is another great VPN service that offers unlimited data and server selection. Like other good VPNs this also comes with a death switch plus an always-on VPN. The only downside to ProtonVPN is that they slow down for their free users, but I have to admit that it’s still not bad. ProtonVPN also has support for all major platforms, including Mac and Windows. ProtonVPN has been supported by Mozilla, PCMag and many others as the best free VPN service. They are based in Switzerland, which has some of the world’s strict privacy laws.
With over 200 million downloads, Hotspot Shield is the most popular free VPN software. It is available as a free version (with advertisements) and for a fee. In addition, Access Point Shield is available for various platforms, including iOS, Android, Windows and Mac. Some of the main features of using VPN hotspot shields include website unlocking, anonymous browsing, secure, secure browsing, wifi security, malware protection and data compression for iPhone and Android.
Windscribe is the best free VPN service I can recommend now. They are available on all platforms I know, whether Windows, Mac, Android, iOS, Linux, Chrome, Kodi, etc. They are relatively new to this segment and perhaps that’s why they offer a generous monthly bandwidth of 10 Gb, 8 free locations without ads. If this is not enough it comes with a firewall and an adblocker as well. Tweeting on their service will give you 5GB more and 1GB for each friend you refer to. Windsribe doesn’t record your traffic unlike some free VPN providers, so your privacy is guaranteed. You’ll love its service and well-designed apps.
This is an temporary problem. Therefore, in the face of this U7353 error code, you can simply try to stream the desired video again. You should fix it. But, if it does not work or error 7353 appears repeatedly, you will need to do a little more work to get rid of it.
Whoops, something went wrong ...
We're having trouble playing this title right now. Please try again later or select a different title.

Error code: U7353
We like to recommend disabling VPN/Proxy, antivirus or firewall software. These elements can create several problems with Internet connectivity. As a result, unexpected errors may occur. Therefore, disabling them can help you. Anyway, here are some methods, you can follow to fix the U7353 error on Netflix.
1. Check for updates: Whenever you face similar issues, you should check the Windows update as well as the Netflix application update. To check for Windows updates, go to Settings > Update and Security > Windows Update. To check for Netflix app updates, open the Windows Store. Then click your profile picture and choose Downloads and Updates. Now, click Check for Updates. It may be helpful to correct the Netflix error u7353. 2. Empty or change DNS settings: Emptying DNS can resolve this Netflix streaming error u7353.You can also change DNS addresses to display, if it helps. To do this:
Open RUN by pressing Win + R. Type ncpa.cpl and press ENTER. Now, right-click the connection and navigate to the properties. Double-click Internet Protocol Version 4 (TCP/IPv4). Now, change and set your DNS to 8.8.8.8 or 8.8.4.4 (Google DNS). If desired, you can also use another public DNS. Now, empty the DNS. After you do this, you may no longer be using the streaming error in the Netflix app for Windows 10.
3. Restore the Netflix app: Resetting the Netflix app is another thing that can solve various issues. If you don’t know how to do this, follow these steps:
Press Win and I to open the settings. Now, go to Apps > Apps & Features > Netflix > Advanced Options. Then click Reset. Now restart the Netflix app and sign in with your credentials. You must resolve error code u7353. You should resolve error code u7353. 4. Reinstall the Netflix app: If the first two methods don’t resolve the type, you can reinstall the Netflix app. You can resolve this issue. To uninstall Netflix from Windows 10, simply right-click it and choose Uninstall. Then go to the Windows Store and search for Netflix. Then install it again.
There are a few things you can try to fix the issue of screenshots not working on your iPhone:
Restart your iPhone: Hold down the power button until the “slide to power off” option appears, then slide to turn off your phone. Once it’s off, hold down the power button again to turn it back on.
Check for updates: Go to Settings > General > Software Update to see if there is a new version of iOS available.
Check the screenshot settings: Go to Settings > Control Center > Customize Controls, and make sure that the Screenshot option is turned on.
Force restart your iPhone: On an iPhone X or later or an iPad with Face ID: Press and hold the side button and one of the volume buttons until the power off slider appears. Drag the slider to turn off your device. Then press and hold the side button again until you see the Apple logo.
Check your Assistive Touch setting: Go to Settings > General > Accessibility > AssistiveTouch and make sure it is turned off.
Try using iTunes to restore your iPhone to factory settings. This will erase all content and settings from your device, so make sure to back up your data first.
If none of these steps work, you may need to contact Apple Support for further assistance.
Taking a screenshot on your iPhone is usually fast and painless, with the method varying depending on your particular model. In previous versions that have a Home button, it’s just a matter of pressing that and the on/off button at the same time. If you have an iPhone X, XS, XS Max or XR, you’ll need to press the side button and ‘volume up’ at the same time to capture the contents of the screen.
Causes iPhone screenshot issues Sometimes things don’t work as expected and the standard method of taking a screenshot just isn’t doing the trick. Maybe one of the buttons is locked, or maybe there is another problem with the device that prevents what should be the basic functionality of the work. Don’t worry, as our troubleshooting guide below will guide you through some alternative methods to adjust that screenshot of your iPhone.
Find screenshots Before you dive into fixes or alternatives, maybe the screenshot feature is working, but you don’t know where the screenshots go after taking one. Open the Photos app and see if they appear in the Photos (lower-left) section of the Photos app. You can also tap albums (at the bottom of the screen in the Photos app) and swipe up until you see the media types and tap the Screenshot label.
Initiate a forced restart of your iPhone Before proceeding, it is best to force your device to restart and try to take a screenshot once it has been turned on again. Sometimes the simplest solution is the right one.
For older models that have a Home button, follow these steps to force your iPhone to restart.
Press and hold the Home button.
Then hold down the Suspend/Wake button at the top or side of the device. Do not release the Home button during this operation.
After about ten seconds, you will notice that the screen will turn black. Press and hold both buttons until the Apple logo appears, at which point you can drop and wait for the restart.
For newer models that don’t have a Home button, the process is slightly different, and it’s important to follow the instructions in the exact order below.
Press and release the volume up button.
Press and release the volume down button.
Hold down the side button for about ten seconds until the screen turns black. Press and hold this button until the Apple logo appears, at which point you can drop and wait for the restart.
After forcing a restart, try taking a screenshot again. If you still can’t do this, go to the next section of this troubleshooting guide.
Take screenshots using assistiveTouch The iPhone’s AssistiveTouch features have been launched to help users with accessibility issues, allowing them to control their device through pinch, gestures, swipes and voice-activated commands. AssistiveTouch can be useful even if you have trouble taking screenshots through traditional methods. It can be enabled by following these steps.
Tap the Settings icon on your iPhone’s home screen.
The iOS configuration interface should now be displayed. Select the General option.
The general settings are displayed. Tap Accessibility.
Several accessibility options should be listed. Scroll down until you find the one called AssistiveTouch, which is located in the INTERACTION section. Select this option.
On the next screen, tap the button that accompanies the AssistiveTouch option to change it from white to green.
Then select Customize top-level menu.
Tap the plus button in the lower-right corner of the screen. Now a new icon will be added to this screen, also another symbol. Tap this button. You should see a list of accessibility features. Scroll down and select the one marked Screenshot, making sure it has a blue check mark next to it.
Tap Done in the upper-right corner of the screen. You should now see a screenshot option added to the top-level menu.
You’ll notice that an overlapping gray circular button overlaps your iPhone’s screen. Tap this new button at any time to open the AssistiveTouch interface.
To capture the contents of the screen, simply tap the Screenshot icon. The new image will be saved instantly to your camera roll.
PhotoScape has several sections at the top of the program where you can open different tools to perform different actions. Viewer, Photo Editor, Combine, and ANIMATED GIF are just some of the sections in PhotoScape.
The edit feature has dozens of frames to choose from, each with the ability to round corners and adjust frame margin and line settings.
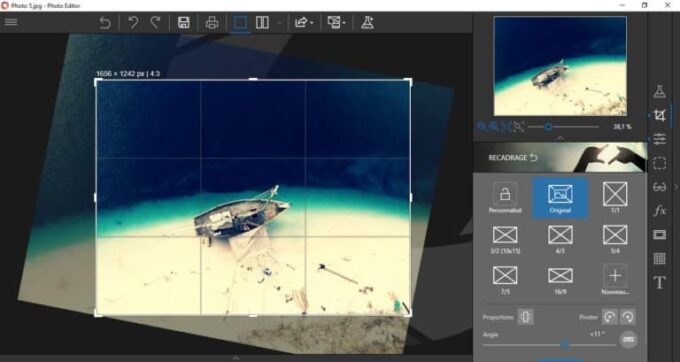
You can also add objects and text and crop an image freely or use one of several presets (for example, 16:9, Legal Ratio, and US business card ratio).
Some other tools included in PhotoScape are a red-eyed remover, a clone-tight tool, a stain remover, a brush, and, among others, an effect brush (such as grayscale, blur, blackout, and brightness).
With each tool you select, a description of what you do and how to use it is displayed on the right, which is very useful and usually not a feature included in programs like this.
CinePaint‘s interface is very banal, colorless and boring, but that doesn’t mean the tools aren’t useful because they are.
Layers are supported so that you can overlay images together, change their blending mode, and change their opacity. You also get a selection tool with CinePaint, among many other common tools.
The first thing you’ll notice when you use CinePaint photo editor is that when you open a photo for editing, you can’t preview it to know you’re selecting the right one, which is a bad.
CinePaint can be downloaded for Windows.
Pixia has an outdated and unattractive interface, but the features and tools are by no means undesirable for a free photo editor.
Layer and mask layers are supported, as well as creating shapes, selecting objects, and editing common photos, such as changing color adjustment and tone balance, filling color, and selecting from different brushes.
All standard image file formats can be opened with Pixia, including those with the Photoshop PSD extension. Images can also be opened directly from the clipboard, camera, or scanner.
Pixia is available for Windows computers.
This free inPixio photo editor is designed for simplicity, but that doesn’t mean it’s empty of useful features. The program itself is easy to understand and navigate, and you can do everything from adding frames and layouts to cropping, changing brightness, and more.
With one-click presets and frames, a before-and-after view, and easy-to-access editing tools, you can complete your changes in no time and even share your image directly to Facebook or Flickr from the Share menu.
If you like how you edited something and want to apply the same changes to another photo, it’s as easy as creating a custom preset.
Many types of image files can be opened in this program, and if it is saved on your computer, you can choose between JPG, PNG, TIFF, JXR and WDP.
Inkscape is a vector graphics editor, more like Illustrator than a photo manipulation package, but it still has many useful functions.
The interface can be a bit messy, but this is just proof of the large number of tools it includes. Almost all the tools you use are often planted on either side of Inkscape for easy access.
Circles, arcs, 3D boxes, ellipses, stars, spirals, and polygons can be created using Inkscape. You can also draw straight or freehand lines.
Tons of file types are supported when opening and saving. Among many other useful features, you can work with layers, apply a large number of filters to an image, and use spell checking along with the Text tool.
As someone who has watched the whole Devialet thing evolve over the last decade, it’s been a great run. The French company, founded by a couple of former Nortel engineers with a smart amplifier circuit, has quickly established itself as perhaps the best example of disruptive technology in today’s audio industry. First with the D-Premier, and now with the Phantom and Expert series, Devialet continues to innovate, develop and grow.
And now, where we once had Devialet Expert, we now have Expert Pro, which brings a whole host of new technologies and innovations to support. And, as has been the case from the beginning, even the owners of the first models can move on to the latest Expert Pro technology. Few other brands treat their existing customers so well.
The big change in the movement of ‘Pro’ is the new Core Infinity motherboard. However, switching to that new board requires a lot of heavy lifting from the expert. This is why owners of original D-Premier models needed to periodically put their devices for updates, so they would not be left off the circuit for future developments.
Core Infinity is, in fact, the biggest move to the Devialet platform since that platform first emerged. It redesigns the basic ADH (Class A/Class D Hybrid) technology to a fairly fundamental level by introducing a new Class A voltage amp, a new 10-bit sensor circuit and a new D-class current amplifier… and redraws the base a/D class algorithm. It’s not a stylistic change… it’s a whole new engine.
There’s more, but let’s focus on this a little earlier. The movement of the current eight- to ten-bit sensor improves the accuracy of the delivery from the current amplifier to the voltage amplifier, and that along with a more efficient and sensitive code that controls the entire ADH circuit means digits of much lower distortion.
The original Magic Wire D/A conversion circuit was also examined in Core Infinity, which in turn brings an improvement of 6 dB in THD and a 2.5 dB drop in noise. This may be back lily, such as the distortion of the expert and the signal-to-noise ratio was already at low levels of world class, but this also represents some of the most significant changes in the base core of the deviation since its launch. All these changes form what Devialet calls ‘ADH Intelligence’.
In fact, many of these developments (especially in the Class D amplifier) have been seen in the strictly limited Original d’Atelier model, but collective changes also eclipse that design. In fact, the Infinity Core board is one of those technologies that would become operational at the time of the original d-Premier’s release, and prohibitively expensive at the launch of the Expert line. AXD is the company’s latest acronym and requires expert Pro amplifiers that are properly equipped to work. As Active X-over Design means, it also requires a speaker that is known to Devialet and is in excellent shape. This would require a couple of speakers that we currently don’t have, and several additional Expert Pro amplifiers that we don’t have to provide either, but this is the next step in the company’s Active Matching Speaker… and we could do that with Wilson Duette II.
DEVIALET 140 EXPERT PRO TECHNICAL SPECIFICATIONS:
Type: Built-in digital amplifier
Connections: 1-Optical Toslink, 1-Combined Optical Jack & RS232 Mini 3.5mm, 1-USB for computer or revolving usb connection, 1-Ethernet RJ45 for LAN connection, 4-S/PDIF digital inputs in RCA (or two analog inputs at line level), 1x Phono input – 1x Phono Input – Adjustable gain and sampling rate (96 or 192KHz, fully configurable, MM or MC, load, sensitivity, 1953 or 1976 RIAA as standard, 13 additional EQUALization curves available with leverage on the fly from the RAM menu), 1 trigger, terminals speaker and subwoofer output. Optional stereo pre-exit
Output power: 2 x 140W in six ohm, adjustable from 50 to 140 via inline configurator
THD-N (harmonic distortion) at full power: 0.0005%
SNR (signal-to-noise ratio): 130 dB not weighted
Bandwidth, 8 to 2 digital inputs or load: DC–87 kHz (-3dB), DC–60kHz (-1dB), DC–30kHz (-0.1 dB); Analog inputs: 0.1 Hz (-3dB)
Japan’s largest automaker, Toyota Motor Corp, has introduced a new hydrogen fuel cell car in a bid to revive demand for technology that aims to compete with the rise of California’s Tesla Inc.
photo:Naomi Tajitsu
Toyota showed off a prototype of its fully renovated fuel cell sedan, the Mirai, which is built on the same platform as its Lexus brand luxury LS coupe.
The carmaker has been developing fuel cell vehicles for more than 20 years, but the technology has been overshadowed by the rapid rise of rival battery electric vehicles promoted by Tesla Inc.
Fuel cells divide hydrogen molecules to create an electric current capable of powering an engine. The only byproduct of the process is water, which makes these systems much cleaner for the environment than traditional fossil fuel engines. Its biggest drawbacks are that hydrogen re-fuelling stations are rare and gas is highly combustible.
Electric cars like Tesla use lithium-ion batteries similar to those found in smartphones and laptops. They must be recharged, which can take longer than filling a hydrogen fuel cell car, but they do not carry an explosive gas.