Home Blog Page 55

Top Wi-Fi Troubleshooting Apps to Improve Your Network Connection

1

When it comes to our daily use, Wi-Fi is one of the most valuable resources we rely on. Smooth operations make everything feel right in the world, but any interruption can turn a day into a disaster, especially if you work from home. For essential work-from-home tips, click here.

However, it’s not always clear why you may be experiencing Wi-Fi problems. Internet issues could stem from several factors, including a faulty router or modem, ISP maintenance, or malfunctions in devices ranging from your phone to your computer. Bandwidth crowding from someone stealing your internet is also a possibility.

Top Wi-Fi Troubleshooting Apps
The best Wi-Fi Troubleshooting Apps – photo Pixabay

To address these concerns, there are useful apps available that can help troubleshoot Wi-Fi problems. Wi-Fi analyzer apps are critical tools that can demonstrate the strength of your signal, how congested your network is, and identify available networks in your vicinity. With this information, you can target potential issues to enhance your connection or restore it to normalcy.

OpenSignal is a mobile application that provides users with real-time insights and data on the performance of their mobile network connection. The app is available on both Android and iOS platforms and offers a range of features to help users monitor and improve their network experience.

One of the main features of the OpenSignal app is its network coverage maps, which allow users to see the strength and quality of mobile network signals in their area. The app also provides data on network speed, latency, and reliability, as well as information on which network providers are offering the best performance in a given area.

In addition to these features, OpenSignal also offers a range of tools to help users troubleshoot and optimize their network connection, including a signal compass, which helps users locate the direction of the nearest cell tower, and a data usage monitor, which allows users to track their mobile data consumption and avoid going over their monthly data limit.

The OpenSignal app is a valuable tool for anyone who wants to monitor and improve their mobile network performance. Whether you’re experiencing slow speeds, dropped calls, or other network issues, the app can provide you with the data and insights you need to take action and get the most out of your mobile device.

WiFi Analyzer app for iOS and Android provide useful information about Wi-Fi signals

WiFi Analyzer is a mobile application that is available on both iOS and Android platforms, designed to help users analyze and optimize their wireless network connections. The app provides a range of features that can help users identify issues with their Wi-Fi signal, such as interference or weak signal strength.

One of the primary features of the WiFi Analyzer app is its ability to visualize Wi-Fi signal strength, channel usage, and channel overlap. This can help users identify areas in their home or office where signal strength is weak, and where there may be interference from neighboring Wi-Fi networks.
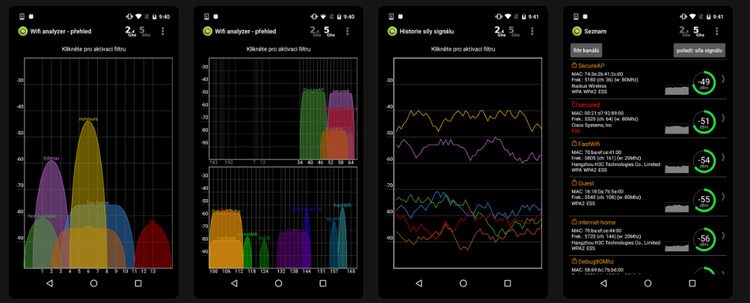
WiFi Analyzer
WiFi Analyzer photo source

In addition to these features, WiFi Analyzer also offers a range of tools to help users optimize their wireless network connection, including the ability to select the best channel for their Wi-Fi network, and to measure the strength of their Wi-Fi signal in different parts of their home or office.

The WiFi Analyzer app is a valuable tool for anyone who wants to improve their wireless network performance. By providing detailed information about Wi-Fi signal strength and interference, the app can help users optimize their network settings and get the most out of their wireless network connection.

There are many great apps available that can help you troubleshoot and optimize your Wi-Fi. Here are some additional apps that you may find useful:

  • NetSpot: NetSpot is a Wi-Fi analyzer app for Mac, Windows, and Android that allows you to visualize, troubleshoot, and optimize your wireless network. The app provides detailed information about Wi-Fi signal strength, interference, and channel usage, allowing you to identify and resolve issues with your network.
  • Wi-Fi Analyzer and Surveyor: This Android app helps you analyze and optimize your Wi-Fi network by providing real-time information about signal strength, channel usage, and interference. It also includes a range of diagnostic tools and the ability to create heat maps of your Wi-Fi coverage.
  • Fing: Fing is a network scanning and troubleshooting app that allows you to identify and diagnose issues with your Wi-Fi network. The app provides information about connected devices, network speed, and security vulnerabilities, and can help you optimize your network for performance and security.
  • Wi-Fi SweetSpots: This iOS app allows you to measure the strength and speed of your Wi-Fi signal in different parts of your home or office. It also includes tools to help you optimize your network, such as channel analysis and signal strength mapping.
  • WiFi Manager: WiFi Manager is an Android app that allows you to manage and optimize your Wi-Fi network. The app provides real-time information about signal strength, channel usage, and network speed, and allows you to prioritize certain devices on your network for optimal performance. It also includes tools for troubleshooting common Wi-Fi issues.

There are many useful Wi-Fi troubleshooting apps available for both iOS and Android platforms that can help you to optimize your Wi-Fi network. These apps provide real-time information about Wi-Fi signal strength, channel usage, and interference, allowing you to identify and resolve issues with your network. Some of the most popular apps include NetSpot, WiFi Analyzer and Surveyor, OpenSignal, Fing, Wi-Fi SweetSpots, WiFi Analyzer and WiFi Manager. By using these apps, you can ensure that your Wi-Fi network is operating at peak performance, and enjoy a fast and reliable internet connection.
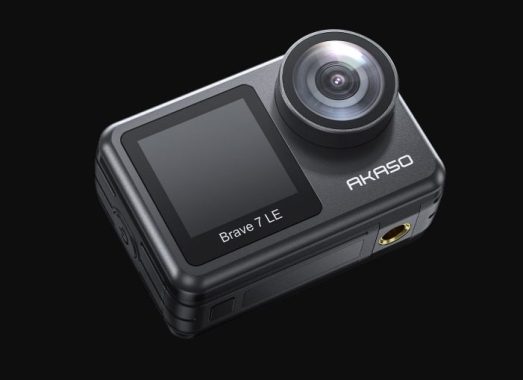
AKASO Brave 7 LE Action Camera – Unleash Your Creativity

0

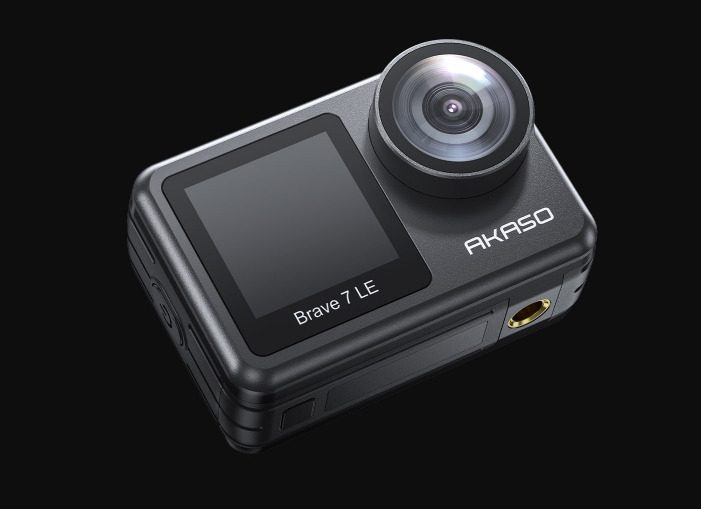
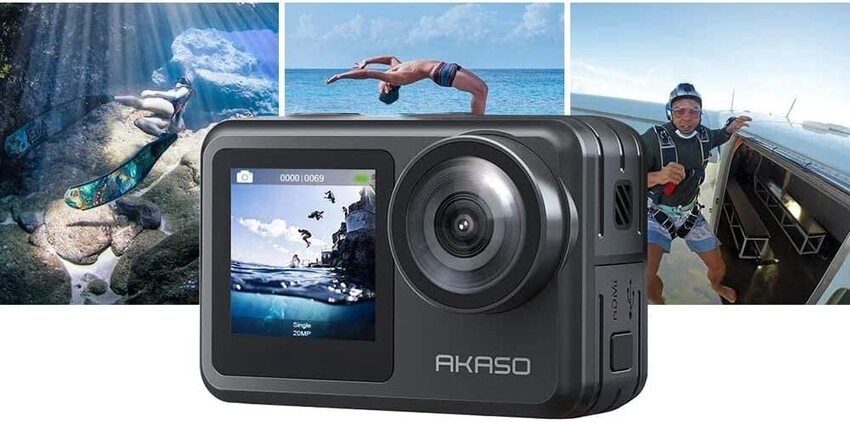
Unleash your creativity and capture stunning footage with AKASO Brave 7 LE action camera. With its digital zoom function and various shooting modes, such as time-lapse, burst photo, and fast motion, this camera offers endless possibilities for your content creation.

The AKASO Brave 7 LE 4K30FPS 20MP WiFi Action Camera is a weatherproof and distinct camera designed to unlock all the filming scenarios and ease your vlogging experience. With its IPX7 water-resistant design, it can protect the action camera from rain, snow, and water splashing. The camera can even be used underwater down to 131FT/40M while equipped with the included waterproof housing.

Dual-Color Screen Design

One of the unique features of this camera is its convenient dual-display. With innovative dual color screens design, you can change framing and monitoring views between back and front. The vivid front screen can satisfy your selfies need, and the 2-inch back touch screen makes it easy to use than ever.

AKASO Brave 7 LE action camera

The camera can shoot hyper-quality 4K 30Fps video and 20MP photo, recording your adventure without missing any details. It is equipped with improved 6-axis EIS, providing gimbal-like stabilization and boosting the stability and fluency of your recording. It can enable excellent footage even in fast-moving scenarios.  photo: Akaso tech

The camera comes with a full set of professional functions and free accessories, including 2 rechargeable batteries, remote, waterproof housing, and multifunctional mounting kits, helping you expand your usage scenarios with a pleasant budget. (Price: $149.99)

While the AKASO Brave 7 LE has many advantages, there are also some cons to consider. The camera’s battery life is relatively short, and it can drain quickly when recording in 4K or using Wi-Fi. The camera also lacks an image distortion correction feature, which can be problematic for certain shots. Lastly, the camera’s audio quality can be a bit muffled, especially when used in windy conditions.

AKASO Brave 7 LE action camera

The AKASO Brave 7 LE is a great action camera for vloggers and adventure enthusiasts looking for a reliable, waterproof camera that can shoot high-quality videos and photos. However, it’s essential to consider the cons mentioned above before making a purchase decision.

The AKASO action camera boasts an innovative dual-color screen design that offers enhanced recording capabilities. The newly added front screen optimizes your experience, enabling you to easily take selfie photos and videos and see real-time displays right in front of the camera. The 2.0″ back touch screen is clear and vivid, providing easy operation and convenience. Please note that the dual screens cannot be used simultaneously.

Additionally, this camera is Wi-Fi supported, enabling wireless photo and video sharing via the AKASO GO App. The app also enables you to clip the video you record, and the built-in HDMI Port allows you to connect it directly with your television for easy viewing.

Moreover, the camera comes with a 2.4GHz Wi-Fi supported remote control, allowing you to leave your hands free while controlling the camera from a distance. This feature is especially helpful when you are engaged in sports activities or taking selfies.

Enjoy Steady and Smooth Footage with 6-Axis Gyroscope Design The AKASO Brave 7 LE action camera boasts a powerful 6-axis gyroscope design that corrects vibrations when you’re moving fast, resulting in remarkably steady and smooth footage.--AKASO Brave 7 LE action camera

What’s in the Box?

Everything You Need for Your Adventure – In the box, you’ll find the AKASO Brave 7 LE Action Camera, a remote control, two 1350mAh batteries, a waterproof case, a battery charger, a bicycle stand, six mounts, two 2-sided tapes, two helmet mounts, bandages, five tethers, a protective backdoor, a USB cable, a lens cloth, and a quick reference guide. Please note that the accessories kit is compatible with most cameras, including GoPro. Get ready for your next adventure with everything you need right in the box.

Fixing iOS 16.5 Issues: A Step-by-Step Troubleshooting Guide

0

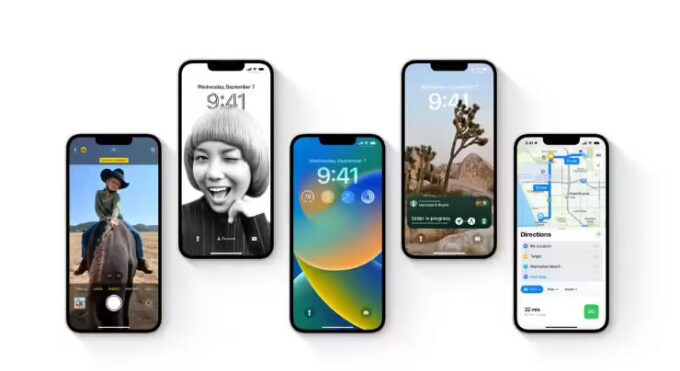
Apple has recently released the iOS 16.5 Beta version, which some iPhone users have already installed. However, a few users are experiencing minor issues and glitches with the latest iOS 16.5 Beta 3 version. This is a common occurrence every year where users face unknown bugs and issues on their iPhone devices with the latest iOS version.

Furthermore, some users have reported encountering software bugs and issues on their iPhone devices after updating to the latest iOS 16.5. Reports of these issues have been made on several platforms such as Reddit and Twitter, causing frustration for users who rely on their iPhone for various purposes. Connectivity problems and network issues are just a few of the problems that can occur.Fixing iOS 16.5 Issues

In this guide, we will provide solutions to some common iOS 16.5 issues. These solutions can be applied to iPhone 12, 13, and 14 series as well as other iPhone models. Instead of immediately seeking assistance from the Apple Service Center, users can try fixing the problem themselves. Let’s begin without delay. photo: Apple

List of iOS 16.5 Common Problems

Several users installed the iOS 16.5 Beta version on their iPhone devices. The update includes several bugs and issues, such as unresponsive Cloud settings, Crash Detection optimization, Siri requests and more. However, there are a number of iOS 16.5 problems faced by multiple users, which are mentioned below.

  • Battery Drain Issue
  • App Crashes
  • Wi-Fi Connectivity Issue
  • Network Connectivity Issue
  • Bluetooth Connectivity Problem
  • Touch ID & Face ID are not working properly
  • App Store Issue
  • Overheating Issue
  • iMessage not working properly or crashing
  • Screen Recording Issue

These problems can be fixed by trying some possible troubleshooting methods.

iOS 16.5 – Wi-Fi Connectivity Issue

Most iPhone users encounter Wi-Fi connectivity issues after updating their device to iOS 16.5 Beta. This can be frustrating, especially when trying to connect to a Wi-Fi network. If you’re facing this issue, you can reset your Wi-Fi network by following these steps:

  1. Open the Settings app on your iPhone.
  2. Select General.
  3. Tap on Reset and choose Reset Network Settings.
  4. Now try to connect to the Wi-Fi network again and check if the issue has been resolved.

Bluetooth Connectivity Issues

Another common issue faced by iPhone users is Bluetooth connectivity problems. If your Bluetooth connectivity is unstable or not working properly, try turning off your Bluetooth settings and turning them back on after a moment. If that doesn’t work, you can try forgetting the Bluetooth network and reconnecting to it to see if that resolves the issue.

Screen Recording Issue: If you’re unable to record your iPhone device’s screen after upgrading to iOS 16.5, you may need to restart your device. This problem is often caused by software bugs and glitches that prevent the screen recording function from working properly. To restart your iPhone, press and hold the power and volume down buttons simultaneously until the Apple logo appears on the screen, then release the buttons. After restarting, check to see if the screen recording issue has been resolved.

Overheating Issue: Some users have reported that their new iPhones are overheating while in normal use after updating to iOS 16 or the latest beta version. To address this issue, you can close background apps or restart your device. Additionally, removing any unused apps from your phone may help. If you’re using your phone in hot temperatures or direct sunlight, avoid doing so. Finally, it’s best to avoid using your iPhone while it’s charging. By following these steps, you can hopefully resolve the overheating issue.

iCloud Sync Issue: If you’re experiencing iCloud Sync issues after updating to iOS 16.5 beta, try signing out of iCloud and then signing back in. This may help you to fix the issue you’re experiencing. Additionally, resetting your iCloud settings is another option. To do so, head to the Settings app on your iPhone device, select General, then tap Reset. Finally, tap Reset All Settings, and confirm by tapping Yes or OK.

If you’re unable to record your screen, restart your device. This issue may be caused by software bugs and glitches that prevent the screen recording from working. Hold down the power and volume down buttons simultaneously until the Apple logo displays on the phone screen and release the button immediately. Once restarted, check if the screen recording issue has been resolved.

If your device is overheating, try closing background apps or restarting your device. You can also uninstall unusable apps from your device. Avoid using your phone in direct sunlight or hot temperatures, and avoid using your iPhone device while it’s charging.

If you’re having issues with iCloud Sync, try signing out of iCloud and then signing back in. This may help you to fix the iCloud Sync issue you’re facing on your device. Additionally, you can try resetting your iCloud settings by going to the Settings app on your iPhone device, choosing General, selecting Reset, tapping on Reset All Settings, and confirming it by tapping Yes or OK.

Pioneer Elite VSX-LX305 Home Theater Receiver Review

0

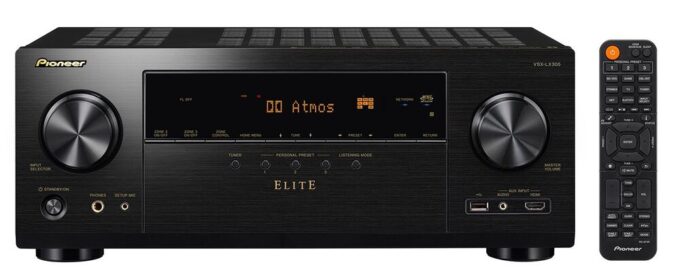
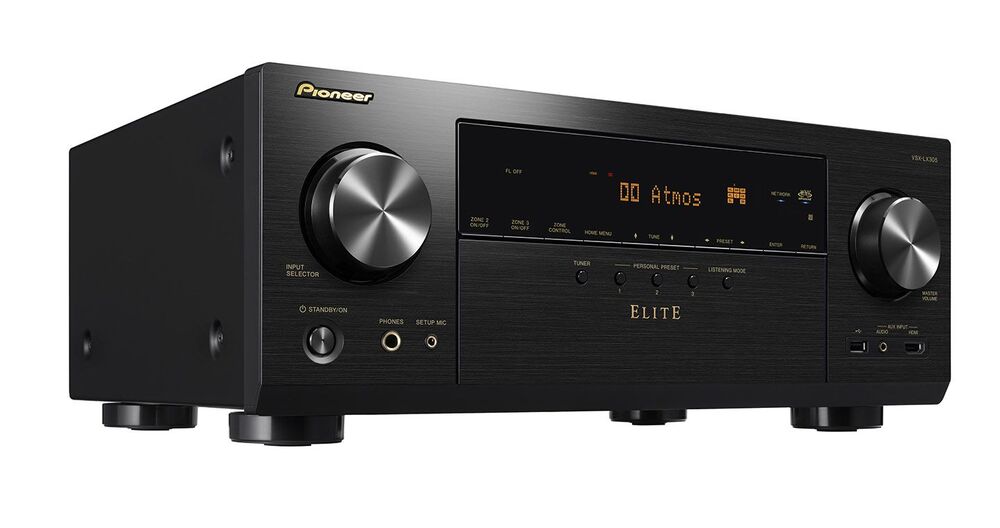
The Pioneer Elite VSX-LX305 is a high-end home theater receiver that offers 9-channel amplifier and 100 watts per channel into 8 ohms at 0.08% THD with 2 channels driven. The receiver supports Dolby® and DTS® surround sound decoding, Dolby Atmos and DTS:X® processing for use with in-ceiling or “height” speakers for ultra-enveloping home theater sound, and supports 5.1.4 or 7.1.2 Dolby Atmos and DTS:X setups.

One of the standout features of the Pioneer Elite VSX-LX305 is its Dolby Atmos Height Virtualization technology, which creates three-dimensional effects without height speakers. The Dirac Live® room correction feature also tailors the sound to your room’s acoustics, with a microphone included to help you optimize the settings.

Pioneer Elite VSX-LX305

The receiver offers an impressive range of connections, including 7 HDMI audio/video switching inputs and 2 outputs, with rear-panel HDMI 2.1 connections that support 4K/120Hz and 8K/60Hz signals. The HDCP 2.3 technology ensures compatibility with 4K and 8K Ultra HD sources and TVs, and it supports HDR10, HDR10+, Dolby Vision®, and HLG. It also has digital audio inputs, analog line-level RCA stereo audio inputs, a phono input for turntables with moving magnet cartridges, a front-panel 3.5mm auxiliary input, and a 1/4″ headphone connection on the front panel.

The Pioneer Elite VSX-LX305 also has music streaming options, with Chromecast built-in, Spotify® Connect, Apple AirPlay 2, and Bluetooth with support for high-quality aptX® HD streaming. The receiver is also compatible with the Sonos Port, and it works with Amazon Alexa and Google Assistant voice control assistants.

The Pioneer Elite VSX-LX305 boasts MCACC Auto Room Tuning, a feature that ensures optimal sound quality by adjusting the sound based on the listening room and speaker setup. With up to nine positions available for measurement, this feature provides a wide listening area. Additionally, it suppresses standing waves that occur between walls or ceiling and floor, resulting in clearer sound. The Auto Phase Control Plus feature provides real-time analysis of phase differences and automatically compensates for the gap between the LFE and main signals. This results in strong bass and clear high-frequency sound.

While the Pioneer Elite VSX-LX305 offers impressive features, there are some cons to consider. Firstly, the receiver is quite expensive ($1,099.00), which may put it out of reach for some consumers. Additionally, the remote control included with the receiver may not be as user-friendly as some users would like. Finally, the receiver does not support Wi-Fi connectivity, which may be a drawback for some users who prefer wireless connections.

Pioneer Elite VSX-LX305  pros:

The Pioneer Elite VSX-LX305 home theater receiver has several main advantages that set it apart from other receivers in its class.

Firstly, the receiver has a powerful 9-channel amplifier that delivers 100 watts per channel into 8 ohms at 0.08% THD with 2 channels driven. This allows the receiver to produce clear, detailed and immersive sound, making it an excellent choice for home theater enthusiasts.

Secondly, the VSX-LX305 supports Dolby Atmos and DTS:X processing for use with in-ceiling or “height” speakers, which creates a truly enveloping home theater sound. Additionally, its Dolby Atmos Height Virtualization technology creates a three-dimensional effect without height speakers, making it easier and more cost-effective to set up a home theater system.

Thirdly, the receiver has advanced connectivity options, including 7 HDMI audio/video switching inputs and 2 outputs, with rear-panel HDMI 2.1 connections that support 4K/120Hz and 8K/60Hz signals. It also supports HDR10, HDR10+, Dolby Vision®, and HLG, making it compatible with the latest video technology.   photo: Pioneer

Pioneer Elite VSX-LX305

Fourthly, the Dirac Live® room correction feature tailors the sound to your room’s acoustics, providing a more customized listening experience. Additionally, the receiver is compatible with popular music streaming options, including Chromecast built-in, Spotify® Connect, Apple AirPlay 2, and Bluetooth with support for high-quality aptX® HD streaming.

Finally, the Pioneer Elite VSX-LX305 comes with a 3-year warranty, providing peace of mind to consumers who invest in this high-end receiver. The Pioneer Elite VSX-LX305 offers an impressive range of features and capabilities that make it an excellent choice for anyone looking for a high-end home theater receiver.

Experience premium home theater performance with the Pioneer Elite VSX-LX305 receiver. With nine channels of robust power and advanced surround sound decoding, this receiver offers cinematic overhead effects with upward-firing or in-ceiling speakers, supporting 7.1.2 or 5.1.4 speaker configurations. The Dirac Live room correction software allows you to perfect your surround sound on your mobile device, PC, or Mac. Additionally, the advanced HDMI connections include ports that support 8K and 4K/120 Hz sources, including next-gen game consoles. Gamers will appreciate features like Auto Low Latency Mode and Variable Refresh Rate for smooth and stutter-free on-screen action.

This receiver also offers various music streaming options, including Bluetooth, Apple AirPlay 2, Chromecast built-in, and Spotify Connect, allowing you to create your own concert hall. Furthermore, the Pioneer Elite VSX-LX305 is compatible with Sonos Port, enabling you to integrate your home theater into a whole-house audio system using the Sonos app on your mobile device, PC, or Mac for a whole-home Sonos experience.

The Pioneer Elite VSX-LX305 is an excellent home theater receiver that offers impressive sound quality and a wide range of features. While it may not be the most affordable option, it is definitely worth considering for anyone looking for a high-end receiver with advanced technology and versatile connectivity options.Pioneer Elite VSX-LX305

VSX-LX305 specs:

Channels  9
Amplification Type    – Direct Energy
225 W/ch   – (6 ohms, 1 kHz, THD 10 %, 1ch Driven)
100 W/ch        –  (8 ohms, 20 Hz-20 kHz, THD 0.08 %, 2ch Driven FTC)
HDMI 6 In   – 4 Assignable
HDMI 2 Out     – 1 for MAIN, 1 for SUB/ZONE 2
Ethernet 1 In   – Yes
USB 1 In for USB Drive   – Yes
Audio 4 In   – Assignable
Phono (MM) 1 In   – Yes
Digital Coaxial 1 In   – Yes
Digital Optical 1 In   –  Yes
Subwoofer 2 Pre Out   – Yes
ZONE 2 Pre/Line Out/ZONE B Line Out  – Yes
Speaker 9 ch Out   – FRONT, CENTER, SURROUND, HEIGHT 1/Bi-AMP/ZONE 2, SURROUND BACK/HEIGHT 2/ZONE 3
IR 1 In/1 Out   – Yes
12 V Trigger 2 Out  – Yes
RS-232C   –  Yes
FM/AM Antenna   – Yes

VSX-LX305
VSX-LX305


Rotel RMB-1506 power amplifier – Specifications

0

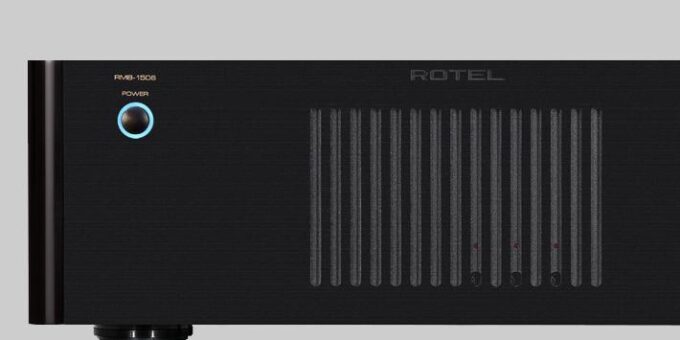
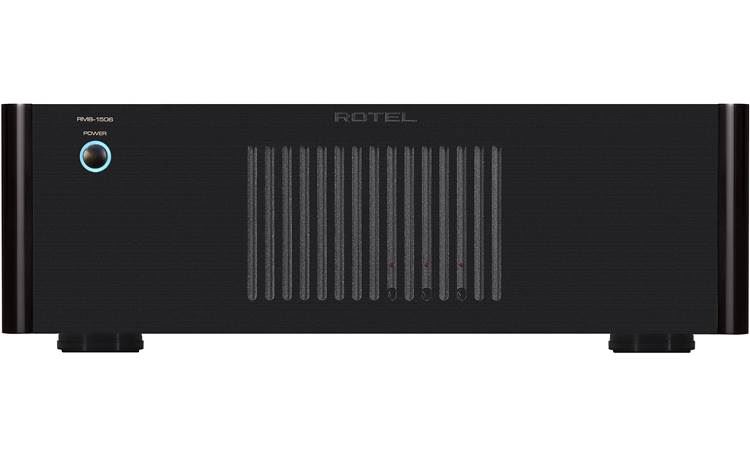
The Rotel RMB-1506 power amplifier is an impressive piece of audio equipment that delivers a solid 50 watts of power to each of its 6 channels. This amplifier is an excellent choice for powering speakers in up to three zones in a custom-installed multi-room sound system.

One of the standout features of the RMB-1506 is its convenient connections and switching options. The back panel features three pairs of binding posts for connecting up to three pairs of speakers, and the switches allow you to link the inputs or use them independently. This gives you greater flexibility in setting up your audio system to suit your specific needs.

Rotel RMB-1506 power amplifier
Rotel RMB-1506 power amplifier – photo: Rotel

Additionally, a stereo RCA output lets you daisy-chain an additional amplifier, making it easier to expand your audio system as needed. The RMB-1506 also boasts three selectable turn-on options – a front panel switch, 12-volt trigger control, or signal-sensing – allowing you to customize the amp’s performance to your preferences.

Rotel RMB-1506 Power Amplifier: High Performance and Versatile Connectivity

The Rotel RMB-1506 power amplifier is a top-of-the-line audio equipment that delivers exceptional performance, making it an ideal choice for audiophiles and home theater enthusiasts. With 50 watts of power per channel into 8 ohms and 80 watts per channel into 4 ohms, it can handle even the most demanding audio setups. Here’s a closer look at what makes the RMB-1506 stand out.

High-Performance Design with Custom Toroidal Transformer

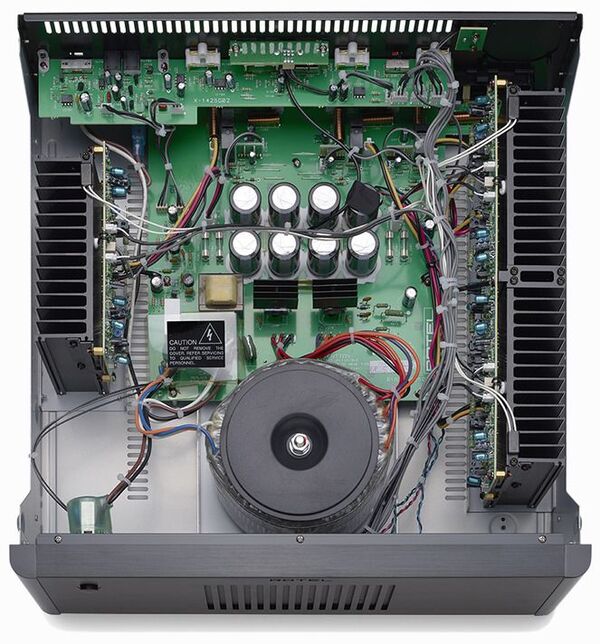
The RMB-1506 is built to deliver stable, noise-free performance, thanks to its custom-made toroidal transformer. The amplifier’s Class AB design ensures that it operates efficiently while maintaining high-quality sound reproduction. With a frequency response of 10-100,000 Hz (±1dB) and a signal-to-noise ratio of 115 dB, the RMB-1506 offers impressive sound quality that rivals even the most expensive amplifiers.RMB-1506

RMB-1506 – Robust Protection and Easy Connectivity

The Rotel RMB-1506 also features thermal and overcurrent protection circuitry, ensuring that the amplifier remains safe and stable even during prolonged use. Additionally, the detachable power cord and rack mounting ears make it easy to set up and install the amplifier in any audio system. The 5-way binding post terminals for A/B/C speakers and unbalanced stereo RCA signal output link further add to the amplifier’s versatility.

Flexible Input Options with Adjustable Input Level Controls

The RMB-1506 offers three unbalanced stereo RCA inputs for A/B/C channel pairs, as well as a mono switch that links left and right channels for feeding both with a single mono RCA connection. The link switches also allow users to send A channel input signals to the B and/or C channels, providing greater flexibility in setting up multi-zone audio systems. The independent input level controls on the front panel can be adjusted via a small flat-blade screwdriver, making it easy to fine-tune the amplifier’s output.

Rotel RMB-1506 power amplifier
Rotel RMB-1506

Warranty and Conclusion

With a 5-year warranty, the Rotel RMB-1506 power amplifier is a reliable and high-performing piece of audio equipment that offers exceptional sound quality and versatile connectivity options. Whether you’re building a home theater system or a multi-room audio setup, the RMB-1506 is a great investment that will provide years of reliable service.

The Rotel RMB-1506 power amplifier is a fantastic choice for anyone looking for clean, robust power for their speakers. With its easy-to-use connections and switching options, it’s a versatile and adaptable amplifier that can meet the needs of a wide range of audio enthusiasts. Highly recommended!

DIMENSIONS (W × H × D)
431 × 144 × 424mm
17″ × 5.7″ × 16.7″
FRONT PANEL HEIGHT
3U / 132.6mm (5.25″)
POWER REQUIREMENTS
230V, 50Hz
POWER CONSUMPTION
450W
STANDBY POWER CONSUMPTION
2.6W
NET WEIGHT
15.3kg (34lbs.)
BTU RATING (4Ω, 1/8th power)
1680 BTU/h
CONTINUOUS POWER OUTPUT
50W/Ch (All channels driven, 8Ω)
80W/Ch (All channels driven, 4Ω)
TOTAL HARMONIC DISTORTION (THD)
(20Hz–20kHz) <0.03%
FREQUENCY RESPONSE
10Hz – 100kHz ±1dB
S/N RATIO (IHF “A” Weighted)
115dB
GAIN
26dB

Review: PSU NZXT C1200 Gold – 1200W Fully-Modular

0

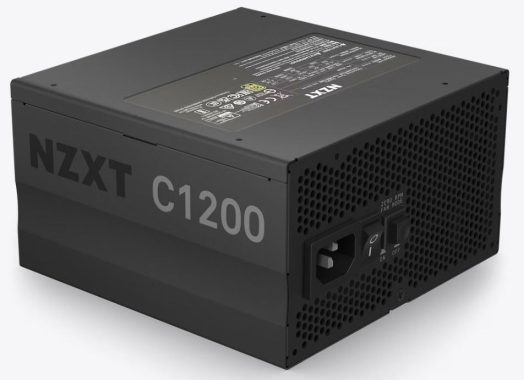
The C1200 Gold is NZXT’s latest addition to the high-capacity PSU market, boasting compatibility with ATX v3.0 and PCIe 5.0. Equipped with a 600 W 12VHPWR connector, it can easily handle power-hungry components like the NVIDIA RTX 4090 at max power limit. The unit is built on Channel Well Technology’s (CWT) CSZ platform, which is well-known in the market and is used in other popular PSUs like Thermaltake GF3 and Montech Titan Gold lines.

It is crucial to ensure that any new PSU adheres to the ATX v3.0 spec and has 12VHPWR connectors to remain future-proof. It is unwise to invest in an outdated PSU, especially with the imminent need for 12+4 pin PCIe connectors for AMD GPUs in the future. Investing in a PSU is a long-term decision, and choosing a future-proof unit can save money and prevent the need for frequent replacements.

PSU NZXT C1200 Gold
PSU NZXT C1200 Gold photo: NZXT

Despite its high capacity, the NZXT C1200 Gold PSU has a compact form factor, measuring only 150 mm long. While this may impact airflow and noise output, the Cybenetics Standard+ noise rating suggests that noise levels are still acceptable. NZXT cautions that the unit can’t deliver full power continuously at temperatures above 50°C, but this is not a significant concern as running a PSU at such high temperatures can lead to failures. The suggested limit of PSU loads is 45-47°C.

The NZXT C1200 Gold PSU is a high-capacity unit that boasts impressive specs and features. It is built in collaboration with Channel Well Technology, and it is ATX v3.0 and PCIe 5.0 ready, with a 600W 12VHPWR connector. The price tag of $260 seems reasonable, considering the product’s features, and it is on par with the Corsair RM1200 Shift.

The PSU has achieved a Gold efficiency rating in the Cybenetics test and a Standard+ noise rating. At only 150mm deep, it is a compact unit, making it easier to fit into smaller cases. Additionally, the PSU comes with a ten-year warranty, which is consistent with most competing offerings.

The NZXT C1200 Gold PSU is a powerful unit with a maximum power output of 1200W. It has several high-power connectors, including two EPS (2x cables), four PCIe 6+2 pin (2x cables), and one PCIe 12+4 pin (600W). Peripheral connectors include eight SATA (3x cables) and four 4-pin Molex (single cable). The semi-passive operation is selectable, and the unit is fully modular.

The PSU’s dimensions are 150 mm x 85 mm x 150 mm, and it weighs 1.77 kg (3.90 lb). It has a 135mm Fluid Dynamic Bearing Fan (HA13525H12SF-Z) for cooling. The ATX/EPS cable length is 600/700mm, and the distance between SATA/4-pin Molex connectors is 150mm. In-cable capacitors are not present.

The NZXT C1200 Gold PSU is an excellent choice for those who need a high-capacity PSU that is efficient, compact, and comes with a ten-year warranty. The semi-passive operation and fully modular design make it a flexible unit that can adapt to various needs. The PSU’s Gold efficiency rating and Standard+ noise rating are impressive, and the price is reasonable for what it offers.PSU NZXT C1200 Gold

The NZXT C1200 Gold is a high-performance power supply unit that meets the latest ATX v3.0 specifications. Its 600W 12VHPWR connector allows it to support even the most powerful NVIDIA graphics cards available today, and it will also be compatible with upcoming GPUs. Despite achieving good efficiency levels, especially at lighter loads, its compact size of only 150mm may lead to suboptimal airflow. Additionally, the increased platform capacity and lack of proper heatsinks on its secondary side means that increased fan speed is required to deal with the heat generated, leading to an average noise output of over 35 dBA.

However, under normal operating temperatures and up to 600W loads, noise output is minimal, with the fan’s noise only exceeding 30 dBA when pushed above 880W. This means that as long as the PSU is not pushed hard, it should not cause any noise issues. The fan-speed profile with several modes of operation is a welcome feature. At high loads, other PC components, such as the CPU and GPU coolers, are likely to produce more noise than the PSU, unless they are cooled by a custom water-cooling solution.

NZXT C1200 Gold PSU specs:

OUTPUT CONNECTORS

  • 24-pin ATX power:1
  • 4+4-pin CPU power:1
  • 8-pin CPU Cable :1
  • 6+2-pin PCIe power :2
  • 16-pin (12+4) 12VHPWR PCIe Cable:1
  • SATA power :8
  • Peripherals :4

CABLE SPECS

  • 24-pin ATX power:600 mm, Nylon sleeving
  • 4+4-pin CPU power:700 mm, Nylon sleeving
  • 8-Pin CPU Power Cable:700mm, Nylon sleeving
  • 6+2-pin PCIe power:650 + 150 mm, Nylon sleeving
  • 16-Pin (12+4) 12VHPWR PCIe Cable:650mm, Nylon sleeving
  • SATA power:500 + 150 mm
  • Peripherals:500 + 150 mmNZXT C1200 Gold

GENERAL

  • Dimensions:150 x 150 x 86mm
  • Material(s):Steel, PCB and Plastic
  • Compliance Standard:ATX12V v3.0 / EPS12V v2.92
  • Regulation & Certification:cTUV-SUDus / CUL (UL60950/62368-1) / TUV / (EN60950/62368-1) / CB/ (IEC 950/62368-1) / CCC / CEC /BSMI / RCM / EAC / CE / LVD / UKCA
  • Warranty:10 years

DC OUTPUT RATING

  • +3.3V and +5V:22A (120W)
  • +12V:100A (1200W)
  • -12V:0.3A (3.6W)
  • 5Vsb:3A (15W)
  • Total:1200W

Toyota and ExxonMobil partner on synthetic fuel development

0

Exxon Mobil and Toyota Motors have partnered to test low-carbon fuel blends in gasoline engines, offering drivers a potential way to reduce emissions without switching to electric vehicles. These fuel blends, made from cleaner feedstocks, could potentially reduce greenhouse gas emissions from internal combustion engines by up to 75% compared to regular gasoline. The fuels, primarily composed of renewable biomass and ethanol produced using cleaner processes, have proven compatible with Toyota vehicles, raising the possibility of a drop-in solution that could compete with battery-powered cars in the future.

Toyota
Toyota – photo: Pixabay

However, the fuels are still in the testing phase and would require government policy support to become commercially available. According to Andrew Madden, Exxon’s vice president for strategy and planning, a policy construct that allows the market to innovate and find the lowest-cost way to decarbonize transportation would be ideal. While both Exxon and Toyota have previously pursued moonshot technologies to reduce transportation emissions that failed to meet expectations, they believe that a portfolio approach that includes electric and hydrogen-powered vehicles, along with lower-carbon fuels, is necessary to meet climate targets quickly.

E-fuels, also known as synthetic fuels, produce reduced exhaust emissions, but they are not completely emission-free. However, their production process uses renewable energy and carbon capture technology, making them carbon-neutral for the environment.

On the other hand, battery-electric vehicles do not emit any harmful pollutants and are more efficient and cost-effective to operate. However, the current battery technology relies on unsustainable and expensive raw materials. Additionally, the carbon footprint of these vehicles depends on various factors, such as their supply chain, manufacturing processes, and the power source used for charging.

In addition to exploring synthetic fuels, Toyota, along with other carmakers like Hyundai and BMW, is also developing hydrogen fuel-cell technology, which offers a longer driving range and uses a similar production process. Toyota has also invested in hydrogen-combustion engine propulsion, as showcased on the Corolla Cross H2 concept.

Review: Amazon Fire TV Cube (3rd Gen) streaming device

0

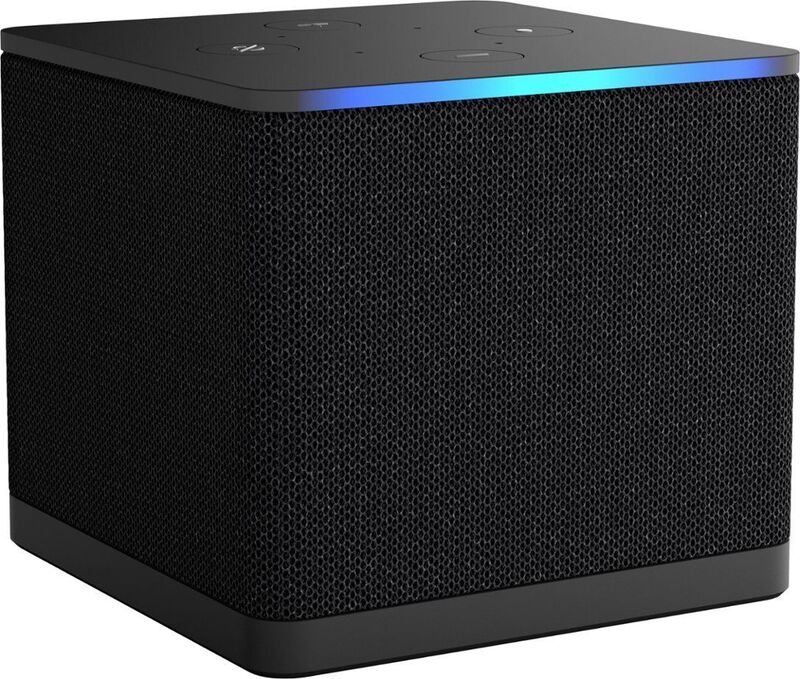
The Amazon Fire TV Cube (3rd Gen) is a streaming device that offers both content streaming and Alexa speaker capabilities in one package. Compared to its 2019 predecessor, the 3rd Gen model features a more robust speaker and a sleek fabric mesh surround, which is a welcome change from the hard-cornered design of the previous version.

One of the most notable upgrades on the new Fire TV Cube is its support for Wi-Fi 6E, which offers faster performance and less interference from other Wi-Fi devices in the home. According to Amazon, this makes it the first streaming media player with access to the 6 GHz band. Additionally, the device is equipped with a new octa-core processor that boasts 20% more speed.

Amazon Fire TV Cube (3rd Gen)

The 3rd Gen Fire TV Cube also offers HDMI and USB inputs, as well as a 4K upscaler, which is sure to please users who demand high-quality picture and sound. The device’s upscaling capabilities make it possible to enjoy a wide range of content in stunning 4K resolution.
In order to provide a better understanding of the Fire TV Cube (3rd Gen), we were also provided with the Alexa Voice Remote Pro, an additional upgrade to the remote that comes with the device. The premium remote features two programmable shortcut buttons that allow users to quickly access apps, channels, or Alexa Routines, and is designed to reduce the amount of time spent searching for the remote. The box includes the Cube, the remote control, a power adapter, and a quick startup guide, but note that there is no HDMI cable provided.

The Cube itself is a sleek, stylish block wrapped in dark grey cloth and measuring 86mm by 86mm by 76mm. It features a black plastic topside panel with volume, power, and Alexa voice reception defeat buttons, as well as maroon and turquoise LEDs that light up when Alexa is listening. The rear panel includes an HDMI input, HDMI output, Ethernet and USB-A ports, power connection, and IR Extender. A rubber sole on the bottom of the Cube keeps it from slipping.

The included remote offers excellent functionality for navigating the Fire TV interface and includes an Alexa voice button and presets for Prime, Netflix, Disney+, and Amazon Music. The standard remote is longer than the Pro remote at 15.5 cm, and the more compact clicker offers a ‘find my remote’ option and two customizable buttons. Both remotes are made of high-quality matte black plastic, but the tactile buttons make an audible clicking sound.Amazon Fire TV Cube (3rd Gen)

The Cube supports 4K UHD images, Dolby Vision, and HDR10+, as well as Dolby Atmos audio (7.1.2). Its HDMI input allows users to connect a gaming console, Blu-ray player, or satellite box, and control them via the Cube’s on-screen interface. The device can even display CCTV camera feeds via the picture-in-picture setting.

Setting up the Amazon Fire TV Cube is straightforward and easy. After plugging it in and connecting the HDMI ARC to your TV, you can easily follow the on-screen menu to connect to your wireless network. If you prefer a hard-wired Ethernet connection, that is also supported. Adding your Amazon Prime membership and passwords for various apps is simple, and the on-screen menu even allows you to select your soundbar or powered speaker manufacturer for easy integration. Both the standard and Pro remotes initiate easily, with the Pro allowing for preset buttons and voice-activated remote location. The Home menu is heavily focused on Amazon Prime content, but responsiveness is impressively fast.

Amazon Fire TV Cube Performance

Despite the potential for a tedious setup, the Fire TV Cube’s intuitive interface and quick responsiveness make it a joy to use. Alexa effortlessly understands commands and performs them with lightning-fast speed, all while providing clear and crisp voice reproduction. The Cube was able to easily identify and integrate with a Yamaha soundbar, but couldn’t identify remote commands for JBL 4305P monitors.

The Amazon Fire TV Cube (3rd Gen) is an impressive streaming device that combines a versatile hands-free smart speaker with a vast selection of entertainment apps. Setting it up and navigating through the interface is a breeze, and the included remote controls are responsive and well-made. It’s also easy to find a spot for this versatile little box near your TV or hidden in a home cinema setup.

Unlike most streaming devices, the Fire TV Cube is a stand-alone unit that connects via an HDMI cable and offers hands-free voice control with a built-in microphone and speaker. With an HDMI 2.1 output and input, a 100Mbits/sec Ethernet port, and built-in Wi-Fi 6E, it boasts a wide range of connectivity options. Additionally, it supports all the major HDR and audio formats, including Dolby Vision, HDR10+, HLG, Dolby Digital Plus, and Dolby Atmos. With its new octa-core CPU and 2GB of RAM, the device delivers lightning-fast navigation between screens and menus, limited only by the speed of the app or service and your internet connection. It’s worth noting that while the Fire TV Cube is exceptionally smooth and responsive, the Roku and Fire TV 4K Max products are also very quick.

Amazon Fire TV Cube (3rd Gen)
Fire TV Cube (3rd Gen) – photo: Amazon

However, it’s essential to consider your needs before investing in a Fire TV Cube. Are you looking for comprehensive app support for an aging TV or voice command control over your AV domain? While the Cube delivers excellent video and audio quality, it’s worth noting that the HDMI input only supports 60 Hz if you’re a keen gamer.

At a price of £140, the Cube may not be the most affordable option, especially compared to some alternatives. The 3rd Gen model is £20 more expensive than the 2nd Gen, and opting for the more versatile Pro remote will add another £35 to the cost. You could replicate many of the Cube’s functions with a Fire TV Stick or other streamer with a smart speaker, sometimes for under £100 with a bit of hunting around. Ultimately, your budget and specific needs will determine which device is the best fit for you.
The Fire TV Cube (3rd Gen) is a versatile and feature-rich streaming device that offers excellent performance and control options. Its combination of Alexa speaker capabilities, Wi-Fi 6E support, and powerful processor make it a top choice for anyone looking to upgrade their home entertainment system.

Bluehost vs Hostinger: Which Hosting Provider is Better?

1

Are you wondering which hosting provider to choose between Bluehost and Hostinger? This article compares both providers based on pricing, features, ease of use, and performance to help you make an informed decision.

When it comes to affiliate programs, Hostinger and Bluehost both provide opportunities for individuals to earn commissions by referring new customers to their web hosting services. However, there are some differences between the two programs that are worth considering:

  • Commission Rates: Hostinger offers up to 60% commission per new sale, whereas Bluehost offers a $65 commission per sale.
  • Cookie Duration: Hostinger has a 30-day cookie duration, while Bluehost’s cookie duration is 90 days.
  • Minimum Payout: Hostinger’s minimum payout is $100, whereas Bluehost’s minimum payout is also $100.
  • Marketing Materials: Both Hostinger and Bluehost offer a range of marketing materials, such as banners, links, and promotional codes, to support affiliates in promoting their services.

    Which Hosting Provider
    Which Hosting Provider?

Both Hostinger and Bluehost have good reputations and high levels of customer satisfaction as web hosting providers. As an affiliate marketer, the program that you choose may depend on which commission rate, cookie duration, and minimum payout structure best suits your needs.

If you’re looking for affordable web hosting, Hostinger is worth considering. It’s hard to find a cheaper option that still offers reliable hosting. To help you decide if Hostinger’s hosting plans are suitable for your website, consider the following features:

Benefits of Using Hostinger Web Hosting:

  • Decent Uptime: While Hostinger’s uptime rates aren’t the highest in the industry, they’re not the lowest either. Their average uptime over the course of a year is around 99.9%, but it can vary from 99.8% to even as low as 99.04% in some months. However, some months with 100% uptime balance out the average. It’s important to balance the cost with your needs – if you have a small personal website with low traffic, 10-14 hours of downtime per year may be acceptable. However, if you have a business website, you’ll want slightly better uptime rates. Overall, Hostinger’s uptime rates are adequate for most small websites.

Hostinger provides a free domain and website builder with all of its plans, making it an excellent choice for those starting a new website or who are beginners. The drag-and-drop website builder makes customizing a website simple, without requiring any development knowledge or experience. Hostinger offers many templates for users to choose from as well. The Hostinger administrative dashboard is straightforward and easy to use, even for those without much experience with web hosting or website management. From the dashboard, users can access any installed apps like WordPress, change their usage, upgrade their plan, change their domain, manage email settings, and access usage statistics to determine if the current plan meets their website’s needs. While Hostinger’s interface is easy to use, it’s not perfect, which will be discussed in more detail later. Hostinger is a trusted name in the industry, offering affordable web hosting solutions for small websites. It’s recommended to stick with their shared options, such as the Premium and Business shared plans, which are sufficient for small websites or personal blogs.

Bluehost
Bluehost photo: Bluehost

Bluehost was founded in 2003 by Matt Heaton and Danny Ashworth. Despite having only one datacenter located in the US, Bluehost powers over 2 million websites, and it is growing by the day. After only 7 years of operation, Bluehost attracted the attention of web hosting giant Endurance International Group and became a part of the EIG group of companies. Bluehost is a popular web hosting provider for businesses and blogs, and their onboarding process and automatic WordPress installation make it very easy to use. Although their product is not the cheapest, it is reliable and easy to use. They have seven pros, which include being easy to use, fast, having high-performance servers, fantastic security features, and fast support, and four cons, including only having one datacenter, untrained trainees, no uptime guarantee, and dodgy checkout practices. Bluehost offers three hosting options, which are shared hosting, VPS hosting, and dedicated hosting. They are not the best web hosting provider, but they are still a strong web hosting provider.

Bluehost offers domain name registration with prices starting at $1.99/year for .website, $4.99/year for .tech, and up to $14.99/year for .net. Its shared hosting plans start at $2.75/month for Basic, $4.95/month for Plus, $5.45/month for Choice Plus, and $13.95/month for Pro. Dedicated hosting plans are available starting at $79.99/month for Standard, $99.99/month for Enhanced, and $119.99/month for Premium. For users looking for something in between shared and dedicated hosting, Bluehost offers VPS hosting plans starting at $18.99/month for Standard, $29.99/month for Enhanced, and $59.99/month for Ultimate.

Hostinger’s VPS Server Plan 2 is its most popular VPS plan, priced at $5.99/month for 12 months, which saves you 54% from the regular price of $12.99/month. The plan renews at $9.99/month after the first year. Hostinger also offers three cloud hosting plans: Cloud Startup for $9.99/month (renews at $24.99/month), Cloud Professional for $14.99/month (renews at $44.99/month), and Cloud Enterprise for $29.99/month (renews at $59.99/month).

Hostinger
Hostinger photo: Hostinger 

Hostinger is known for its affordable hosting plans that offer many features and reliable performance. Free domains, SSL certificates, and on-demand support are some of the benefits that come with Hostinger’s plans. The company offers various types of hosting plans with discounted prices, making it a great choice for those looking for cost-effective options. For instance, the shared web hosting plan starts at $2.99/month (renews at $5.99/month), WordPress hosting at $2.99/month (renews at $8.99/month), and VPS hosting at $3.99/month (renews at $7.99/month). Hostinger frequently provides promotional offers, giving new customers the chance to save significantly on their hosting plans while still receiving all the necessary tools to establish an online presence.

Bluehost vs Hostinger – When it comes to comparing Bluehost and Hostinger, Hostinger comes out on top in terms of pricing and features. Their Premium Shared Hosting plan, which costs only $2.89 a month with a 48-month contract, offers more value than Bluehost’s Basic plan, which costs $3.95 a month with a 36-month contract.

Hostinger also has the advantage in terms of datacenters, with six locations worldwide to cater to audiences everywhere. Additionally, they provide an uptime guarantee and have a knowledgeable localized support team. However, Bluehost’s custom UI is preferred over Hostinger’s by some.

Hostinger outperforms Bluehost in terms of datacenters, with 6 located all over the world to cater to audiences globally. Additionally, Hostinger offers an uptime guarantee to ensure your site stays up at all times, and has a localized support team with expertise in the field. However, it’s worth noting that despite these advantages, we prefer Bluehost’s custom UI over Hostinger’s.

When it comes to bandwidth allowance, Hostinger is more transparent than Bluehost, which hides behind the vague “unlimited” buzzword. However, Bluehost allows users to create unlimited email accounts, while Hostinger only allows up to 100, which should still be sufficient for most users. In terms of storage space, both providers offer generous amounts, but Hostinger’s cheapest plan allows for hosting more than one site, unlike Bluehost.

Both providers require customers to select the longest billing term to get the advertised price, and prices increase upon renewal. However, Hostinger’s pre-payment option is much cheaper than Bluehost’s, especially for a four-year term. Bluehost’s dashboard includes a plugin for managing website changes and creating copies, and it also integrates marketing tools like Google My Business and Google Ads.

In terms of ease of use and hosting management, both Bluehost and Hostinger are user-friendly, but with some notable differences. Hostinger has a more traditional control panel and focuses on account security, while Bluehost’s dashboard includes main management features and also gives access to cPanel, which can be overwhelming for some users. Bluehost wins in terms of site staging and marketing management tools, while Hostinger excels in performance optimization, offering LiteSpeed web server with pre-configured caching and the latest PHP versions. Hostinger also allows users to select a server location from seven data centers worldwide, improving speed for audiences in specific regions. Bluehost, on the other hand, uses older technology, with basic caching and slower PHP version updates, and only has servers in the US.

Both providers show good results in terms of speed, but Hostinger is significantly faster.

Summary: Bluehost vs Hostinger

The comparison between Bluehost and Hostinger shows that Hostinger offers lower pricing and more features, with 6 datacenters worldwide and an uptime guarantee. Bluehost offers more email accounts and marketing tools, as well as a custom UI. Both providers have generous storage space and require long billing terms for advertised prices, but Hostinger offers lower pre-payment rates. In terms of ease of use and hosting management, both are easy to use but have different strengths. Hostinger is more performance-focused with speed optimizations and server location options, while Bluehost offers site staging and marketing management tools. Ultimately, Hostinger is faster, while Bluehost offers more advanced functionalities.

Tips: How to Play VOB File on iPhone?

0

Before we proceed with showing you how to play VOB files on iPhone, it’s essential to understand what a VOB file is. In this article, we’ll define VOB and introduce some VOB to iPhone converters, such as Tipard DVD Ripper and Xvid4psp. You can choose the most suitable converter for your needs based on the tutorials provided.

What is VOB file?

VOB stands for “Video Object.” It is a movie data file that is typically found in the VIDEO_TS folder at the root of a DVD disc. A VOB file contains most of the data stored on the disc, including video, audio, subtitles, DVD menus, and other navigation content. VOB files are usually formatted as MPEG-2 system streams and can be opened by various video playback programs.

How to Convert VOB to iPhone with Tipard DVD Ripper?

Tipard DVD Ripper
Tipard DVD Ripper photo: Tipard

Tipard DVD Ripper is a powerful tool that enables users to convert DVDs to various video and audio formats such as MP4, AVI, MOV, WMV, MKV, MP3, and more. This software can be used to rip DVD movies, presentations, and slideshows to clips that can be played on mobile devices. Here’s a step-by-step guide on how to convert VOB to iPhone using Tipard DVD Ripper:

  • Download, install, and launch Tipard DVD Ripper on your computer. Click the “Load Disc” button to import the DVD disc into the program. You can choose from “DVD Disc”, DVD Folder, or “DVD IFO Files” from the drop-down list.
  • To convert VOB to iPhone, select the iPhone Compatible format. If desired, you can also improve the video quality or edit the videos using multiple excellent features available in the software.
  • Once all the necessary parameters have been set, click on the “Convert” button to start the conversion process from DVD to iPhone.

Convert VOB to iPhone with Xvid4psp

If you’re looking for a simple and user-friendly video converter to convert VOB to iPhone, Xvid4psp is a great option. With its well-designed graphical user interface, Xvid4psp makes it easy to convert video files for those who frequently watch movies on the go. Here’s how to convert VOB to iPhone using Xvid4psp:

Play VOB File on iPhone
-Play VOB File on iPhone- photo: Pixabay
  • After installing Xvid4psp on your computer, double-click the program to open it. Click the “Open” button to select your desired VOB file. The video file will take a few seconds to load into the main interface.-
  • Once the loading is complete, select the iPhone Compatible format in the “Format” button.
  • You can also utilize Xvid4psp’s editing features to trim the video or make other simple edits. When all the desired settings are in place, click on the “Encode” button to save your edited file. The conversion process from VOB to iPhone with Xvid4psp may take some time.

In conclusion, playing a VOB file on an iPhone requires converting it to a compatible format. We introduced two popular VOB to iPhone converters, Tipard DVD Ripper and Xvid4psp, which make the conversion process easy and straightforward. With the help of these converters, you can enjoy your favorite DVD movies on your iPhone without any hassle. Just choose the converter that suits your needs and follow the steps outlined in our guide.