Home Blog Page 57

Analog Turntable TEAC TN-3B-SE – high-end build quality

0

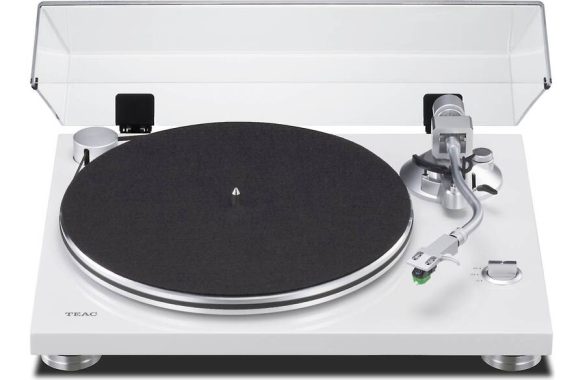
The TEAC TN-3B-SE turntable appears to have several attractive features. The large-diameter belt drive design ensures excellent rotational stability, while the lightweight static-balance S-shaped aluminum tonearm is accurate when reading grooves. The turntable also boasts a knife-edge pivot-point tonearm bearing and precision anti-skating and stylus pressure adjustment, which contribute to very accurate motion.
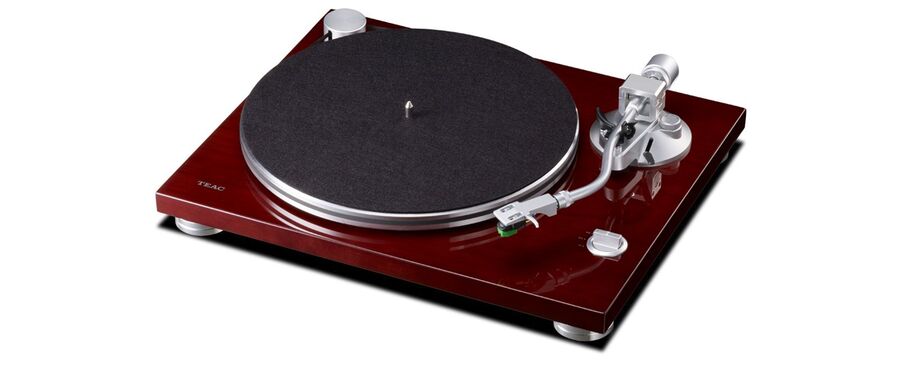
TEAC TN-3B-SE turntable
TEAC TN-3B-SE turntable photo: TEAC

In addition, the high-density plinth with shock-absorbing feet and honeycomb-patterned bottom panel minimize unwanted vibrations, and the die-cast aluminum platter provides excellent speed stability. The built-in switchable phono preamp and gold-plated stereo RCA output with ground terminal are convenient features for users. The turntable also offers both 33-1/3 and 45 rpm speeds, providing versatility in use.

However, the turntable’s signal-to-noise ratio of 67 dB may be considered lower than that of some other turntables on the market. Additionally, while the Audio-Technica AT-VM95E moving magnet cartridge is factory-installed, it may not be suitable for users who prefer a different type of cartridge. Lastly, the turntable’s wow and flutter of 0.2% is not the lowest on the market, which may disappoint audiophiles seeking an even more precise playback experience.

Another issue with the TEAC TN-3B-SE turntable is that its built-in phono preamp may not be of the same quality as a dedicated external preamp. Users who are serious about their audio setup may prefer to use a separate phono preamp instead.

While the turntable has some exceptional features and benefits, it may not be the top choice for audiophiles seeking the highest possible sound quality or those who prioritize flexibility in their audio setup.TEAC TN-3B-SE turntable

Here are a some big advantages of the TEAC TN-3B-SE turntable:

  • The large-diameter belt drive design ensures excellent rotational stability, contributing to accurate playback of vinyl records.
  • The lightweight static-balance S-shaped aluminum tonearm reads grooves accurately, resulting in a high-quality audio experience.
  • The turntable is designed in collaboration with SAEC, a high-end tonearm manufacturer, indicating a commitment to producing a high-quality product.
  • The high-density plinth with shock-absorbing feet and honeycomb-patterned bottom panel minimize unwanted vibrations, reducing interference with the sound quality.
  • The built-in switchable phono preamp and gold-plated stereo RCA output with ground terminal provide convenience for users who prefer an all-in-one solution.
  • The turntable offers both 33-1/3 and 45 rpm speeds, allowing users to play a wide variety of vinyl records.

Pros:

  1. Impeccable design with high-quality finishes.
  2. Detachable RCA cables for convenient setup.
  3. Saec tonearm enhances performance.
  4. Built-in phono stage with the option to turn off.
  5. Versatile upgrade options through cartridge replacement on the pickup.

Cons:

  1. Non-adjustable tonearm height.
  2. All controlling and functional components, including the tonearm, are silver-colored, which, although elegant, might be overwhelming against a white table. The addition of a black felt slip mat helps balance the color palette.

The black belt, covering the aluminum platter’s visible circumference, complements the overall aesthetics. The electronic speed switch for 33 and 45 RPM, located in the upper right corner, also serves as a power switch.

The ‘S’ in TN-3B-SE stands for the distinctive S-shaped tonearm, a collaborative creation of Teac and Saec. This static tonearm, featuring a blade bearing, comes equipped with an Audio-Technica cartridge (AT-VM95E). This thoughtful inclusion simplifies the upgrade process, allowing users to experiment with various cartridges and needles without the hassle of complex configurations. The TN-3B-SE offers a straightforward and clear approach to enhancing sound quality.

The TEAC TN-3B-SE turntable is currently available in 3 color options: glossy black, cherry and white. The glossy black option offers a sleek, modern look that would fit well in many different types of home decor styles, while the matte cherry option provides a more unique, bold look that may appeal to those looking for something different. Both color options are attractive and well-made, so it ultimately comes down to personal preference when choosing which one to purchase. The TEAC TN-3B-SE turntable price: $529.99

TEAC TN-3B-SE turntable
TEAC TN-3B-SE

TEAC TN-3B-SE turntable specs:

TypeBelt-drive (External drive)
MotorDC Motor
Rotation Speeds33-⅓ rpm, 45 rpm
Wow-and-Flutters0.1% or less
S/N Ratio67dB (A-weighted, 20kHz LPF)
Turntable (Platter)
MaterialAluminum Die-cast
Diameter30cm
Tone-arm section
TypeS-shape, Static-balanced
Effective Length223mm
Needle Pressure Range0g to 5.0g
Compatible Cartridge Weight3.0g to 12.0g
14g to 23g (including Head-shell)
Cartridge section
TypeMM-type
Output Voltage4.0mV (1kHz, 5cm/sec.)
Needle Pressure1.8 to 2.2g (2.0g recommended)
Weight6.1g
Head-shell weight11g (including screws, nuts, and wires)
Compatible StylusAT-VMN95E * Average stylus life: approx. 300 hours.
Analog Outputs
ConnectorRCA Pin jack × 1 pair (Gold-plated)
Output Voltage
PHONO4.0mV (1kHz)
LINE224mV (–13dBV)
Operating PowerAC 100 to 240V, 50/60Hz
Power Consumption1.5W
Standby Power0.5W
Overall Dimensions (W×H×D)420 × 117 × 356 mm /
16.5″ × 4.6″ × 14.0″ (including protrusions)
Weightapprox. 5.0kg / 11.0 lbs.
Included AccessoriesFelt Mat, EP Adapter, Counter Weight, Head-shell (AT-VM95E installed), Platter, Dust Cover, Hinges × 2, RCA Audio cable with GND terminal, AC Adapter (GPE053A-V120050), Owner’s Manual (including Warranty Card)

How to Open and Convert EXO Files?

0

Learn how to open and convert EXO files using specialized video player software and third-party converter tools. Follow our step-by-step guide for easy conversion.

An EXO file is a type of file used by the video player software developed by Samsung, called “Samsung Smart TV”. It is used to store video content that has been encrypted and packaged for secure streaming over the internet.

The EXO file format is a proprietary format created by Samsung and is not commonly used outside of their ecosystem. These files typically have the file extension “.exo” and are not playable on most other video players without first being decrypted and converted into a more widely recognized format, such as MP4 or MKV.

EXO files are used by Samsung’s Smart TV video player software to securely stream encrypted video content over the internet.

EXO file
photo: Pixabay
How to open EXO files?
To open an EXO file, you will need a special video player software designed to work with Samsung’s Smart TV system. If you have a Samsung Smart TV, you can transfer the EXO file to the TV and play it using the built-in video player.

However, if you do not have a Samsung Smart TV, you will need to convert the EXO file into a more commonly used video format like MP4 or MKV using a third-party converter tool. There are several video converter tools available online, both free and paid, that can convert EXO files into other video formats.

Once you have converted the EXO file into a more widely recognized format, you can play it using any standard video player software, such as VLC media player, Windows Media Player, or QuickTime Player. To open the converted file, simply double-click on it or drag and drop it into the video player software.

How to convert EXO files?
To convert EXO files to a more commonly used video format, you can use a third-party video converter tool. Here are the steps to convert EXO files:
  1. Download and install a video converter tool that supports EXO file format conversion. There are several such tools available online, both free and paid, such as Any Video Converter, Freemake Video Converter, and Handbrake.
  2. Open the video converter software and select the “Add Files” or “Import” option to import the EXO file you want to convert.
  3. Choose the output format you want to convert the EXO file to. Commonly used video formats include MP4, AVI, MKV, and MOV.
  4. Set the output folder where you want to save the converted file.
  5. Click the “Convert” button to start the conversion process. The time it takes to convert the file will depend on the size and length of the original EXO file.
  6. Once the conversion is complete, the converted file will be saved in the designated output folder. You can now play the converted file using any standard video player software.

It’s important to note that while converting an EXO file to another format may allow you to play the file on a wider range of devices, it may also compromise the file’s original quality or encryption.

A really strong drone – PowerVision PowerEgg X Wizard

0

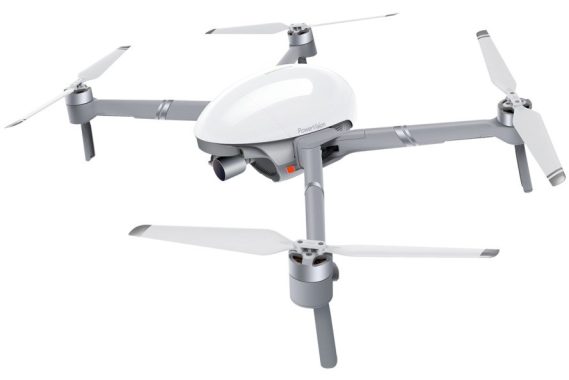
The PowerEgg X drone has a unique design that sets it apart from other drones, including its predecessor, the PowerEgg. The body of the drone is egg-shaped, and it has a detachable bottom panel that protects the camera and gimbal. The top panel is also removable and houses the battery and memory card, along with accessory sockets on the sides of the device.

The main body of the PowerEgg X drone is lightweight at 522g with a battery and microSD card installed, and the take-off weight becomes 862g when the propeller arms are attached to the accessory sockets on either side of the egg-shaped body. The drone can be used in handheld camera mode by attaching a hand strap or secured to a tripod for the AI camera mode by attaching a tripod mount.

drone PowerEgg X Wizard
PowerEgg X Wizard – photo PowerVision

The PowerEgg X is designed to be versatile and perform most aerial tasks expected of a modern drone, including front obstacle avoidance and autonomous flight modes like return-to-home, follow-me, orbit, and time-lapse. It can also transform into a hand-held stabilized camera and a tripod-mounted video recorder with motion tracking ability.

One of the most unique features of the PowerEgg X is its ability to land and take off on water, making it an ideal drone for use on or around water. In drone mode, it handles well in the sky and can fly in wind speeds up to 23mph/38kph. The battery life is advertised as up to 30 minutes in drone mode, and 3.5 hours in other camera modes. However, wind speed, temperature, and the use of the waterproof housing and floats can impact battery life.

13-core multiprocessor and 5-core high-performance CPU+single-core GPU+4-core DSP+dual-core neural network engine booster+single-core MCU

When using the waterproof housing and floats, the drone’s handling in the air is impacted, and it tends to reduce altitude when being flown forwards. The floats also make the drone unstable in the air when it’s windy. Water landings work well, but it’s best to avoid fast-moving water or landing too close to a riverbank to prevent the drone from getting flipped over or caught in reeds. The floats are also useful for landing on snow, mud, and long grass.

In rainy conditions, the top of the waterproof housing can suffer from fogging, but during testing, this wasn’t a problem at the front of the housing where the camera is situated. Rain droplets in front of the camera were visible in videos. Overall, the PowerEgg X is a versatile and unique drone that offers a range of features and capabilities for both aerial and ground-based photography and videography.

The PowerEgg X drone boasts advanced flight technology with front obstacle avoidance and downward sensors to aid with landing. While rear obstacle avoidance sensors would have been an added advantage, their absence is not a deal-breaker. The intelligent camera modes accessed via the app include Follow Me, Point of Interest, QuickShots, and Time Lapse, which are all easy to use and perform as expected.PowerEgg X Wizard

In handheld gimbal camera and AI camera modes, you can use the drone’s video functionality either handheld or tripod mounted. The AI camera utilizes facial recognition and can smoothly follow subjects, which is continually improved through deep learning and firmware updates. The egg body features a microphone that can pick up sound, and the internal fan’s audible noise is faintly noticeable in video footage, but not to the point of being unusable.

There is a noise reduction facility that can be turned on in the app, but basic noise reduction always changes sound, so you have to compare with and without to decide which you prefer. When flying the drone, sound can be recorded from the controller, allowing the drone pilot to capture ambient sound or add voice notes to video footage. Image quality is best in brighter conditions where subjects appear sharper, and color is more vivid than in dull and cloudy conditions, as with most consumer drones.

In-drone processed JPEGs suffer from heavy sharpening and noise reduction, and the color balance and overall saturation are never as good as when processing Raw files. Shooting through the waterproof housing affects image sharpness and clarity when shooting both stills and video. Despite the small sensor size, shooting in Raw and manually processing the image can produce good results.

The PowerEgg X produces good quality video, but it’s not as good as DJI’s Mavic series. Recording in Raw video formats, such as D-Log, is not currently possible, although it may be added in a future firmware update. However, for short, sharp video sequences in bad weather, the PowerEgg X has a clear advantage. The PowerEgg X Wizard pack’s main USP is that it comes with a waterproof housing for the drone and floats for landing on water. The floats are great for raising the drone, enabling it to land on wet ground, snow, or water, making it an ideal drone for use in heavy rain.

The PowerEgg X Wizard kit comes with everything you need to fly the drone in both standard and waterproof modes. This includes the polystyrene carry case and two batteries that provide around 50 minutes of flight time. The design of the PowerEgg X is like no other drone, with its egg-shaped body and detachable bottom panel that neatly hides and protects the camera and gimbal, while the top panel is also removable, where the battery and memory card live. There are accessory sockets on the sides of the device.PowerEgg X Wizard kit

The Wizard kit costs $1,249 and includes a waterproof housing, floats for water landings, an additional battery, two extra pairs of propellers, a propeller arm case, and a mini tripod for AI camera mode. The Wizard kit represents the best value for money, like most drone bundles with additional accessories. The PowerEgg X Wizard is a surprisingly good drone to fly, providing great stability in the air thanks to the large propellers. While image quality is good, it may not be outstanding, and the lack of Raw video formats may deter some professional videographers. However, photographers will be pleased to know that Raw stills can be captured in DNG format. The waterproof housing and floats for landing on water make this unique drone stand out from the crowd.

How to Create an M3U IPTV List: A Guide and Recommended Generators

0

Learn how to create an M3U IPTV list using a step-by-step guide and explore the best generators and tools to make the process easier. Find out how to add channels and streams to your playlist, customize your playlist, and test it with any compatible IPTV player.

IPTV
photo-pixabay

Creating an M3U IPTV list is a relatively simple process that involves compiling a list of video or audio streams that you would like to play on an IPTV player. Here are the basic steps to create an M3U IPTV list:

  • Determine the source of the streams: Before you can create an M3U IPTV list, you need to know where your streams are coming from. These can be live TV channels, video on demand services, or even streams from your own media server.
  • Compile a list of the stream URLs: Once you know where your streams are coming from, you need to compile a list of the URLs that will be used to access them. You can usually find these URLs on the websites of the IPTV service providers or in the documentation for your media server.
  • Open a text editor: To create your M3U IPTV list, you will need to open a text editor such as Notepad, TextEdit, or Sublime Text.
  • Start a new document: Create a new document in your text editor.
  • Add a header: At the beginning of your document, add the following line:

#EXTM3U

This line is the header for your M3U file and lets the player know that this is an M3U file.

  • Add the stream URLs: Below the header, add the URLs for the streams you want to include in your playlist. Each line should begin with #EXTINF: followed by the name of the channel or program, and then the URL for the stream. For example:

#EXTINF:0 tvg-id=”Example” tvg-logo=”http://myserver.com/example.png”, EXAMPLE http://examplestream1.com/stream1

  1. Save the file: Once you have added all of the streams to your playlist, save the file with a .m3u extension. For example, you could name your file myIPTVlist.m3u.
  2. Test the playlist: Open your IPTV player and load the M3U file you just created to test that it works correctly.

That’s it! You have now created an M3U IPTV list that can be used with any compatible IPTV player.


Which generator to use to create m3u playlist?

There are many free online tools and software that can be used to generate an M3U playlist. Here are a few options to consider:

– Playlist Creator: Playlist Creator is a free Windows-based tool that allows you to create M3U, PLS, and WPL playlists. It’s a simple drag-and-drop interface that lets you easily add media files to your playlist and save it as an M3U file.

– Xtream Editor: Xtream Editor is an online service that allows you to create, edit, and manage M3U playlists for IPTV services. It’s a powerful tool that lets you customize your playlist with logos, channel numbers, and EPG data.

– IPTVEditor: IPTVEditor is another online service that allows you to create and manage M3U playlists for IPTV services. It has a simple interface that lets you add channels and streams to your playlist, and you can even create multiple playlists for different devices.

– M3UPlus: M3UPlus is a free online tool that allows you to create M3U playlists for IPTV services. It’s a simple drag-and-drop interface that lets you add channels and streams to your playlist, and you can even customize the channel logos.

– Notepad or any other text editor: If you prefer to create your M3U playlist manually, you can use any text editor, such as Notepad, to create and edit the playlist. Simply follow the steps I mentioned in the previous answer to create your M3U file.

Overall, the choice of generator or tool to create an M3U playlist will depend on your specific needs and preferences.

Dolby Access for immersive audio

0

Dolby Access empowers you to manage the sound quality while enjoying multimedia by providing you with software to control your hardware, such as speakers and other devices.

The world of audio devices is expanding rapidly and becoming more advanced, with some cutting-edge smart features only just entering the market. However, without the appropriate software, utilizing these features can be challenging, limiting your ability to unleash their full potential.

Dolby
Dolby – photo: Pixabay

With Dolby Access, you can control the sound output from your audio devices, including the Dolby Atmos trial, a powerful software that maximizes the potential of your surround sound devices. With this tool, you can customize and refine your listening experience according to your preferences.

Change the Sounds You Hear To use Dolby Access, you need to download and install it and the Dolby Atmos software. Then, you can change the properties of your headphones and speakers from the “Speaker Properties” panel. This application provides access to innovative sound technologies and offers test files, such as videos and music, to demonstrate the full capabilities of Dolby Atmos.

Get a New Level of Immersion by altering the sound output of your media, you can significantly transform your viewing experience. With Dolby Access, you can unlock a unique and entirely new level of immersion.

Dolby Atmos for headphones is available as a free trial, which doesn’t charge you at the end of the 7-day period. Most titles on Netflix can be enjoyed in high-quality audio with 5.1 surround sound or Dolby Atmos. Select TV shows and movies on Netflix also have 5.1 surround sound, which is indicated by either a Dolby Digital Plus icon or a 5.1 icon on the movie description page. To stream with 5.1 surround sound, you need an audio system that is capable of 5.1 surround sound. If you have GamePass, you can experience popular Dolby Atmos titles like Psychonauts 2, Gears 5, Ori and the Will of the Wisps, and Rise of the Tomb Raider.

For games, Dolby Atmos allows you to hear threats before you see them, providing a more immersive experience. Some of the games that support Dolby Atmos include F1 2021, Microsoft Flight Simulator, Immortals Fenyx Rising, Cyberpunk 2077, and more.

If you want to enjoy immersive audio for your favorite shows and movies, Dolby Atmos is available on various platforms, including Netflix, Disney+, Microsoft Movies & TV, Amazon Prime Video, iQiyi, VUDU, and Maxdome.

Dolby Access is a software that enables you to control the sound output from your sound devices and provides you access to Dolby Atmos technology.

Download and try Dolby Access HERE

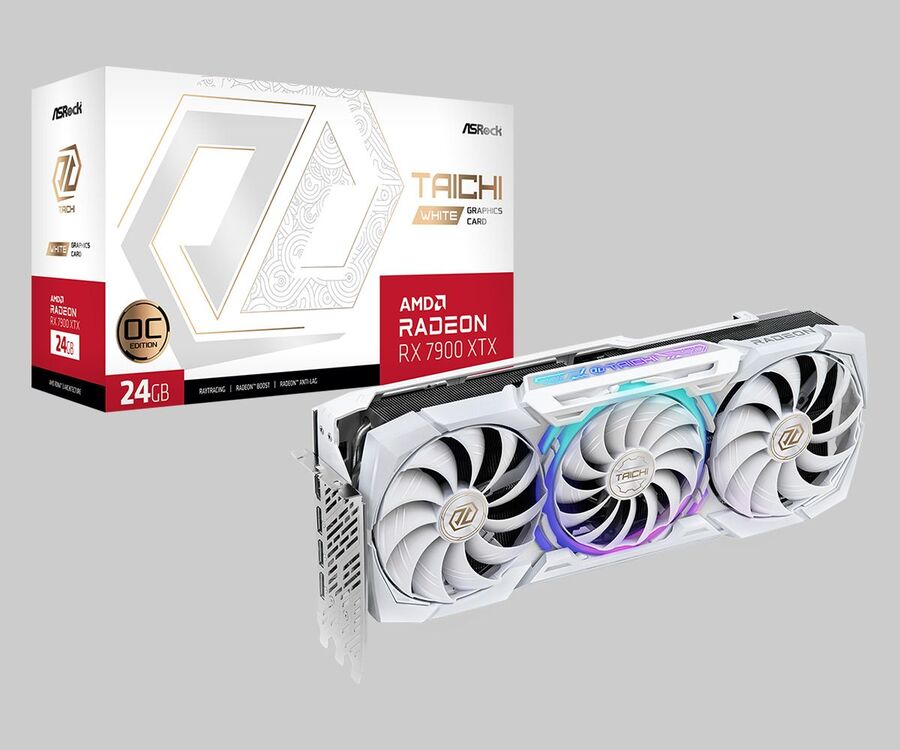
ASRock has introduced the Radeon RX 7900 XTX Taichi White 24GB OC Graphics Card

0

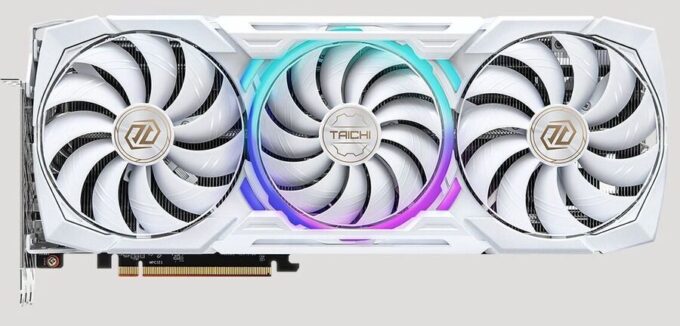
ASRock, a leading global manufacturer of motherboards, graphics cards, and mini PCs, has introduced its first white graphics card, the ASRock Radeon RX 7900 XTX Taichi White 24GB OC. This graphics card boasts the high-end AMD Radeon RX 7900 XTX GPU and 24GB GDDR6 memory, alongside ASRock’s latest technologies. Its exceptional performance and exquisite white appearance make it an excellent choice for avid gamers and professional creators who desire a high-performance PC with a white theme.

The revolutionary AMD RDNA™ 3 architecture with chiplet technology is utilized in this graphics card. This architecture delivers up to 54% more performance-per-watt than AMD RDNA 2 and features the world’s fastest interconnect, connecting the graphics and memory system chiplets at up to 5.3 TB/s. It also includes up to 96 new unified compute units and second-generation AMD Infinity Cache™ technology. Additionally, it offers increased AI performance and architected compute units with second-generation raytracing technology, providing higher raytracing architectural performance in select titles compared to previous-generation AMD graphics cards with AMD RDNA 2 architecture.

AMD Radeon™ RX 7900 XTX Taichi White 24GB OC
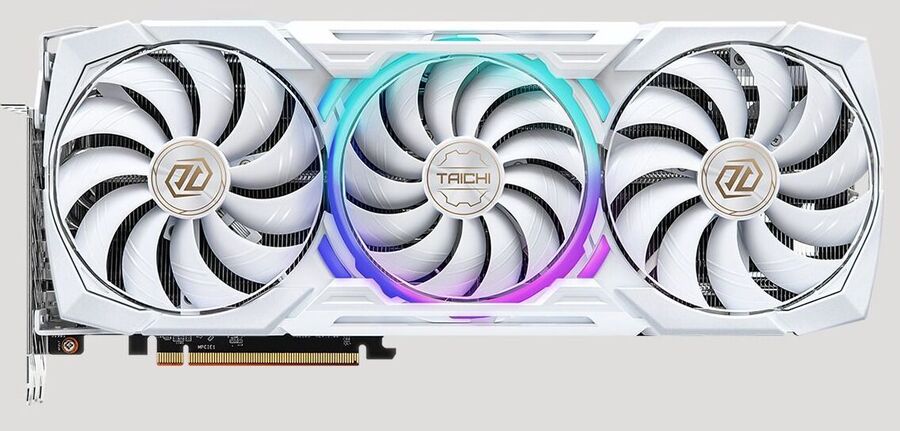
AMD Radeon RX 7900 XTX Taichi White 24GB OC – photo: ASRock

The graphics card’s surface has a pearlescent white coating that provides an exceptional visual and tactile experience. The metal frame and backplate also have the same coating, ensuring a consistent color scheme and experience throughout the entire product. Its stunning aesthetics make it a focal point of any white-themed PC.

The Dr.MOS design incorporates the latest SPS (Smart Power Stage) technology, optimized for monitoring current and temperature of each phase, resulting in smoother and more efficient power delivery to the GPU with improved performance and overclocking capability. Compared to conventional chokes, ASRock’s premium 100A power chokes improve saturation current up to three times, delivering enhanced Vcore voltage to the graphics card. The Japanese SP-Cap, which uses a highly conductive polymer as an electrolyte, boasts lower equivalent series resistance (ESR) and superior electrical properties. Additionally, it provides excellent operational life, reliability, and heat resistance. The Radeon RX 7900 XTX Taichi graphics card not only supports 4K graphics but also the next-generation 8K video output, providing the ultimate visual experience. It boasts 22 power phases with robust components to deliver maximum current to the GPU and memory for exceptional performance.

Moreover, the ASRock Radeon RX 7900 XTX Taichi White 24GB OC graphics card supports several ASRock exclusive features, including three Striped Ring Fans and the Ultra-fit Heatpipe for efficient cooling, a metal frame and backplate for a sturdy construction, the Polychrome SYNC technology for customizable fancy ARGB lighting effects, and the Dual BIOS for users to choose their preferred VBIOS settings. With these premium specifications and exclusive features, the ASRock Radeon™ RX 7900 XTX Taichi White 24GB OC graphics card is undoubtedly a premium choice for power users who aim to build a high-performance PC.AMD Radeon™ RX 7900 XTX Taichi White 24GB OC

AMD Radeon™ RX 7900 XTX Taichi White 24GB OC  specs:

  • Graphics Engine  – AMD Radeon™ RX 7900 XTX
  • Bus Standard  – PCI® Express 4.0 x16
  • DirectX  – 12 Ultimate
  • OpenGL  – 4.6
  • Memory  – 24GB GDDR6
  • Engine Clock  – Boost Clock*: Up to 2680 MHz
    – Game Clock**: 2510 MHz

    *Boost Clock is the maximum frequency achievable on the GPU running a bursty workload. Boost clock achievability, frequency, and sustainability will vary based on several factors, including but not limited to: thermal conditions and variation in applications and workloads.

    **Game Clock is the expected GPU clock when running typical gaming applications, set to typical TGP (Total Graphics Power). Actual individual game clock results may vary.

  • Stream Processors   – 6144
  • Compute Units   – 96
  • Memory Clock    – 20 Gbps
  • Memory Interface    – 384-bit
  • Resolution    – Digital Max Resolution: 7680×4320
  • Interface
    – 3 x DisplayPort™ 2.1*
    – 1 x HDMI™ 2.1

    *DisplayPort (DP) 2.1 on any one or two ports. DisplayPort (DP) 1.4a on any and up to 4 ports simultaneously.
  • HDCP    – Yes
  • Multi-view    – 4
  • Recommended PSU   – 1000W
  • Power Connector   – 3 x 8-pin
  • Accessories
    – 1 x Quick Installation Guide
    – 1 x Taichi White Post Card
    – 1 x Graphics Card Stand
  • Dimensions    – 345 x 140 x 61 mm, 3-slot
  • Net Weight   – 1900 g

Panamax Power360 over/under voltage protection – The best in class

0

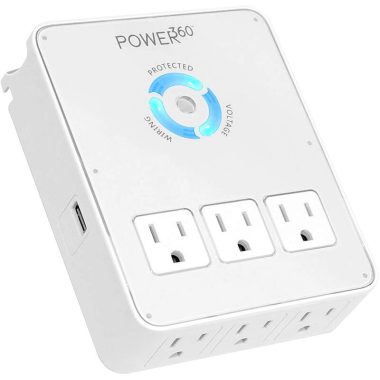
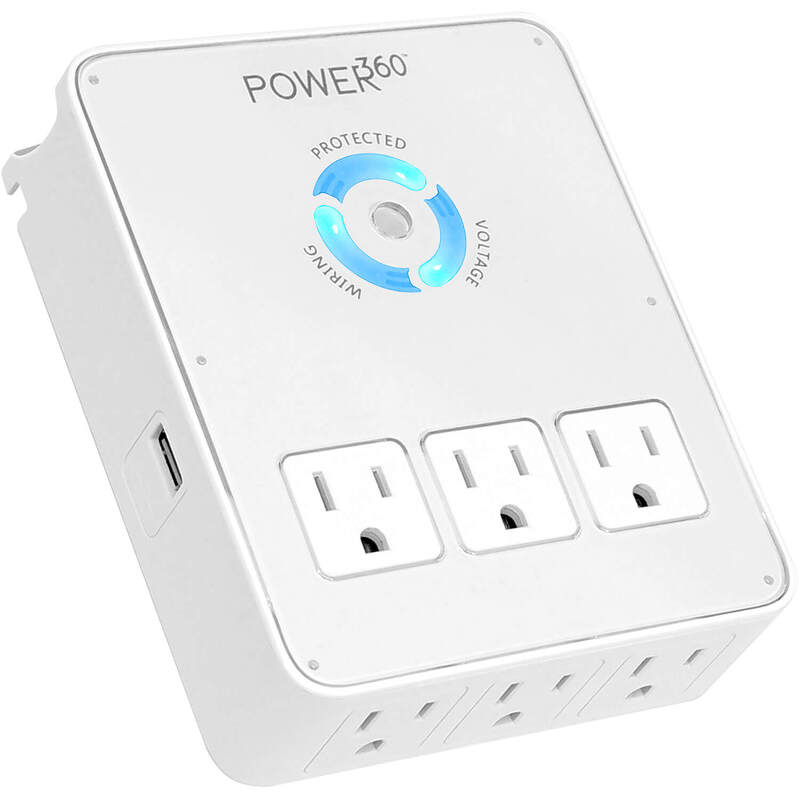
The Panamax Power360 P360-Dock offers a practical solution for safeguarding your electronics from harmful surges and spikes, especially in situations where traditional power strips cannot be used. This device fits over your AC wall outlet and can safely power up to six components, while also providing two USB charging ports that are protected. Additionally, the device comes with a convenient cradle where you can rest your phone or tablet while it charges.

The P360-Dock offers two layers of reliable protection for your equipment. In the event of a catastrophic power spike, such as a lightning strike, the Protect or Disconnect™ circuitry reacts almost instantly by switching off power to your devices, and then resets itself automatically when voltage returns to normal. Similarly, the SmartGuard feature provides protection against under-voltage (brownout) or over-voltage conditions by automatically disconnecting power until voltage returns to safe levels.

Panamax Power360 P360-Dock
Panamax Power360 P360-Dock – photo: Panamax

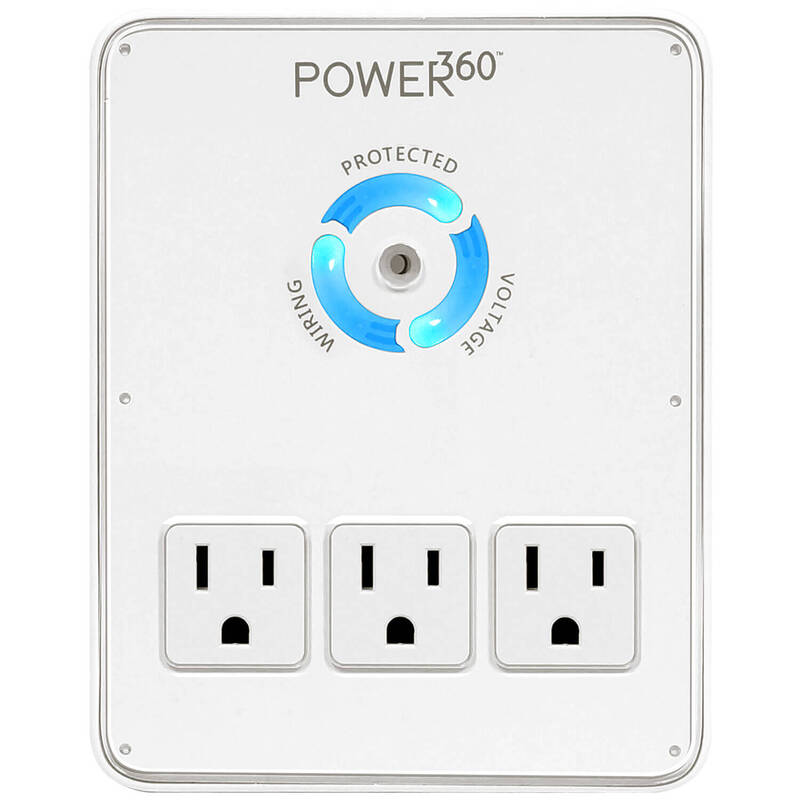
The Circle of Protection™ LED indicator on the front of the P360-Dock allows you to monitor the status of your protection, wiring, and voltage. This multi-color display provides easy-to-understand information at a glance, giving you a real-time report on the state of your electronics’ protection.

The Panamax Power360 P360-Dock is an excellent solution for protecting your electronics from harmful surges and spikes. This device offers 6 protected AC power outlets and two USB charging ports, each with a total capacity of 2.1 amps, allowing you to charge two phones at once or one tablet with ease.

One of the standout features of the P360-Dock is its space-saving design, which allows it to plug directly into a standard AC outlet, making it a convenient and practical option for any household or office space.

Additionally, the device is equipped with Protect or Disconnect circuitry, which automatically disconnects AC power to your equipment in the event of a catastrophic surge or spike, providing reliable and efficient protection for your devices. SmartGuard technology also offers active over/under voltage monitoring, ensuring that your electronics are safe from any power-related issues.

The Circle Of Protection LED display on the front of the P360-Dock is another great feature, which allows you to easily monitor the status of your protection, wiring, and voltage. The device also comes with a convenient charging cradle, providing a safe and stable place to hold your phone or tablet while it charges.Panamax Power360 P360-Dock

The P360-Dock offers reliable and efficient protection for your electronics with 1080-joule protection and a maximum current rating of 15 amps. It also comes with a lifetime warranty, giving you peace of mind knowing that your investment is protected for the long term. Panamax Power360 P360-Dock is a very useful product at an attractive price of $65.00.

Panamax Power360 specs:

Energy Dissipation: 1080 J

USB Charging
Ports: 2 USB Type-A
Removable Modules: No
Output Voltage: 5.0VDC +/- 0.5VDC
Output Current, per port: 1 A max
Output Current, total: 2 A max

General
  • Family     360 Series
  • Line Voltage        120 (Volts)
  • Number of Outlets         6
  • Outlet Descriptions               All 6 outlets filtered and surge protected
  • Control                    On/Off control to all outlets through power switch.
  • Compliance             UL 1449 VPR (pending UL) 500 V
  • USB Charging                         2 high capacity USB ports
  • Low Voltage Trigger           N/A
  • AC Power Cord                       N/APanamax Power360 P360-Dock--
AC Protection
  • AC Protection Technology                 Protect or Disconnect + Smartguard
    Active Over/Under Voltage Monitoring
    L-N, L-G, N-G Protection Modes
  • Undervoltage Shutoff           95 VAC +/- 5 VAC
  • Over-Voltage Shutoff                  140 VAC +/- 7 VAC
  • Maximum Current Rating                 15 (Amps)
Filtration
  • Filtration Technology              RFI/EMI Filtration
  • Signal Line Protection                No

Tips & Tricks On How To Reduce Netflix Data Usage

0

Netflix is a popular video streaming platform that allows users to watch their favorite movies, TV shows, and documentaries on-demand. However, streaming video can use a lot of data, which can be costly if you have a limited data plan or slow down your internet connection.

There is some tricks to reduce data usage while streaming Netflix:

  1. Adjust Playback Settings: Netflix allows users to adjust their playback settings. To change the settings, go to “Your Account” > “Playback Settings” and choose the option that best suits your needs. Reducing the streaming quality can significantly reduce data usage.
  2. Download Content: Downloading content for offline viewing can help reduce data usage, as it allows users to watch their favorite shows without streaming them. To download content on Netflix, tap the download icon next to the title you want to download.

    netflix
    Photo: Netflix
  3. Limit Usage: Limiting your Netflix usage to certain times of the day or for a specific number of hours can help reduce data usage. You can set a timer to remind yourself when to take a break from streaming.

    Limiting your Netflix usage can help reduce data usage and prevent you from unintentionally streaming more content than you intended. Here are some tips on how to limit your Netflix usage:

    • Set a time limit: Decide on how much time you want to spend watching Netflix and set a timer to remind you when it’s time to take a break.
    • Schedule your viewing: Set a specific time of day or week when you allow yourself to watch Netflix. This can help you avoid spending too much time watching TV.
    • Use parental controls: If you have kids, you can use parental controls to limit the amount of time they spend watching Netflix. You can also use this feature to restrict access to certain shows or movies.
    • Share your account: Consider sharing your Netflix account with friends or family members. This can help limit your own usage and save money on your subscription.
    • Take breaks: Give yourself regular breaks while watching Netflix. This can help you avoid binge-watching and reduce data usage.
  4. Use Wi-Fi: Whenever possible, connect to Wi-Fi to stream Netflix. This will help reduce data usage and provide a better streaming experience.
  5. Use a VPN: Using a VPN can help reduce data usage by compressing the data before it reaches your device. This can help reduce the amount of data used when streaming Netflix.

    Using a free VPN for Netflix is not recommended as it can result in poor streaming quality and possible violations of Netflix’s terms of service. Many free VPN services have limited bandwidth and slow server speeds, which can negatively affect your streaming experience on Netflix. Additionally, Netflix actively blocks VPNs and proxy services, so even if you find a free VPN that works with Netflix, it may not be reliable or sustainable.

    If you want to access Netflix content that is not available in your region, it is recommended to use a reputable paid VPN service that has fast server speeds and a large network of servers. This will provide you with a better streaming experience and reduce the risk of your VPN being blocked by Netflix. However, keep in mind that using a VPN to access content that is not available in your region may still violate Netflix’s terms of service, and may result in account suspension or termination.

  6. Turn off Autoplay: Autoplay can cause you to unintentionally stream more content than you intended. Turning off autoplay can help reduce data usage by limiting the amount of content you watch.

    Netflix’s autoplay feature is designed to automatically play the next episode of a TV series or a suggested video, which can sometimes lead to unintended streaming and increase data usage. However, you can easily turn off this feature by following these steps:

    • Log in to your Netflix account on a web browser.
    • Click on your profile icon located in the top right corner of the page.
    • Select “Account” from the dropdown menu.
    • Scroll down to the “Profile & Parental Controls” section and click on the profile that you want to modify.
    • Under the “Playback settings” section, click on the “Autoplay controls” option.
    • Choose the option “Off” to disable autoplay for previews and the next episode.

    That’s it! Once you’ve turned off autoplay, Netflix will no longer automatically play the next episode or suggest new content, which can help reduce your data usage and prevent you from accidentally streaming more content than you intended.

  7. Close Unused Apps: Closing other apps and programs on your device can help reduce data usage by freeing up bandwidth and reducing the strain on your device.

    Closing unused apps and programs on your device can help reduce data usage while streaming Netflix. This is because when multiple apps and programs are running simultaneously, they can consume valuable bandwidth and resources, which can slow down your internet connection and increase data usage. Here’s how you can close unused apps:

    On a Windows PC:

    1. Press Ctrl+Shift+Esc to open the Task Manager.
    2. Under the “Processes” tab, select the apps or programs that you want to close.
    3. Click on the “End Task” button to close the selected apps.

    On a Mac:

    1. Click on the Apple menu in the top-left corner of the screen.
    2. Select “Force Quit” from the dropdown menu.
    3. Choose the apps or programs that you want to close and click on the “Force Quit” button.

    On a mobile device:

    1. Swipe up from the bottom of the screen to access the app switcher.
    2. Swipe left or right to locate the app that you want to close.
    3. Swipe up on the app to close it.
  8. Use a Data Saving Browser: Some web browsers, such as Google Chrome, offer data-saving features that can help reduce data usage when streaming Netflix.

By implementing these tips, you can reduce your data usage while still enjoying your favorite Netflix content.

Top Notch Router – Linksys MR7350 + powerful Wi-Fi 6

0

I recently purchased the Linksys MR7350 Wi-Fi router and have been using it for several weeks now. In general, I am pleasantly surprised with the performance and features of the router.

One of the standout features of the MR7350 is its Wi-Fi 6 compatibility, which has noticeably improved the speed and reliability of my home network. I have experienced fewer buffering issues and faster download speeds when streaming video content or playing online games.

The MR7350 is also relatively easy to set up, thanks to the Linksys smartphone app, which guides users through the process step-by-step. The app also allows me to manage my network settings and perform speed tests, which is a convenient feature.

In terms of security, the MR7350 offers a range of features, including WPA3 encryption and automatic firmware updates. It also has a built-in VPN server, which allows me to access my home network securely when I am away from home.

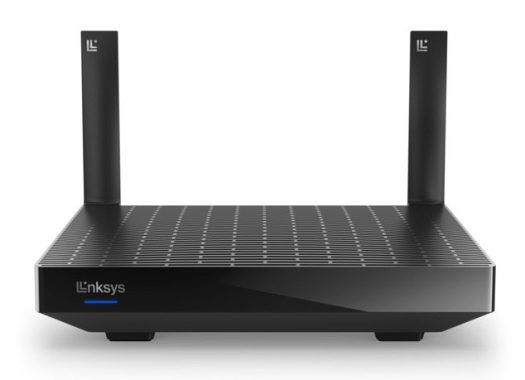
Linksys MR7350 Wi-Fi router
Linksys MR7350 Wi-Fi router – photo Linksys

However, I have noticed that the range of the MR7350 is somewhat limited, especially in larger homes or spaces with many walls or obstacles. In some areas of my home, the Wi-Fi signal is weaker, which can result in slower speeds or dropped connections.

Additionally, the MR7350 does not have as many advanced features as some of its more expensive competitors. For example, it does not have parental controls or advanced QoS settings, which may be a drawback for some users.


Linksys MR7350 setup

As someone who recently set up the Linksys MR7350 Wi-Fi router, I can say that the process was relatively easy and straightforward.

The first step was to download the Linksys smartphone app, which guided me through the setup process step-by-step. The app was easy to use and provided clear instructions for connecting the router to my modem and configuring my network settings.

One of the convenient features of the app was the ability to perform speed tests and check my network status directly from my smartphone. This allowed me to quickly diagnose any issues or connectivity problems and make adjustments as needed.Linksys MR7350 Wi-Fi router

Overall, the setup process took me around 20 minutes to complete, and I did not encounter any significant issues or difficulties. However, I did have to experiment with the placement of the router to find the optimal position for my home, as the Wi-Fi signal was somewhat weaker in certain areas.

Despite this minor issue, I am satisfied with the setup process of the Linksys MR7350 router. The smartphone app made it easy to configure my network settings and get up and running quickly, and the range of features and security options provided by the router make it a reliable and cost-effective option for home users.

I have had a really positive experience with the Linksys MR7350 Wi-Fi router. The reception is excellent and I’m getting incredible speeds, even on a “400Mbps” plan from xfinity/comcast, achieving speeds up to 480Mbps. This has exceeded my expectations and has made streaming video content and playing online games a breeze. It’s not expensive either, the price is approx $149.99.

In general, I am satisfied with my purchase of the Linksys MR7350 Wi-Fi router. It offers good performance, easy setup, and a range of useful security features, making it a solid mid-range option for users looking to upgrade their home network. However, users with larger homes or advanced networking needs may want to consider a more powerful and feature-rich router.Linksys MR7350 Wi-Fi router

WiFi Bands   –   Dual-Band


WiFi Speed       – AX


WiFi Technology     – WiFi 6 (802.11ax) , WiFi 5 (802.11ac)


Coverage         1,500 – 3,000 sq. ft.


Connected Devices         25 – 50


Router Type       Mesh Router


Number of Ethernet Ports

  • x1 Gigabit WAN
  • x4 Gigabit LAN


Wi-Fi Range        –  Up to 1700 Sq ft


LEDs          – Power/Status/Connection, Ethernet, Internet, USB


Dimensions (LxWxH)     – 215 x 155 x 56 mm (antennas folded down)


Weight   – 1.25 lbs. (567 g)


Operation Modes

  • Wireless Bridge
  • Wireless Router


Wi-Fi Speed  – AX1800 (574 + 1201)


Storage File System Support

  • APFS (Read Only)
  • FAT
  • FAT32
  • NTFS


Security Features

  • WPA2 Personal
  • WPA2/WPA3 Mixed Personal
  • WPA3 Personal


Wi-Fi Technology – AX1800 Mesh Dual-Band Gigabit 574 + 1201 Mbps


Easy Setup

  • Required for setup: (1) Internet connection with Modem. (2) Mobile device with Android 6.0.1 or iOS 11.4 and higher, Bluetooth preferred.
  • Simple and secured App based setup


Key Features

  • 1.2 GHz Quad-core Processor
  • 2 Adjustable Antennas
  • Automatic Firmware Updates
  • Dual-Band (2.4GHz + 5 GHz), 2×2 WiFi 6
  • Easily Expandable Mesh WiFi System
  • Easy App Controls
  • Intelligent Mesh Technology
  • OFDMA Technology
  • Seamless WiFi
  • Simultaneous Dual-Band
  • USB 3.0 port


Power Supply    Input: 100-240V ~ 50-60Hz; Output: 12V, 2A


Antennas    2x external adjustable antennas


Other Ports   Power, USB 3.0 Port


Processor    1.2 GHz Quad-core Processor


Wi-Fi Bands    2.4 and 5GHz (Simultaneous Dual-Band)


Network Standards

  • 802.11a
  • 802.11b
  • 802.11g
  • WiFi 4 (802.11n)
  • WiFi 5 (802.11ac)
  • WiFi 6 (802.11ax)

What to look for when buying a gaming monitor?

0

Don’t know where to start when it comes to buying a gaming monitor? We’ve got you covered. Our guide covers everything from response time and panel type to connectivity and adaptive-sync technology.

There are several key features to look for when buying a gaming monitor:

  1. Resolution: A higher resolution will provide sharper and more detailed visuals. Popular resolutions for gaming monitors include 1080p, 1440p, and 4K.

    Monitor resolution refers to the number of pixels that make up the display on a monitor. A higher resolution means that there are more pixels on the screen, resulting in a clearer and sharper image. This is particularly important for gamers who want to experience the game’s graphics and details to the fullest.

    The most common monitor resolutions for gaming are:

    • Full HD (1920 x 1080) – This is the minimum resolution that is recommended for gaming. While it’s not as high as other resolutions, it still offers a decent gaming experience and is a good option for those on a budget.
    • Quad HD (2560 x 1440) – This resolution offers a significant improvement in image quality over Full HD and is a popular choice for gamers who want a higher level of detail in their games.
    • Ultra HD/4K (3840 x 2160) – This resolution offers the highest level of detail and clarity and is ideal for gamers who want the most immersive gaming experience possible. However, it requires a powerful graphics card to run smoothly.

    It’s important to note that a higher resolution also requires a more powerful graphics card to run smoothly. When selecting a gaming monitor, it’s important to choose a resolution that is compatible with your graphics card and provides the best balance between image quality and performance.

    when buying a gaming monitor
    photo: Pixabay
  2. Refresh Rate: A higher refresh rate means smoother and more fluid motion on the screen. 60Hz is the standard, but gaming monitors can offer refresh rates of 144Hz, 165Hz, or even 240Hz.

    It is measured in Hertz (Hz), with a higher refresh rate resulting in a smoother and more responsive visual experience.

    For gaming, a higher refresh rate is essential, as it helps to reduce motion blur and input lag, which can affect the gameplay experience. The most common refresh rates for gaming monitors are:

    • 60Hz – This is the standard refresh rate for most monitors and is suitable for casual gaming.
    • 120Hz – This refresh rate offers a significant improvement over 60Hz and is a good option for gamers who want a smoother and more responsive experience.
    • 144Hz – This refresh rate is considered the minimum for competitive gaming, as it provides a noticeable improvement in motion clarity and responsiveness.
    • 240Hz – This refresh rate is the highest currently available and offers the smoothest and most responsive experience possible. It’s recommended for professional esports players and serious gamers who want the best possible experience.

    It’s important to note that a higher refresh rate requires a more powerful graphics card to achieve the best performance. When selecting a gaming monitor, it’s important to choose a refresh rate that is compatible with your graphics card and provides the best balance between performance and image quality.

  3. Response Time: This refers to how quickly the pixels on the screen can change colors. A lower response time will reduce motion blur and ghosting, leading to a clearer image during fast-paced action scenes. Response time refers to the time it takes for a pixel to change color from one shade to another. In gaming, a fast response time is important because it helps to reduce motion blur and ghosting, resulting in a clearer image during fast-paced action scenes.

    Response time is measured in milliseconds (ms), and the lower the number, the faster the response time. A response time of 1ms is considered to be excellent for gaming, while 5ms or higher may result in noticeable motion blur during fast-paced games. It’s important to note that response time can vary depending on the panel type of the monitor. TN panels typically have the fastest response times, while IPS and VA panels may have slightly slower response times. When selecting a gaming monitor, it’s important to consider the response time along with other key features such as resolution, refresh rate, and panel type to ensure the best gaming experience.

  4. Panel Type: There are three types of panels commonly used in gaming monitors: TN, IPS, and VA. TN panels offer the fastest response times, but poorer viewing angles and color accuracy. IPS panels offer better color accuracy and wider viewing angles, but slower response times. VA panels offer the best contrast ratios, but can suffer from motion blur and ghosting.

    There are three main types of panels commonly used in gaming monitors: TN (twisted nematic), IPS (in-plane switching), and VA (vertical alignment).

    TN panels are known for their fast response times, which make them a popular choice for competitive gaming. They also tend to be more affordable than IPS and VA panels. However, TN panels have poorer color accuracy and viewing angles compared to the other two panel types.

    IPS panels offer better color accuracy and wider viewing angles than TN panels. They are a great choice for gamers who prioritize image quality and visual fidelity over response time. However, IPS panels typically have slower response times than TN panels, which can result in motion blur and ghosting during fast-paced games.

    VA panels offer the best contrast ratios, which make them a popular choice for gamers who prioritize deep blacks and vivid colors. They also offer wider viewing angles than TN panels. However, VA panels can suffer from slower response times and visible motion blur during fast-paced games. When buying a gaming monitor, it’s important to consider the trade-offs between these panel types and choose the one that best suits your gaming needs and preferences.

  5. Size: The size of the monitor can impact your overall gaming experience. A larger screen will provide a more immersive experience, but may be more difficult to fit on a desk. A smaller screen may be more suitable for competitive gaming, as it allows for easier tracking of on-screen objects.
  6. Adaptive-Sync Technology: This technology helps to reduce screen tearing and stuttering by synchronizing the monitor’s refresh rate with the graphics card’s output. G-Sync is compatible with Nvidia graphics cards, while FreeSync is compatible with AMD graphics cards. Adaptive-Sync technology is designed to reduce screen tearing and stuttering during gaming by synchronizing the monitor’s refresh rate with the graphics card’s output. This helps to ensure that the monitor and graphics card are working together seamlessly, resulting in a smoother and more enjoyable gaming experience. There are two main types of Adaptive-Sync technology: G-Sync and FreeSync. G-Sync is a proprietary technology developed by Nvidia, while FreeSync is an open standard developed by AMD. Both technologies work by adjusting the monitor’s refresh rate to match the output of the graphics card, which eliminates screen tearing and stuttering.

    G-Sync is only compatible with Nvidia graphics cards, while FreeSync is compatible with AMD graphics cards. However, some FreeSync monitors also support G-Sync compatibility, allowing them to work with Nvidia graphics cards as well.

    When selecting a gaming monitor, it’s important to consider whether or not you need Adaptive-Sync technology. If you’re experiencing screen tearing or stuttering during gameplay, then Adaptive-Sync technology may be worth considering. However, if you’re not experiencing any issues, then it may not be necessary to invest in a monitor with Adaptive-Sync technology.

  7. Connectivity: Ensure that the monitor has the necessary ports for connecting to your gaming setup, such as HDMI, DisplayPort, or USB-C.

Ultimately, the best gaming monitor for you will depend on your personal preferences and budget. Consider which features are most important to you and choose a monitor that meets those requirements.