Home Blog Page 54

How to fix: Netflix – Black screen with no sound on Smart TVs or PC

0

If you’re experiencing a black screen with no sound while trying to stream Netflix on your Smart TV or PC, you can try the following troubleshooting steps:

  • Check your internet connection: Ensure that your Smart TV or PC is connected to the internet and that your connection is stable. You can test your internet connection by accessing other websites or streaming services to see if they work properly. If your internet connection is weak or unstable, it can affect the streaming quality of Netflix.

    Netflix
    Netflix – photo: Pixabay
  • Restart your devices: Begin by restarting both your Smart TV and your internet router. Turn off your TV and unplug it from the power source. Also, turn off your router and unplug it. Wait for about 30 seconds, then plug in your router and turn it on. Finally, plug in your TV and turn it on. Launch Netflix again and see if the issue is resolved.
  • Update the Netflix app: Ensure that you have the latest version of the Netflix app installed on your Smart TV or PC. Outdated versions of the app can sometimes cause playback issues. Visit the app store or the official website for your device and check for any available updates for the Netflix app. If an update is available, install it and try streaming Netflix again.
  • Clear Netflix app data or cache: If you’re using a Smart TV, try clearing the app data or cache for the Netflix app. Go to the settings or apps section on your TV, find the Netflix app, and look for the option to clear data or cache. This process may vary depending on the TV’s manufacturer and model. After clearing the data or cache, relaunch Netflix and check if the issue is resolved.
  • Check HDMI or display cable connections: If you’re using an HDMI cable to connect your Smart TV or PC to another device, such as a receiver or soundbar, ensure that the cable is securely connected to both devices. Try disconnecting and reconnecting the HDMI cable to make sure it is properly seated. Additionally, try using a different HDMI cable to rule out any cable-related issues.
  • Adjust display settings: On your Smart TV or PC, adjust the display settings to ensure they are compatible with the TV’s or monitor’s capabilities. For PCs, right-click on the desktop, select “Display settings,” and verify that the resolution and refresh rate are correctly set. On Smart TVs, access the display or picture settings and make any necessary adjustments.
  • Update graphics drivers: If you’re using a PC, outdated or incompatible graphics drivers can cause display and audio issues. Visit the website of your graphics card manufacturer (e.g., NVIDIA, AMD, Intel) and download the latest drivers for your specific model. Install the drivers and restart your PC before trying to stream Netflix again.
  • Disable VPN or proxy: If you’re using a VPN or proxy service on your PC or Smart TV, disable it and try streaming Netflix without it. Some VPNs or proxies can interfere with the streaming service and cause playback issues.
  • Contact Netflix support: If the issue persists after trying the above steps, it’s best to reach out to Netflix support directly. They have access to specific account and technical information and can provide further assistance in troubleshooting the issue.

When contacting Netflix support, provide them with the details of the issue, including the specific error message, device information, and any troubleshooting steps you have already taken. This will help them in their investigation and provide you with more targeted support.

By following these steps, you should be able to address the black screen with no sound issue and resume streaming Netflix on your Smart TV or PC.

How to fix: Netflix and device both freeze?

When both Netflix and your device freeze simultaneously, it can be a challenging issue to troubleshoot. However, you can try the following steps to resolve the problem:

  1. Restart your device: Begin by restarting your device. If it’s a Smart TV, unplug it from the power source and wait for about 30 seconds before plugging it back in. If it’s a streaming device, game console, or computer, power it off completely and then turn it on again. Restarting can help clear any temporary glitches that may be causing the freeze.
  2. Check your internet connection: Ensure that your device is connected to a stable internet connection. If possible, try connecting to a different network or restarting your router. A weak or unstable internet connection can cause freezing issues with Netflix.
  3. Update Netflix app or firmware: Make sure that both your Netflix app and your device’s firmware are up to date. Outdated software can sometimes lead to compatibility issues. Visit the app store or the manufacturer’s website to check for any available updates and install them if necessary.
  4. Clear app cache or data: If you’re using a mobile device or a Smart TV, try clearing the cache or data of the Netflix app. This can help resolve any corrupted data that might be causing the freeze. Refer to the device’s settings or app management section to find the option for clearing cache or data.
  5. Check for device overheating: Overheating can cause both Netflix and your device to freeze. Ensure that your device is not overheating by keeping it in a well-ventilated area. If necessary, clean any dust from vents or use external cooling solutions.
  6. Uninstall and reinstall the Netflix app: If the freeze persists, try uninstalling the Netflix app from your device and then reinstalling it. This can help eliminate any app-related issues or corrupted files. Visit the app store or the manufacturer’s website to download the latest version of the Netflix app.
  7. Try a different device: If possible, try streaming Netflix on a different device to determine if the freezing issue is specific to your current device. If Netflix works fine on another device, it suggests a device-specific problem that may require further troubleshooting or repair.
  8. Contact device or Netflix support: If none of the above steps resolve the freeze issue, it’s best to reach out to the technical support of your device manufacturer or Netflix support. They can provide specific guidance based on your device and account details and help resolve the problem.

When contacting support, provide them with the details of the issue, including the device model, operating system version, and any error messages you may have encountered. This information will assist them in diagnosing the problem more effectively.

By following these steps and seeking appropriate support, you should be able to resolve the freezing issue with Netflix and your device.


How to fix: Netflix Error TVQ-ST-103 or TVQ-ST-131

0

Netflix Error TVQ-ST-103 or TVQ-ST-131 typically occurs when there is an issue with the app or the data stored on your streaming device. Here are some steps you can try to resolve this error:

  • Restart your streaming device: Begin by restarting your streaming device (smart TV, game console, streaming box, etc.). Turn off the device, unplug it from the power source, wait for about 30 seconds, and then plug it back in. Turn on the device and try launching Netflix again.
  • Clear Netflix app data (smart TVs): If you’re using a smart TV, try clearing the app data for Netflix. Access the settings or app management section on your TV, find the Netflix app, and look for the option to clear data or cache. This process may vary depending on your TV’s manufacturer and model. After clearing the data, relaunch Netflix and check if the error is resolved.

    netflix
    Photo: Netflix
  • Reinstall the Netflix app: If clearing the app data didn’t work, uninstall the Netflix app from your streaming device and then reinstall it. Access the app management section on your device, locate Netflix, and choose the option to uninstall. Once uninstalled, visit the app store or official website for your device, search for Netflix, and reinstall the app. Launch Netflix again and see if the error persists.
  • Update the Netflix app: Ensure that you have the latest version of the Netflix app installed on your streaming device. Outdated versions can sometimes cause compatibility issues. Visit the app store or official website for your device, check for any available updates for the Netflix app, and install them if necessary.
  • Check your internet connection: Make sure your streaming device is connected to the internet and that your internet connection is stable. You can try accessing other websites or using other streaming services to verify the connectivity. If you’re using a Wi-Fi connection, consider moving your device closer to the router or connecting via an Ethernet cable for a more stable connection.
  • Test Netflix on a different device: If possible, try accessing Netflix on a different device, such as a smartphone, tablet, or computer. This can help determine if the issue is specific to your streaming device or if it’s a broader problem. If Netflix works fine on another device, it suggests a device-specific issue that needs to be addressed.
  • Contact Netflix support: If the error persists after trying the above steps, it’s best to reach out to Netflix support directly. They have access to specific account and technical information and can provide further assistance in troubleshooting the issue.

When contacting Netflix support, provide them with the exact error code TVQ-ST-103 or TVQ-ST-131 and any other relevant information about your streaming device and network setup. This will help them diagnose and resolve the issue more effectively.

From Bitcoin to Altcoins: A Short Guide to the World of Digital Cryptocurrencies

0

Step into the realm of digital finance as we guide you through the evolution of cryptocurrencies. From Bitcoin to altcoins, gain a fundamental understanding of these virtual assets and their role in shaping the future of global finance.

What is altcoin?

Altcoin refers to cryptocurrencies other than Bitcoin. Many altcoins are essentially modified versions of bitcoin with limited and unremarkable changes. Nevertheless, numerous altcoins promote themselves as superior alternatives to bitcoin. The initial success of bitcoin paved the way for other cryptocurrencies to achieve their own accomplishments.

The term “altcoin” is a combination of “alternative” and “coin.”

Altcoins are primarily marketed by addressing some of bitcoin’s potential limitations while retaining its core functionalities that attract bitcoin users.

Since altcoin encompasses all cryptocurrencies except bitcoin, there is a wide variety of altcoins in existence.

Digital Cryptocurrencies
Digital Cryptocurrencies – photo: Pixabay

Like bitcoin, most altcoins operate on a decentralized peer-to-peer network and involve the process of block mining, where users solve problems to earn cryptocurrency rewards.

Despite these similarities, Altcoins can differ significantly from Bitcoin. For instance, some altcoins employ different proof-of-work algorithms, alternative methods for users to contribute energy to mining blocks, and enhancements to user anonymity.

Notable examples of well-established altcoins include Litecoin, Ethereum (the second-largest cryptocurrency by market share after bitcoin), and Ripple.

Currently, Litecoin is considered the primary competitor to bitcoin. While its coding closely resembles that of bitcoin, there are notable differences. Litecoin approves a mined block approximately every two and a half minutes, compared to bitcoin’s ten-minute interval. Additionally, bitcoin has a maximum coin limit of twenty-one million, whereas Litecoin allows for a maximum of eighty-four million coins. Moreover, Litecoin employs a distinct proof-of-work method, making it more challenging for small groups to dominate the Litecoin blockchain.

Which 5 altcoins have the potential to achieve a level of success similar to Bitcoin?

At first glance, Ethereum and Bitcoin may appear similar, but they have significant differences under the surface. Originally intended as an enhancement to Bitcoin, Ethereum evolved into a separate project aimed at overcoming the limitations and frustrations of the Bitcoin platform. Ethereum can be seen as the improved version 2.0 of Bitcoin.

While Bitcoin is a cryptocurrency, Ethereum goes beyond that by incorporating smart contract capabilities. This enables Ethereum to serve as a platform for blockchain projects in ways that are not feasible with Bitcoin. With increasing industry support, it is becoming increasingly likely that Ethereum will surpass Bitcoin by a substantial margin. Fundamentally, Ethereum is a superior product and will enjoy greater success than Bitcoin.

Currently, Ethereum is the only altcoin truly challenging Bitcoin’s dominance. Although Bitcoin and Ethereum are safer choices, there are several smaller altcoins showing potential for stronger growth and higher returns.

Ethereum Classic (ETC): Formerly viewed as a questionable coin funded by hackers, ETC has undergone remarkable transformation. Supported by IOHK, a company founded by Charles Hoskinson, one of Ethereum’s creators, ETC has forged its own distinct ideology and development roadmap. Despite its turbulent beginnings, the price of ETC has been on the rise and is projected to continue its upward trajectory.

MobileGo (MGO): In the altcoin market tailored for gaming, MobileGo stands out as a frontrunner. It’s only a matter of time before a cryptocurrency firmly establishes itself within the gaming community. As mainstream adoption progresses, the price of MobileGo is expected to witness significant growth.

ZenCash (ZEN): Among the altcoins employing zero-knowledge encryption, Zcash (ZEC) holds the most prominence. However, ZenCash presents a lesser-known alternative with a smaller market capitalization. Although it faced challenges during its launch and experienced developer controversies leading to a sell-off, ZenCash has ambitious plans and continues to advance in its development. The forthcoming introduction of their inaugural differentiating feature, Secure Nodes, is anticipated to garner attention and propel the price upwards.

Honorable Mention: IOTA (MIOTA): The Internet of Things (IoT) industry is expanding rapidly and holds immense potential. IOTA aims to be a cryptocurrency tailored to meet the specific requirements of IoT. While the concept of IOTA is promising, its implementation raises some doubts. The Tangle technology is intriguing, but the unproven economic incentivization model raises questions.

It’s important to note that investing in altcoins carries risks, and thorough research and analysis should be conducted before making any investment decisions.

How do I access archived photos on iOS devices?

0

To access archived photos on iOS devices, you can follow these steps:

  1. Open the Photos app on your iOS device.
  2. Tap on the “Albums” tab located at the bottom of the screen.
  3. Scroll down until you find the section called “Other Albums” and look for an album named “Recently Deleted.”
  4. Tap on the “Recently Deleted” album to open it.

In this album, you will find photos and videos that have been deleted but are still recoverable for a certain period of time. iOS keeps these items in the “Recently Deleted” album for 30 days before permanently removing them.

access archived photos on iOS devices
Access archived photos on iOS devices – photo: Pixabay

If you want to restore an item, follow these additional steps:

  1. Open the photo or video you wish to restore.
  2. Tap on the “Recover” button located at the bottom-right corner of the screen.
  3. Confirm by tapping on “Recover Photo” or “Recover Video” in the pop-up dialog.

After following these steps, the photo or video will be restored to your main Photos library, and you will be able to access it as usual.

It’s important to note that if the photos were deleted more than 30 days ago or if you have manually emptied the “Recently Deleted” album, the photos may no longer be recoverable through the device’s native methods. In such cases, you may consider restoring from a backup if you have one available.

Is there some app to access archived photos on iOS devices?

There isn’t a specific app dedicated solely to accessing archived photos on iOS devices since the process is typically handled within the built-in Photos app. However, if you have previously backed up your iOS device using iCloud or iTunes, you can use third-party software to extract and access archived photos from the backup file.

There are several reputable third-party applications available for both Windows and Mac platforms that can help you extract photos from an iOS backup. Some popular options include iExplorer, Dr.Fone, and iMazing. These tools allow you to browse and extract various types of data, including photos, from your iOS device’s backup.

When using third-party software, it’s important to download and use trusted applications from reputable sources to ensure the security and integrity of your data. Always exercise caution and research the software before proceeding.

Remember, it’s recommended to follow the official methods provided by Apple and use the Photos app and iCloud backups for accessing and managing your photos. Third-party software should only be used if you have a specific need to extract data from a backup.

Review: 45-inch OLED monitor LG 45GR95QE-B

0

Introducing the LG 45GR95QE-B Monitor: A Closer Look at its Features

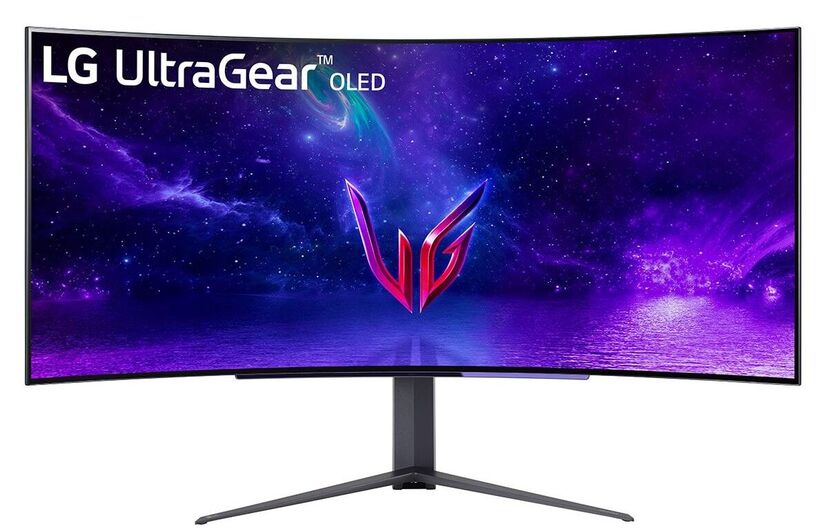
The LG 45GR95QE-B monitor stands out with its exceptional build quality, boasting a solid construction using premium materials. Meticulously assembled, this monitor showcases no apparent flaws in its design. The bezels are seamlessly integrated with the screen, ensuring a cohesive and polished appearance. The monitor’s stand is crafted from sturdy metal, while the remainder of the body is composed of durable plastic.

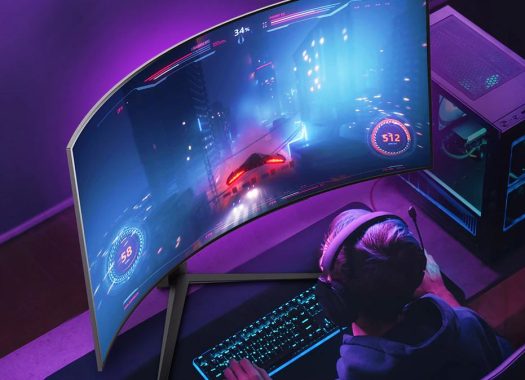
The visual appeal of the LG 45GR95QE-B monitor is undeniable, offering an unparalleled gaming experience when positioned optimally. However, its design lacks versatility, making it less suitable for basic desktop use due to the aggressive curve. Additionally, watching movies can be challenging due to the distortion around the curve when seated too far back.

In terms of connectivity, the LG OLED 45 features a standard set of ports, including two HDMI 2.1 and a DisplayPort 1.4 for inputs, along with two USB 3.2 Gen 1 connections via the built-in USB hub. Unlike the Samsung Neo G8, LG opts for a rear placement of the ports, protruding slightly but not significantly problematic given the monitor’s size.

Audio options stand out with a convenient headphone jack supporting DTS Headphone:X virtual surround sound located under the front of the display. An optical audio jack is also available behind the monitor. While the UltraGear OLED 45 lacks built-in speakers, connecting external speakers or a soundbar is a straightforward solution.

Despite the excellent ports, a notable drawback lies in the control mechanism. Similar to the UltraGear OLED 27, accessing the on-screen display (OSD) requires the use of the included remote. While it provides standard settings, including a few color profiles, the full menu remains inaccessible without the remote.

However, it’s worth noting a couple of downsides. The monitor tends to wobble easily, which may pose a challenge if your desk is prone to movement, particularly during intense typing sessions. Additionally, the reflective housing beneath the bottom bezel can be distracting if exposed to bright light sources nearby.

The LG 45GR95QE-B monitor features a V-shaped stand that adds to its overall aesthetic appeal but requires a spacious desk due to its size. It’s also worth mentioning that the monitor, together with its stand, carries considerable weight, making it advisable to have assistance when lifting and positioning it. The thickness of the monitor from the center to the back of the stand measures 14.0″ (35.5 cm).

LG 45GR95QE-B Monitor

One standout feature of the LG 45GR95QE-B is its remarkable horizontal viewing angle. While the image may start to fade at extremely wide angles, you can comfortably view the screen from various perspectives without experiencing any significant issues. The vertical viewing angle is equally impressive, allowing for unobstructed visibility even when the monitor is mounted above eye level or when viewed from a standing position. Although the top of the screen appears slightly brighter when looked at from above, this discrepancy is hardly noticeable.

The monitor’s color accuracy is truly exceptional, particularly after a full calibration. However, it’s worth noting that calibrating the monitor may result in slightly oversaturated colors. The color temperature and gamma closely align with their intended targets, ensuring minimal visible inaccuracies in most colors and white balance. In fact, even without calibration, the image maintains a high level of accuracy. It’s recommended to perform calibration only if achieving perfect gamma and white balance is crucial. The LG 45GR95QE-B offers an outstanding SDR color gamut, delivering flawless coverage of the widely-used sRGB color space. It also performs admirably in the Adobe RGB color space, commonly employed in photo editing. However, there may still be slight deviations in reds and greens within the Adobe RGB spectrum.

When it comes to variable refresh rate (VRR) support, the LG 45GR95QE-B excels. It seamlessly functions with both DisplayPort and HDMI connections, ensuring a smooth and uninterrupted experience. Moreover, the monitor supports Low Framerate Compensation (LFC), allowing VRR to remain effective even when running games with low frame rates.

With a commendable response time at 60Hz, the LG 45GR95QE-B ensures minimal motion blur. While most transitions exhibit quick response times, some instances of noticeable overshoot and inverse ghosting may occur, particularly in darker scenes. It’s important to be aware of this potential distraction when engaging with content that involves darker visuals.

LG 45GR95QE-B Monitor
-LG 45GR95QE-B Monitor- photo: LG

The LG 45GR95QE monitor impresses with its low input lag across most picture modes, ensuring a highly responsive gaming experience. Whether you have Variable Refresh Rate (VRR) enabled or disabled, and regardless of whether you’re using a DisplayPort or HDMI connection, the input lag remains consistently low. However, it’s important to note that certain picture modes, which are not optimized for gaming and disable the Dynamic Action Sync (DAS) feature, experience an increase in input lag. These modes include “Vivid,” “Reader,” “HDR Effect,” “sRGB,” “Color Weakness,” “Calibration 1,” and “Calibration 2.” Below are the input lag measurements in the “Vivid” mode:

  • Native Resolution @ Max Refresh Rate: 13.7 ms
  • Native Resolution @ 120Hz: 21.7 ms
  • Native Resolution @ 60Hz: 31.4 ms

Regarding compatibility, the LG 45GR95QE does not encounter any issues when used with the PS5. However, it’s worth mentioning that since the PS5 does not support ultrawide gaming, black bars will be visible on the sides of the screen due to the monitor’s ultrawide aspect ratio. To ensure that 4K @ 120Hz appears as compatible on the Video Output Information page, it may be necessary to first enter a game with VRR enabled, allowing 4K @ 120Hz to function properly. Despite not being a native 4K monitor, the LG 45GR95QE downscales 4K signals, resulting in a sharper image compared to a native 1440p signal.

LG 45GR95QE-B: Versatile Performance for Office and Gaming

The LG 45GR95QE-B monitor offers decent performance for office use, although it may not be the most ideal choice. It boasts wide viewing angles and impressive reflection handling, making it suitable for well-lit office environments. However, it falls short in terms of brightness, as it may struggle to combat glare effectively. Additionally, the monitor’s low pixel density results in mediocre text clarity, making reading text a bit challenging at times. Another aspect to consider is its aggressive 800R curve, which can take some adjustment and may cause straight lines in documents to appear distorted. It’s important to note that OLED panels, like the one in this monitor, are susceptible to burn-in when exposed to the same static elements over an extended period, such as a taskbar that remains on the screen all day.

On the other hand, the LG 45GR95QE-B monitor truly shines when it comes to gaming. Its impressive 240Hz refresh rate is perfect for high-frame-rate gaming, and it also supports FreeSync VRR and is G-SYNC compatible, effectively reducing screen tearing. With low input lag, gaming on this monitor feels responsive, and its fast response time ensures smooth performance with most signals. The OLED panel delivers perfect blacks, which greatly enhances the gaming experience, particularly in dark room settings.

Cons of the LG 45GR95QE-B Monitor:

  • Prone to burn-in: OLED panels, including the one in this monitor, are susceptible to burn-in when static elements are displayed for prolonged periods. This can be a concern if you frequently have static elements on the screen, as it may result in permanent image retention.
  • Matte coating introduces haziness: The monitor’s matte coating, while intended to reduce glare, can introduce a slight haziness to the display. This may affect the overall visual clarity, especially when viewing content that requires high levels of detail.
  • Text clarity can be mediocre: Due to the monitor’s low pixel density, text clarity may not be optimal. Reading text can be challenging at times, as the characters may appear less sharp and clear compared to displays with higher pixel densities.
  • Adjustment required for aggressive 800R curve: The monitor’s aggressive 800R curve may take some time to get used to, especially when viewing documents or content with straight lines. Straight lines may appear distorted due to the curved nature of the display.

It’s important to consider these cons in relation to your specific needs and preferences before making a purchasing decision.

A 45-inch OLED Gaming Monitor with Impressive Features

The LG 45GR95QE-B is a noteworthy addition to the gaming monitor market, featuring a 45-inch OLED display, a 240Hz refresh rate, and a 3440×1440 resolution. It stands out as one of the first OLED gaming monitors in this size category, providing competition to the Corsair XENEON Flex 45WQHD, which also utilizes the same LG Display panel. However, unlike the bendable panel of the XENEON Flex, the 45GR95QE-B boasts an aggressive 800R fixed curve, which may require some adjustment time to get accustomed to.LG 45GR95QE-B Monitor

In terms of gaming features, this model doesn’t disappoint. It offers FreeSync variable refresh rate (VRR) support, ensuring smoother gameplay, along with G-SYNC compatibility for enhanced tear-free visuals. Furthermore, the monitor benefits from HDMI 2.1 bandwidth, enabling high-speed connectivity. It belongs to the same lineup as the LG 27GR95QE-B and shares the same matte screen coating, which helps reduce glare and reflections.

It’s essential to note that OLED displays are prone to burn-in if exposed to static elements for extended periods. However, the LG 45GR95QE-B includes specific settings designed to minimize this risk.

 LG 45GR95QE-B
LG 45GR95QE-B

The LG 45GR95QE-B presents a compelling option for gamers seeking a large, high-performance OLED monitor. With its impressive refresh rate, resolution, gaming features, and burn-in reduction settings, it offers an immersive gaming experience that is sure to captivate enthusiasts. LG 45GR95QE-B monitor price: $1,499.99

    • Screen Size  44.5″
    • Curved:   Yes
    • Curvature:   800R
    • Display Type   OLED
    • Color Gamut (Typ.)   DCI-P3 98.5%
    • Color Depth (Number of Colors)   1.07B
    • Pixel Pitch (mm)   84 PPI
    • Response Time (GTG)     0.03ms (GtG)
    • Refresh Rate      240Hz
    • Aspect Ratio   21:9
    • Display Resolution:  QHD
    • Resolution    3440 x 1440
    • Brightness   200 cd/m²
    • Contrast Ratio    1500000:1 (Typ.)
    • Viewing Angle    178º (R/L), 178º (U/D)
    • Surface Treatment     Anti-Glare, Low-Reflection of the front polarizer
    • Peak Brightness (Typ.)    1000cd/m²(@HDR 3% APL)
    • Peak Brightness (Min.)    800cd/m² (@HDR 3% APL)

XPG Wins Three 2023 Red Dot Design Awards

0

XPG, a leading provider of high-performance products for gamers and tech enthusiasts, has won three Red Dot Design Awards in the Product Design category for 2023. Check out the award-winning XPG PCIe Gen5 SSD, LANCER DDR5 Memory Series, and VALOR AIR MERA EDITION here.

XPG, a provider of systems, components, and peripherals for Gamers, Esports Pros, and Tech Enthusiasts, has announced that it has won three Red Dot Design Awards in the Product Design category for its XPG PCIe Gen5 SSD, XPG LANCER DDR5 Memory Series, and VALOR AIR MERA EDITION. These products were recognized for their outstanding design and innovative features.

The XPG PCIe Gen5 SSD supports the latest Intel PCIe 5.0 high-speed bus and has sequential read and write speeds of up to 12,000 MB/s. It is the first SSD to introduce a carbon surface crystallization process in heatsink production, which provides efficient heat dissipation and product volume balance. The SSD’s built-in micro-fan and convective heatsink design effectively and quickly dissipate thermal energy, reducing the controller temperature by approximately 26%. The XPG PCIe Gen5 SSD is relatively thin and can be installed in the M.2 expansion slot of the PS5. The surfacing technique of the SSD adopts a new NIL (Nano Imprinting Lithography) manufacturing process, which is sustainable for the environment and protects the earth.

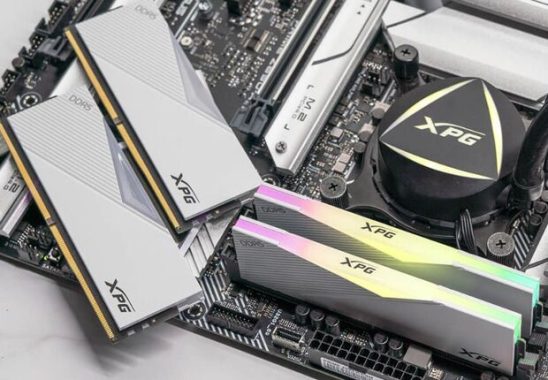
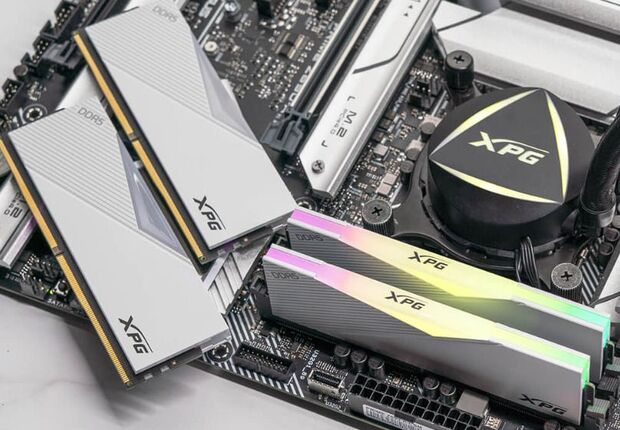
The XPG LANCER DDR5 Memory Series features high-quality ICs and PCBs that ensure uncompromised performance and reliable overclocking, making it ideal for gamers and overclockers. The memory modules can deliver performance of up to 7200MT/s and come with or without RGB lighting. The LANCER is available in two heat sink color options including Midnight Black and Snow White. The XPG LANCER RGB casing design features geometric line detail, a carbon black aluminum heat sink, and silver inlay. The heatsink was reworked during design to fit XPG’s overall aesthetic and production made more environmentally friendly.

LANCER RGB DDR5 DRAM
LANCER RGB DDR5 DRAM – photo: ADATA

The XPG VALOR AIR MERA EDITION is a special edition XPG VALOR AIR chassis that features XPG anime ambassador “Mera” in its primary design language and as a constant across all its design elements. The chassis’ dual-color contrast offers a striking visual differentiation between Mera’s signature living coral and the black of her suit, symbolizing both her youth and impulsivity, as well as balance and style. The VALOR AIR’s compact form factor remains incredibly efficient in terms of thermal performance due to its dynamic mechanical design. In addition, the chassis’ compact dimensions neither compromise its high level of hardware compatibility nor the selection and installation of graphic cards.

The Red Dot Design Award is one of the world’s most prestigious and valued acknowledgements of quality and design excellence, evaluating the best product designs from manufacturers and designers worldwide. XPG provides a full range of products from systems, components, peripherals to devices, and develops them with the highest standards of stability, reliability, and performance in mind. The company also plays an active role in sponsoring and supporting esports events and teams globally to realize extreme gaming experiences at the highest levels.

JBL Quantum 810 Wireless gaming headset – Review

0

The JBL Quantum 810 wireless gaming headset is a premium-quality headset that offers a fantastic gaming experience. The over-ear, closed-back design provides excellent noise isolation and extended bass response, and the high-res certified 50mm neodymium drivers deliver precise, detailed sound with deep bass emphasis.

One of the standout features of this headset is JBL’s QuantumSOUND signature, which is tuned for immersive gaming sound with hard-hitting effects. The active noise cancellation feature senses and blocks out external distractions, allowing gamers to fully immerse themselves in the game.

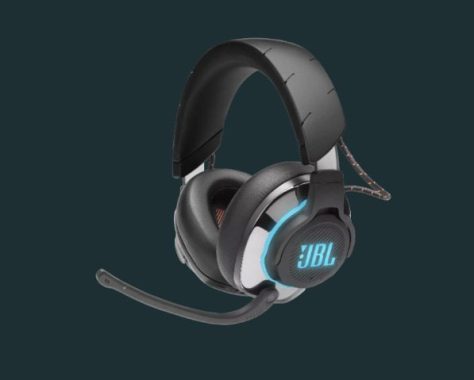
The durable headband with a snug, secure fit, combined with premium leather earpads and headband with extra-thick memory foam, offers ultimate comfort even during long gaming sessions. The LED earcup logos and linings with RGB lighting effects add a touch of style to the headset.

JBL Quantum 810 wireless gaming headset

The built-in unidirectional boom mic with noise suppression technology allows for clear communication with other players, and the flip mic can be quickly muted for privacy. The USB-C wireless transmitter is compatible with PS4, PS5, Nintendo Switch, PC, and Mac, while the 3.5mm stereo audio connection is compatible with controllers for PlayStation® and Xbox™, Nintendo Switch in handheld mode, PC, and Mac.

The JBL QuantumENGINE software and surround sound are other notable features of this headset. The software can be downloaded for free on PC and allows for easy adjustment of EQ, mic settings, RGB lighting, and more. The enhanced JBL QuantumSURROUND offers immersive 3D sound for PC, and the DTS Headphone:X v2.0 virtual surround sound adds to the overall gaming experience.

The easy-to-use controls built into the headset include a volume dial and dedicated power, noise-cancellation, and Bluetooth buttons. The dial for game/chat volume mix is Discord-compatible, and the 3.5mm jack allows for wired listening. The USB-C charging input is another convenient feature that allows gamers to continue playing while the headphones charge.

The JBL Quantum 810 wireless gaming headset is an exceptional headset that offers high-quality sound, comfort, and convenience. With a battery life of 43 hours and a charging time of 3.3 hours, this headset is an excellent choice for serious gamers who want the best gaming experience possible.JBL Quantum 810 wireless gaming headset

While the JBL Quantum 810 wireless gaming headset has many great features, there are a few potential downsides to consider:

  1. Price: The JBL Quantum 810 is a premium headset, so it may not be the best option for gamers on a budget. ($199.95)
  2. Size and weight: The over-ear design of the headset, combined with the extra padding and materials used for comfort, can make the headset feel somewhat heavy and bulky, which may not be ideal for all users.
  3. Compatibility limitations: While the headset is compatible with a wide range of devices, there may be some compatibility limitations with certain devices or operating systems. For example, some users have reported issues with the headset not working properly on Xbox consoles.
  4. Surround sound limitations: While the headset does offer both JBL QuantumSURROUND and DTS Headphone:X v2.0 virtual surround sound, some users may find that the surround sound experience is not as immersive as they would like.
  5. Limited Bluetooth features: While the headset does have built-in Bluetooth 5.2 for wireless music listening and phone calls, some users may find that the Bluetooth functionality is limited compared to dedicated Bluetooth headphones, as it is primarily intended for use during gaming.

Here are some pros of the JBL Quantum 810 wireless gaming headset:

  1. Low-latency wireless USB transmitter: The USB-C wireless transmitter provides a low-latency 2.4 GHz wireless connection with the headphones, which can help minimize lag and delay during gaming.
  2. High-quality audio: The JBL Quantum 810 features high-res certified 50mm neodymium drivers that deliver precise, detailed sound with deep bass emphasis. The headset is also equipped with JBL’s QuantumSOUND signature, which is tuned for immersive gaming sound with hard-hitting effects.
  3. Active noise cancellation: The headset’s active noise cancellation feature senses and blocks out external distractions, helping to improve concentration and immersion during gaming sessions.
  4. Comfortable design: The durable headband and premium leather earpads with extra-thick memory foam help relieve pressure and ensure a snug, secure fit, even during long gaming sessions.
  5. Customizable features: The JBL QuantumENGINE software, which is available for free download on PC, lets you adjust EQ, mic settings, RGB lighting, and more. The headset also has easy-to-use controls built into the earcups, including a volume dial and dedicated power, noise-cancellation, and Bluetooth buttons.
  6. Wide compatibility: The headset is compatible with a wide range of devices, including PS4, PS5, Nintendo Switch, PC, and Mac. It also has a 3.5mm stereo audio connection that is compatible with controllers for PlayStation and Xbox, Nintendo Switch in handheld mode, PC, and Mac.
  7. Long battery life: The JBL Quantum 810 has a battery life of up to 43 hours, which is longer than many other wireless gaming headsets on the market. The headset can also be used while charging via USB.

The JBL Quantum 810 wireless gaming headset is the perfect gaming accessory with its expertly tuned 50mm neodymium drivers, which produce precise, high-fidelity sound and JBL’s QuantumSOUND signature for immersive gaming audio with powerful effects. The headset’s closed-back design offers noise isolation, and active noise cancellation keeps external noises from breaking your concentration. The headset’s sturdy and comfortable construction makes it perfect for long gaming sessions, and with a battery life of up to 43 hours, you can enjoy uninterrupted gameplay without worrying about battery life.

The boom mic is built into the left earcup, and you can flip it up to mute your audio. The microphone also includes noise suppression technology to eliminate unwanted background noise from your team chat. JBL noise suppression technology is a feature found in some of JBL’s headsets, such as the JBL Quantum 810 wireless gaming headset. This technology utilizes advanced algorithms to identify and remove background noise from the user’s audio signal, resulting in clearer and more intelligible audio during voice chat and phone calls. The technology is particularly useful in noisy environments where external sounds might interfere with communication. With JBL noise suppression technology, users can enjoy distraction-free conversations and focus on the task at hand. The Quantum 810 also comes with a foam windscreen for the mic, which helps to soften the impact of plosives like “p” and “b.”

The Quantum 810 headset is optimized for PC gaming with JBL’s QuantumENGINE software, which enables you to customize your EQ, mic settings, and RGB lighting. Additionally, JBL QuantumSURROUND and DTS Headphone:X v2.0 provide impressive 3D audio for a more immersive gaming experience.

JBL Quantum 810 wireless -gaming headset
-JBL Quantum 810 wireless gaming headset- photo: JBL

You can also use the headset with a range of gaming consoles. Connect the headset wirelessly to your PS4, PS5, or Nintendo Switch using the included USB transmitter, or connect via the 3.5mm port if you’re playing on a mobile device or Xbox.

The headset features a dual wireless system, enabling you to connect to the transmitter via USB-C and simultaneously connect to your smartphone via Bluetooth. This allows you to chat with your team on Discord while listening to game audio. The game and chat volume mix is adjustable using the headset’s dial, allowing you to balance environmental cues with your team’s tactical callout

Bluetooth version     5.2
Bluetooth profiles      A2DP 1.3, HFP 1.8
Bluetooth frequency        2400 MHz – 2483.5 MHz
Bluetooth transmitted modulation      GFSK, /4π DQPSK, 8DPSK
Bluetooth transmitter power     <12 dBm
Passive Frequency Response    20 Hz – 20 kHz
Active Frequency Response     20 Hz – 40 kHz
Driver sensitivity at 1kHz/1mW (dB)    95
Dynamic frequency response range (Hz)   20 Hz – 20 kHz
Impedance (ohms)   32
Charging cable     Yes
Audio cable           Yes
Built-in Microphone        Yes
Wireless            Yes
Active Noise Cancelling          Yes
Bluetooth              Yes

JBL Quantum 810: In the box:

  • 1 X JBL Quantum 810 Wireless headset
  • 1 X USB Charging Cable
  • 1 X 3.5 mm audio cable
  • 1 X USB wireless dongle
  • 1 X Windshield foam for microphone
  • 1 X Quick Start Guide | Warranty card | Safety Sheet

Some of the best alternatives for JBL Quantum 810

The JBL Quantum 810 Wireless is a feature-rich gaming headset known for its high-resolution audio, active noise cancellation (ANC), and versatile connectivity options, including 2.4GHz wireless, Bluetooth 5.2, and a 3.5mm audio jack. However, its comfort issues for some users, non-retractable microphone, and limited surround sound compatibility on consoles make it worth exploring alternatives. Below, I’ll discuss several gaming headsets that serve as viable substitutes, focusing on their audio quality, comfort, connectivity, microphone performance, and additional features, while ensuring they align with the needs of gamers seeking a similar or better experience. This exploration will cover a range of price points and brands to offer options for various budgets and preferences, with an emphasis on PC and console gaming compatibility.
1. Logitech G Pro X 2 Lightspeed WirelessPrice: ~$249.99
Key Features: Graphene 50mm drivers, 2.4GHz Lightspeed wireless, Bluetooth, up to 50 hours of battery life, detachable Blue VO!CE microphone.
Why It’s a Good Alternative: The Logitech G Pro X 2 Lightspeed is a strong contender for PC gamers, offering a more balanced and detailed sound profile compared to the JBL Quantum 810, thanks to its graphene drivers. These drivers deliver crisp highs and controlled bass, ideal for competitive gaming where positional audio is crucial, such as hearing footsteps in games like Valorant or Counter-Strike. Its build quality is superior, with premium materials and swappable ear cushions (leatherette or cloth) that enhance comfort for long sessions, addressing the Quantum 810’s reported tightness for users with larger heads. The detachable microphone with Blue VO!CE technology provides clearer voice capture than the Quantum 810’s tinny, Discord-certified mic, making it better for team communication.
Connectivity: It supports 2.4GHz Lightspeed wireless, Bluetooth, and a 3.5mm jack, matching the Quantum 810’s versatility. However, it lacks ANC, which might be a drawback for users prioritizing noise isolation in noisy environments.
Comfort and Build: The G Pro X 2 is lighter and more robust than the Quantum 810’s plastic-heavy build, with a metal headband and plush earpads.
Software: Logitech’s G Hub software offers extensive customization, including EQ presets and surround sound for PC, though console users are limited to stereo sound like the Quantum 810.
Drawbacks: No ANC, and the price is slightly higher. Console surround sound is limited, similar to the Quantum 810.
Best For: PC gamers who prioritize sound clarity, comfort, and microphone quality over ANC.

2. SteelSeries Arctis Nova Pro WirelessPrice: ~$349.99

Key Features: 40mm Neodymium drivers, 2.4GHz wireless, Bluetooth, active noise cancellation, hot-swappable batteries, GameDAC Gen 2.
Why It’s a Good Alternative: The SteelSeries Arctis Nova Pro Wireless is a premium alternative that surpasses the Quantum 810 in several areas. Its dual-battery system allows for unlimited playtime by swapping batteries, compared to the Quantum 810’s 43-hour battery life with play-and-charge functionality. The ANC is comparable, effectively reducing background noise, and the retractable microphone offers superior clarity and flexibility over the Quantum 810’s fixed boom mic. The GameDAC Gen 2 provides intuitive on-the-fly audio adjustments and supports high-resolution audio, making it excellent for both gaming and music. The sound profile is neutral, with customizable EQ settings via SteelSeries GG software, offering versatility for competitive and immersive gaming.
Connectivity: Like the Quantum 810, it supports 2.4GHz wireless, Bluetooth, and a 3.5mm jack, with seamless multi-device pairing. It’s compatible with PC, PS5, PS4, Xbox, and Nintendo Switch.
Comfort and Build: The Arctis Nova Pro is highly comfortable, with a ski-goggle headband and breathable earpads, though some users find it less comfortable than the Logitech G Pro X 2. Its build feels more premium than the Quantum 810’s plastic construction.
Software: The SteelSeries GG software provides robust customization, including parametric EQ and surround sound for PC, with better console support than the Quantum 810.
Drawbacks: It’s significantly more expensive, and the GameDAC’s always-on display might annoy some users.
Best For: Gamers willing to invest in a premium headset with excellent audio, ANC, and microphone quality for both PC and console gaming.

3. HyperX Cloud Alpha WirelessPrice: ~$199.99

Key Features: 50mm dual-chamber drivers, 2.4GHz wireless, up to 300 hours of battery life, detachable microphone.
Why It’s a Good Alternative: The HyperX Cloud Alpha Wireless is a standout for its exceptional battery life—up to 300 hours—far surpassing the Quantum 810’s 43 hours. Its dual-chamber 50mm drivers deliver a balanced sound with strong bass, ideal for immersive single-player games like Assassin’s Creed and competitive titles where audio cues are critical. The detachable microphone is a significant improvement over the Quantum 810’s fixed mic, offering decent voice clarity for team chats. While it lacks ANC and Bluetooth, its simplicity and long battery life make it a reliable choice for gamers who don’t need multi-device connectivity.
Connectivity: Limited to 2.4GHz wireless, compatible with PC, PS5, and PS4, but lacks Bluetooth and Xbox support, making it less versatile than the Quantum 810.
Comfort and Build: Known for comfort, the Cloud Alpha Wireless features plush memory foam earpads and a durable aluminum frame, addressing the Quantum 810’s comfort complaints for users with larger heads.
Software: HyperX NGENUITY software allows EQ customization and battery monitoring but is less feature-rich than JBL’s QuantumENGINE.
Drawbacks: No ANC or Bluetooth, and no Xbox compatibility. Surround sound is PC-only.
Best For: Gamers prioritizing battery life and comfort on PC and PlayStation, who don’t need ANC or multi-device connectivity.

4. EPOS H3Price: ~$119.99

Key Features: 40mm drivers, wired or hybrid options, detachable boom mic, lightweight design.
Why It’s a Good Alternative: The EPOS H3 is a budget-friendly alternative for gamers who don’t need wireless connectivity. Its lightweight design and soft earpads make it more comfortable than the Quantum 810 for extended sessions, especially for users with larger heads or glasses. The audio quality is clear and balanced, with a focus on mid-range frequencies, making it suitable for competitive gaming and music. The detachable microphone offers excellent clarity, rivaling higher-end models, and is a step up from the Quantum 810’s tinny mic.
Connectivity: Available in wired or hybrid (wired with Bluetooth) versions, compatible with PC, consoles, and mobile devices via 3.5mm or USB. It lacks 2.4GHz wireless, which may be a downside for wireless enthusiasts.
Comfort and Build: The EPOS H3 is exceptionally lightweight and comfortable, with a flexible headband that avoids the Quantum 810’s clamping issues.
Software: Limited software support compared to the Quantum 810, but the plug-and-play design simplifies use.
Drawbacks: No ANC or 2.4GHz wireless, and surround sound is limited to specific configurations.
Best For: Budget-conscious gamers seeking comfort and microphone quality for PC and console gaming.

5. Corsair VOID RGB Elite WirelessPrice: ~$109.99

Key Features: 50mm Neodymium drivers, 2.4GHz wireless, 7.1 surround sound, breathable microfiber mesh earpads, customizable RGB lighting.
Why It’s a Good Alternative: Priced lower than the Quantum 810, the Corsair VOID RGB Elite Wireless offers comparable features, including 7.1 surround sound for PC gaming and a robust 50mm driver setup for immersive audio. Its microphone is unidirectional and performs adequately for team communication, though it’s not as clear as the Logitech or SteelSeries options. The breathable earpads and lightweight design make it more comfortable for long sessions compared to the Quantum 810’s reported tightness.
Connectivity: 2.4GHz wireless with a USB dongle, compatible with PC and PS5/PS4, but lacks Bluetooth and Xbox support.
Comfort and Build: The unique angular design and microfiber earpads provide excellent comfort, especially for glasses wearers, surpassing the Quantum 810 in this aspect.
Software: Corsair’s iCUE software allows for RGB customization and EQ adjustments, similar to JBL’s QuantumENGINE but with better integration for Corsair ecosystems.
Drawbacks: No ANC or Bluetooth, and the microphone is non-detachable. Limited console compatibility.
Best For: Budget-conscious PC and PlayStation gamers who want immersive audio and customizable lighting.

6. Sennheiser GSP 670Price: ~$199.99 (often discounted)

Key Features: 7.1 surround sound, 2.4GHz wireless, Bluetooth, broadcast-quality microphone, up to 20 hours of battery life.
Why It’s a Good Alternative: The Sennheiser GSP 670 competes closely with the Quantum 810, offering superior microphone quality that’s near broadcast-grade, ideal for streamers or competitive gamers. Its sound profile is balanced with excellent clarity, making it great for both gaming and music. The headset supports simultaneous 2.4GHz and Bluetooth connectivity, allowing seamless device switching, similar to the Quantum 810. While its battery life is shorter (20 hours), it’s sufficient for most gaming sessions.
Connectivity: 2.4GHz wireless and Bluetooth, compatible with PC, PS4, and mobile devices, but not Xbox.
Comfort and Build: Comfortable for most users, though slightly heavier than the Quantum 810, with adjustable pressure settings to mitigate clamping issues.
Software: Sennheiser Gaming Suite offers EQ customization and surround sound for PC.
Drawbacks: Shorter battery life and no ANC. Slightly dated design.
Best For: Gamers prioritizing microphone and audio quality with versatile connectivity.

Each of these alternatives caters to different priorities. For PC gamers, the Logitech G Pro X 2 Lightspeed offers superior sound and comfort, while the SteelSeries Arctis Nova Pro Wireless is ideal for those seeking premium features and ANC. The HyperX Cloud Alpha Wireless excels in battery life, and the EPOS H3 is a budget-friendly wired option. The Corsair VOID RGB Elite Wireless provides value for money, and the Sennheiser GSP 670 is perfect for microphone-focused users. Consider your platform, budget, and need for features like ANC or wireless connectivity when choosing.

How to recover photos and videos from a mobile phone?

0

If you have lost your photos and videos from your mobile device, there are several steps you can take to try to recover them:

  1. Check your recently deleted folder: Most mobile devices have a folder where deleted files are temporarily stored before they are permanently deleted. Check this folder to see if your photos and videos are still there.
  2. Use a backup: If you have a backup of your mobile device, you may be able to recover your photos and videos from there. This could be a cloud backup or a backup that you created on your computer.
  3. Use a data recovery tool: There are several data recovery tools available for mobile devices that can help you recover deleted photos and videos. Some popular tools include DiskDigger, EaseUS MobiSaver, and Dr. Fone.
  4. Contact a professional: If none of the above steps work, you may need to contact a professional data recovery service. These services can be expensive, but they may be able to recover your photos and videos even if they have been permanently deleted.

    recover photos and videos from a mobile phone
    recover photos and videos from a mobile phone – photo: Pixabay

It’s important to note that the likelihood of successfully recovering your photos and videos depends on how long ago they were deleted, whether they were overwritten by new data, and other factors. It’s best to act quickly and avoid using your device until you have attempted to recover your lost data.

Is there any FREE app to recover photos and videos from a mobile phone?

There are some free apps available for mobile devices that can help you recover deleted photos and videos. Here are a few options:

  1. DiskDigger: DiskDigger is a free app for Android devices that can recover deleted photos and videos from your phone’s internal storage or SD card. It can also recover other types of files, such as documents and music files.
  2. Recuva: Recuva is a free app for Windows computers that can recover deleted photos and videos from your mobile device’s storage when it is connected to your computer. It supports both Android and iOS devices.
  3. EaseUS MobiSaver: EaseUS MobiSaver is a free app for Android and iOS devices that can recover deleted photos and videos from your device’s internal storage, SD card, or iCloud backup.
  4. Dr.Fone – Data Recovery (Free Trial): Wondershare Dr.Fone offers a free trial that can scan and preview recoverable files. Install the Android app, connect to a computer (if needed), and scan for deleted media. While saving files may require a paid version, you can confirm what’s recoverable for free.
  5. Rooted Devices (Optional): Some recovery apps work better on rooted Android devices, as they can access deeper system files. However, rooting voids warranties and carries risks, so proceed cautiously.

It’s important to note that free recovery apps may have limitations in terms of the amount of data they can recover or the file formats they support. Additionally, they may display ads or have in-app purchases for additional features. If you are unable to recover your data using a free app, you may need to consider paid options or professional data recovery services.

FREE app to recover photos
FREE app to recover photos – photo: Pixabay

Some other ways to recover photos from my mobile phone?

Check cloud storage: If you have enabled cloud backup for your photos, such as Google Photos or iCloud, check if your deleted photos are still available there. They may have been automatically backed up before you deleted them.

From social media accounts: If you have previously uploaded your photos to social media accounts, such as Facebook, Instagram, or Twitter, check if they are still available there. You may be able to download your photos from these platforms.

Check your other devices: If you have synced your photos with other devices, such as a computer or tablet, check if the photos are still available on those devices.

Try with friends and family: If you have shared the photos with friends or family, ask if they have copies of the photos that you can recover.

Use Free Computer-Based Tools
Connecting your phone to a computer can improve recovery chances, as desktop software often has more powerful scanning capabilities. These tools are free and work for both Android and iOS.

  • Recuva (Windows): Recuva by CCleaner is a free tool for recovering files from Android devices or SD cards. Connect your phone via USB, enable USB debugging (Settings > Developer Options), and run a scan. Select “Photos” or “Videos” as the file type to speed up the process.
  • PhotoRec (Windows/Mac/Linux): PhotoRec is a free, open-source tool that recovers files from phone storage or SD cards. It’s command-line-based but user-friendly with step-by-step guides. Connect your phone, select the storage, and recover JPG, PNG, or MP4 files.
  • TestDisk (Windows/Mac/Linux): Paired with PhotoRec, TestDisk recovers lost partitions or files. It’s free and works well for corrupted SD cards or phone storage.
  • MiniTool Power Data Recovery (Free Version): This tool offers a free version that recovers up to 1GB of data. Connect your phone, scan for lost media, and preview recoverable files.

Tips for Computer-Based Recovery:

  • Enable USB debugging on Android (Settings > About Phone > Tap Build Number 7 times > Developer Options).
  • For iPhones, use tools like iTunes or Finder to access backups, but avoid overwriting current data.
  • Save recovered files to your computer, not the phone.

How to storage my photos for free on some cloud service?

  • Google Photos: Google Photos offers unlimited storage for photos up to 16 megapixels and videos up to 1080p resolution. You can access your photos from any device with your Google account, and the service also includes features like automatic backup and organization.
  • Apple iCloud: If you have an Apple device, you can use iCloud to store your photos for free. iCloud offers 5GB of free storage, which can be used for photos, videos, and other files. You can access your photos from any device with your Apple ID, and the service also includes features like automatic backup and organization.
  • Amazon Photos: Amazon Photos offers unlimited storage for photos and up to 5GB of storage for videos and other files. If you have an Amazon Prime membership, you can access this service for free, and you can also use it to share photos with friends and family.
  • Dropbox: Dropbox offers 2GB of free storage, which can be used for any type of file, including photos. You can access your files from any device with your Dropbox account, and the service also includes features like automatic backup and file sharing.

Need to note that the free storage limits for these services may not be enough for all of your photos, and you may need to upgrade to a paid plan for more storage. Additionally, it’s a good idea to always have a backup of your photos in case of data loss or service outages.

Troubleshooting and Additional TipsIf Recovery Fails: If no files are found, they may have been overwritten. Try multiple tools, as some are more effective for specific file types or storage locations.

Corrupted Files: If recovered files won’t open, use free tools like VLC Media Player to repair damaged videos or JPEG Repair Toolkit for photos.

Check Other Devices: If you shared media via email, messaging apps, or social media, check those platforms for copies.

Search X for Tips: Use X to search for user experiences with specific recovery tools or phone models. For example, search “recover deleted photos Android free” to find recent posts with advice.

Community Forums: Visit free resources like Reddit (r/techsupport) or XDA Developers for device-specific recovery guides.

Limitations and Realistic Expectations

  • Time Sensitivity: The sooner you act, the better your chances. Overwritten files are nearly impossible to recover.
  • iOS Restrictions: iPhones are harder to recover from without backups due to restricted file system access.
  • App Limitations: Free versions of apps may limit the number of files you can recover or require in-app purchases for full functionality.
  • Damaged Devices: If your phone is physically damaged, recovery may require professional help, which isn’t free.

By following these tips, you can maximize your chances of recovering photos and videos for free using built-in features, free apps, or computer-based tools. Always act quickly, check all possible backup locations, and take preventive measures to avoid future losses.

How to Launch tech product review YouTube Channel?

0

Starting a successful YouTube channel requires careful planning and execution. Here are some steps you can follow to get started with your YouTube tech product review channel:

– Define your niche: Determine what types of tech products you want to review and what kind of audience you want to reach. It’s important to choose a specific niche to establish your channel’s identity and build a loyal following.

– Research your competition: Look at other tech product review channels and learn from their successes and mistakes. Identify what makes them stand out and find ways to differentiate your channel.

– Create a content plan: Develop a content plan that includes a schedule for posting videos, the types of content you’ll produce, and any special features or series you plan to create.

– Choose your equipment: Invest in quality equipment to produce high-quality videos. This includes a camera, microphone, and lighting setup.

– Create your channel: Set up your YouTube channel, create a logo and banner, and optimize your channel for search with relevant keywords and tags.

– Produce and edit your videos: Create engaging and informative content that showcases the tech products you review. Edit your videos to enhance their quality and keep your audience engaged.

YouTube tech product review channel
photo: Pixabay

– Promote your channel: Promote your channel on social media, your website, and other online platforms. Collaborate with other YouTubers or tech brands to expand your reach.

– Engage with your audience: Respond to comments and questions from your audience, and ask for their feedback to improve your content.

YouTube channel and reviewing tech products – how much money you can earn in first 3 months

Typically, YouTube pays creators through Google AdSense, which pays a percentage of the revenue earned from ads shown on your videos. The amount you earn from ads varies depending on the type of ads, the number of views, and the geographic location of your viewers.

According to some estimates, a YouTube creator can earn anywhere from $0.01 to $0.03 per view from ads. So, if your videos get 10,000 views in a month, you could earn between $100 to $300 in ad revenue. This is just an estimate, and your actual earnings may vary.

In addition to ad revenue, you can also earn money through sponsorships and affiliate marketing. As your channel grows, you may be able to attract sponsorships from tech brands or earn commissions by promoting products through affiliate marketing.

It’s important to note that building a successful YouTube channel takes time, effort, and dedication. Don’t focus solely on earning money in the first few months. Instead, focus on creating high-quality content that resonates with your audience and building a loyal following. Over time, as your channel grows, you may be able to earn more money through various sources.

The equipment you will need for your tech product review channel on YouTube will depend on your budget, but here are some essential items:

  • Camera: A good camera is essential for creating high-quality videos. You can use a DSLR camera, a mirrorless camera, or even a high-end smartphone.
  • Microphone: Audio quality is just as important as video quality. You can use a shotgun microphone or a lapel microphone to capture clear audio.
  • Lighting: Lighting can make a big difference in the quality of your videos. You can use natural light or invest in a set of studio lights to make sure your videos are well-lit.
  • Tripod: A sturdy tripod will help keep your camera steady and reduce shaky footage.
  • Editing software: You’ll need editing software to trim and cut your videos, add effects, and create titles and captions. Adobe Premiere Pro, Final Cut Pro, and iMovie are popular choices.
  • Computer: A powerful computer with a good graphics card and plenty of storage will be necessary for editing and storing your videos.
  • Backdrops: Depending on your setup, you may want to invest in backdrops or green screens to create a professional-looking background for your videos.

Keep in mind that you don’t need to have the most expensive equipment to create great content. Start with the basics and upgrade as you go along. The most important thing is to create engaging and informative content that resonates with your audience.

Here are some ways to promote your YouTube channel reviewing tech products:

  • Social media: Share your videos on your social media accounts, such as Twitter, Facebook, Instagram, and LinkedIn. Use relevant hashtags and tag relevant accounts to increase your visibility.
  • Collaborate with other YouTubers: Collaborate with other YouTubers in your niche to create cross-promotion opportunities. You can do guest appearances on each other’s channels, or collaborate on a video together.
  • Engage with your audience: Respond to comments and questions from your audience, and ask for their feedback to improve your content. Engage with your audience on social media as well.
  • Join online communities: Join online communities related to your niche, such as forums or Facebook groups, and share your videos there.
  • Paid promotion: You can run ads on Google or social media platforms to reach a wider audience. You can also reach out to influencers or bloggers in your niche and offer them a product to review or feature on their platforms.
  • Optimize your videos for SEO: Use relevant keywords and tags in your video titles, descriptions, and tags to improve your chances of being found in search results.
  • Create a website or blog: Create a website or blog related to your niche and share your videos there. You can also create written content related to your videos to improve your visibility in search results.

Remember to focus on creating high-quality content that resonates with your audience. If you create great content, your audience will share it with their networks, and your channel will grow organically. Building a successful tech product review YouTube channel takes time and dedication. Be patient, stay consistent, and keep producing high-quality content that resonates with your audience.

Installing Android on Your PC Without Using an Emulator

0

Installing Android on your PC without an emulator is possible using an Android-x86 project. The Android-x86 project is an open-source initiative that ported the Android operating system to run on x86 hardware, such as desktops and laptops. Here are the steps to install Android on your PC without an emulator:

  • Download the Android-x86 ISO file from the official website. You can choose the version that suits your PC hardware, such as 32-bit or 64-bit.
  • Create a bootable USB drive using the ISO file. You can use tools like Rufus or Universal USB Installer to create a bootable USB drive.
  • Insert the USB drive into your PC and restart your computer. Press the appropriate key to enter the BIOS setup, usually F2 or Del.
  • Change the boot order to prioritize booting from the USB drive. Save and exit the BIOS setup.
  • Your PC should boot from the USB drive, and you will see the Android-x86 installation screen. Select “Install” to proceed.
  • Follow the on-screen instructions to complete the installation process. You will need to choose the partition where you want to install Android-x86 and create a new partition if necessary.
  • Once the installation is complete, restart your PC, and you should see the GRUB boot loader with options to boot into Android or other installed operating systems.
  • Select “Android” to boot into the Android operating system on your PC. You can now use Android apps and features as you would on a mobile device.

Note that not all PC hardware is compatible with Android-x86, and you may encounter issues with certain devices or drivers. It’s also important to note that installing Android on your PC without an emulator is not officially supported by Google, and you may not have access to all Google Play services and apps.

Installing Android on your PC
photo: Pixabay

How to Run Android apps on your desktop with Phoenix OS

Phoenix OS is an Android-based operating system designed to run on desktops and laptops, allowing you to enjoy Android apps and games on a larger screen. Here are the steps to run Android apps on your desktop with Phoenix OS:

  • Download the Phoenix OS installer from the official website and run the installer.
  • Choose the installation location and wait for the installation process to complete.
  • Once installed, launch the Phoenix OS from the Start menu or the desktop shortcut.
  • You will see a desktop interface similar to Windows or macOS, with a taskbar and app drawer.
  • Open the Google Play Store app on Phoenix OS, and sign in with your Google account.
  • Search for the Android app you want to run on your desktop and install it.
  • Once installed, you can launch the app from the app drawer or the taskbar.
  • Enjoy using Android apps on your desktop with Phoenix OS.

Note that not all Android apps are optimized for use on a desktop, and you may encounter issues with certain apps. Additionally, Phoenix OS may not support all PC hardware, and you may experience compatibility issues.

What Is Phoenix OS?

Phoenix OS features a desktop-like interface similar to Windows or macOS, with a taskbar, app drawer, and multi-window support. It also comes with pre-installed apps, including the Google Play Store, which allows users to download and install Android apps and games.

The Phoenix OS interface mimics Windows but operates like Android. It may not be compatible with all laptop trackpads, so an external mouse may be necessary. On a touchscreen computer, the interface can be navigated just like on a tablet or smartphone.

Phoenix OS has Google Play preinstalled, enabling direct app downloads from Google. Additionally, APK files can be sideloaded to install apps. Your apps can be accessed by selecting the Menu icon located in the bottom-left corner of the desktop.

The operating system is optimized for use on a desktop or laptop, with support for a keyboard, mouse, and touchpad. It also supports various display resolutions and can run on both Intel and AMD processors.

Phoenix OS is free to download and use, and it offers a way to experience Android apps and games on a larger screen without the need for an emulator or virtual machine. However, it is important to note that not all Android apps are optimized for use on a desktop, and some may not function properly.