Home Blog Page 18

Leema Pulse IV Stereo Amplifier Review

0

The Leema Pulse IV Stereo Amplifier stands as a testament to high-fidelity audio engineering, offering audiophiles a blend of modern features and classic sound quality. This comprehensive review delves into the intricate details of the Leema Pulse IV, exploring its design, features, performance, and overall value in the competitive world of stereo amplifiers.

Design and Build Quality

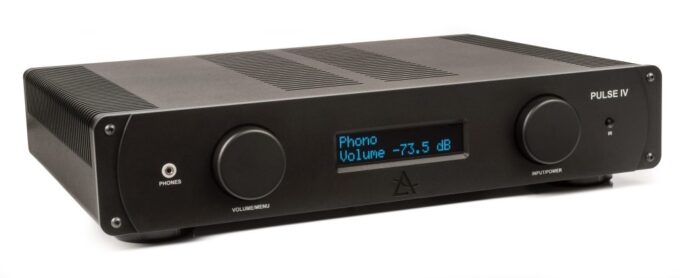
The Leema Pulse IV exudes a sophisticated elegance with its sleek aluminum chassis and minimalist design. The front panel is adorned with a simple yet functional layout, featuring a central volume knob, input selectors, and a clear OLED display. The build quality feels robust, ensuring longevity and durability. The amplifier’s weight and solid construction give it a premium feel, indicative of the high-quality components housed within.

Connectivity Options

The Pulse IV offers a versatile range of connectivity options, catering to both traditional and modern audio setups. It includes:

  • Analog Inputs: Four RCA line inputs for connecting various audio sources.
  • Digital Inputs: Two optical, one coaxial, and a USB input for digital audio sources.
  • Phono Stage: A built-in moving magnet (MM) phono stage for vinyl enthusiasts.
  • Bluetooth: High-quality aptX Bluetooth for wireless streaming.
  • Headphone Output: A 6.3mm headphone jack for personal listening.

The rear panel is well-organized, making it easy to manage connections and ensure a tidy setup.

Pulse IV
Pulse IV – images Leema

Features and Specifications

Amplification and Power

The Leema Pulse IV is a Class AB amplifier, known for its balance between efficiency and sound quality. It delivers 80 watts per channel into 8 ohms, ensuring ample power for driving a wide range of speakers. This power output is sufficient for medium to large rooms, providing a dynamic and engaging listening experience.

Digital-to-Analog Converter (DAC)

One of the standout features of the Pulse IV is its high-quality DAC, capable of handling high-resolution audio files up to 24-bit/192kHz. This ensures that digital sources sound their best, with precise and detailed reproduction.

Phono Stage

The inclusion of a moving magnet (MM) phono stage is a nod to the resurgence of vinyl. This built-in feature allows vinyl enthusiasts to connect their turntables directly, without the need for an external phono preamp. The phono stage is designed to deliver a warm and detailed sound, preserving the nuances of analog recordings.

Bluetooth Connectivity

With aptX Bluetooth, the Pulse IV offers convenient wireless streaming without compromising on sound quality. This feature is perfect for casual listening and quick access to digital libraries on smartphones and tablets.

User Interface and Remote Control

The front panel OLED display is bright and easy to read, providing clear information about the selected input and volume level. The remote control is intuitive, allowing users to switch inputs, adjust volume, and navigate through settings with ease.

Sound Quality

Tonal Balance and Clarity

The Leema Pulse IV excels in delivering a balanced and natural sound. Its tonal balance is impressive, with no part of the frequency spectrum overshadowing the other. The mids are rich and full, the highs are crisp and detailed, and the bass is tight and controlled. This balance makes it suitable for a wide range of music genres, from classical to rock to jazz.

Soundstage and Imaging

One of the hallmarks of a great amplifier is its ability to create a convincing soundstage, and the Pulse IV does not disappoint. It presents a wide and deep soundstage, allowing listeners to pinpoint the location of instruments and vocals with remarkable accuracy. The imaging is precise, contributing to an immersive listening experience.

Dynamics and Detail

The Pulse IV handles dynamic shifts with ease, maintaining clarity and control even during complex musical passages. The amplifier’s ability to resolve fine details enhances the listening experience, revealing subtleties that might be missed with lesser equipment.

Performance

Vinyl Playback

When paired with a high-quality turntable, the Pulse IV’s phono stage delivers an authentic and engaging vinyl experience. The warm and detailed sound signature captures the essence of analog recordings, making it a delight for vinyl purists.

Leema Pulse IV Stereo Amplifier

Digital Sources

The built-in DAC shines when streaming high-resolution audio files. Whether connected via USB, optical, or coaxial, digital sources benefit from the Pulse IV’s ability to deliver clean and detailed sound. The aptX Bluetooth is a convenient option for streaming from smartphones and tablets, offering a respectable sound quality for wireless playback.

Headphone Listening

The dedicated headphone output provides a high-quality listening experience for those who prefer personal audio. The amplifier’s power and clarity translate well to headphones, ensuring a detailed and dynamic sound.

Comparison with Competitors

Marantz PM7000N

The Marantz PM7000N is a popular competitor in the same price range. While both amplifiers offer excellent sound quality and features, the Pulse IV stands out with its superior phono stage and build quality. The Marantz, on the other hand, includes integrated streaming services and a network connection, which might appeal to those looking for an all-in-one solution.

Cambridge Audio CXA81

The Cambridge Audio CXA81 is another strong competitor, known for its detailed and analytical sound. The Pulse IV offers a warmer and more musical sound, which might be preferred by those who enjoy a more laid-back listening experience. The CXA81’s build quality and connectivity options are comparable, making it a matter of personal preference.

User Experience

Setup and Installation

Setting up the Leema Pulse IV is straightforward, thanks to its intuitive design and well-organized rear panel. The included manual provides clear instructions, making it easy even for those who are not technically inclined.

Daily Use

The Pulse IV is a joy to use on a daily basis. The remote control is responsive, and the front panel controls are intuitive. The OLED display is clear and informative, ensuring users can easily navigate through inputs and settings.

Maintenance and Reliability

Leema is known for its reliable products, and the Pulse IV is no exception. The build quality suggests it will provide years of trouble-free operation. Regular dusting and ensuring proper ventilation are the primary maintenance tasks required to keep the amplifier in top condition.

Value for Money

Price Point

The Leema Pulse IV is positioned in the mid-to-high-end range of stereo amplifiers. While it is not the cheapest option available, its combination of features, build quality, and sound performance justifies the investment.

Longevity and Upgrade Path

Given its robust construction and high-quality components, the Pulse IV is likely to serve users well for many years. Additionally, its versatile connectivity options ensure it can adapt to future upgrades in audio sources and speakers.

Customer Feedback and Reviews

Positive Feedback

Many users praise the Pulse IV for its sound quality, highlighting its balanced and detailed performance. The build quality and design also receive high marks, with users appreciating its elegant aesthetics and robust construction.

Criticisms

Some users note that the Pulse IV lacks built-in streaming services, which are becoming increasingly common in this price range. However, this is a minor drawback given its other strengths.

Conclusion

The Leema Pulse IV Stereo Amplifier is a standout choice for audiophiles seeking a high-quality, versatile, and reliable amplifier. Its balanced sound signature, excellent build quality, and comprehensive feature set make it a compelling option in the competitive world of stereo amplifiers. Whether you are a vinyl enthusiast, a digital audio aficionado, or simply someone who appreciates high-fidelity sound, the Pulse IV delivers an exceptional listening experience.

Technical Specifications

• Inputs (analogue): 5x line level
• Phono input: MM/MC (taken from Essentials phono stage)
• Inputs (digital): 3x electrical S/PDIF; 3x optical S/PDIF; 1x USB Type-B 32-bit/384kHz PCM and DSD capable Sabre DAC; aptX Bluetooth
• Outputs: 2x pairs of preamp outputs; single speaker outputs; headphone output; 1x fixed- level record output
• Nominal power: 80W RMS in to 8 Ohms
• Connections: all unbalanced RCA (no XLRs)
• Weight: 11kg
• Dimensions: (WxHxD) 435x90x375mm

The Leema Pulse IV combines modern technology with classic high-fidelity sound, making it an excellent choice for discerning listeners. Its versatile features and impressive performance ensure it stands out in the crowded market of stereo amplifiers.

5G Technology and Human Health: Debunking Myths and Facts

0

5G is the fifth generation of mobile communication technology, designed to offer enhanced performance in various aspects of wireless communication. Compared to previous generations (such as 4G LTE), 5G provides:

  • Higher Data Rates: Capable of delivering speeds up to 10 Gbps, significantly faster than 4G.
  • Lower Latency: Reduces latency to less than 1 millisecond, enabling real-time applications.
  • Increased Capacity: Supports a larger number of connected devices per unit area, essential for the Internet of Things (IoT).
  • Improved Reliability: Enhances connection stability, even in densely populated areas.

The development of 5G technology is driven by the need for improved wireless communication to support advanced applications such as autonomous vehicles, smart cities, and augmented reality.

How Does 5G Work?

5G technology utilizes a combination of frequency bands and advanced techniques to achieve its performance improvements. The three primary frequency bands used in 5G are:

  • Low-band (sub-1 GHz): This band provides broad coverage and deep penetration, making it suitable for rural areas and indoor coverage. While it offers lower data speeds compared to higher frequency bands, it ensures that 5G services are accessible over large areas.
  • Mid-band (1-6 GHz): The mid-band spectrum strikes a balance between coverage and speed. It is widely deployed in urban and suburban areas, offering better data speeds than the low-band spectrum while still providing reasonable coverage.

    5G Technology
    5G Technology – photo: pixabay
  • High-band (mmWave, 24-100 GHz): Millimeter waves (mmWave) are the key to achieving the ultra-fast data speeds promised by 5G. These high-frequency waves can transmit large amounts of data quickly but have limited range and penetration capabilities. They are typically used in densely populated areas and for specific applications requiring high data rates.

To optimize performance, 5G employs several advanced technologies:

  • Massive MIMO (Multiple Input Multiple Output): Utilizes multiple antennas to transmit and receive more data simultaneously, increasing network capacity and efficiency.
  • Beamforming: Directs signals toward specific devices rather than broadcasting them in all directions, improving signal strength and reducing interference.
  • Network Slicing: Allows the creation of virtual networks tailored to specific applications or services, enhancing flexibility and resource management.

Types of Energy Waves in 5G technology

Electromagnetic Spectrum Overview

The electromagnetic spectrum encompasses all types of electromagnetic radiation, ranging from low-frequency radio waves to high-frequency gamma rays. Different parts of the spectrum have distinct properties and uses:

  • Radio Waves: Used for communication, including AM/FM radio, television, and mobile phones.
  • Microwaves: Used in microwave ovens, radar, and certain communication technologies.
  • Infrared Radiation: Emitted by warm objects, used in remote controls and thermal imaging.
  • Visible Light: The only part of the spectrum visible to the human eye.
  • Ultraviolet Light: Higher energy than visible light, can cause skin burns and other biological effects.
  • X-Rays and Gamma Rays: High-frequency radiation used in medical imaging and cancer treatment, capable of ionizing atoms and molecules.

5G Frequency Bands

5G technology operates on various frequency bands, each with its own characteristics:

  • Sub-6 GHz Frequencies: These frequencies include low-band and mid-band spectrums. They are similar to those used in previous generations of wireless technology and provide a balance between coverage and speed. Their ability to penetrate buildings and other obstacles makes them suitable for widespread deployment.
  • Millimeter Waves (mmWave): Operating in the 24-100 GHz range, mmWave frequencies enable ultra-fast data transmission but are limited in range and penetration. They are ideal for high-density urban environments and specific applications requiring high bandwidth. The limited range of mmWave frequencies necessitates the deployment of numerous small cells to ensure consistent coverage.

Biological Effects of Electromagnetic Waves

Ionizing vs. Non-Ionizing Radiation

The electromagnetic spectrum is divided into ionizing and non-ionizing radiation based on the energy of the waves:

  • Ionizing Radiation: This type of radiation has enough energy to remove tightly bound electrons from atoms, creating ions. Examples include X-rays and gamma rays. Ionizing radiation can cause cellular and DNA damage, leading to an increased risk of cancer and other health issues.
  • Non-Ionizing Radiation: Non-ionizing radiation, which includes radio waves, microwaves, and visible light, lacks sufficient energy to ionize atoms. The primary concern with non-ionizing radiation is its potential to cause thermal effects, such as heating tissues. Non-ionizing radiation is generally considered less harmful than ionizing radiation, but its long-term effects at high exposure levels are still a subject of research.

Mechanisms of Interaction

Electromagnetic waves interact with biological tissues through various mechanisms:

  • Thermal Effects: When tissues absorb electromagnetic energy, it can be converted into heat. This heating effect is the primary concern for non-ionizing radiation, particularly at higher power levels. Regulatory standards are designed to limit exposure to levels that prevent significant heating of tissues.
  • Non-Thermal Effects: Some studies suggest that electromagnetic waves may cause biological changes without significant temperature increases. Potential non-thermal effects include oxidative stress, changes in cellular function, and DNA damage. These effects are less well-understood and are the focus of ongoing research to determine their significance and potential health implications.

Scientific Research on 5G and Health

Current Evidence

Extensive research has been conducted to assess the health effects of electromagnetic radiation from wireless communication technologies. Key findings include:

  • Thermal Effects: The majority of studies indicate that exposure to non-ionizing radiation, such as that used in 5G, is unlikely to cause significant thermal effects if exposure levels remain within established safety guidelines. Regulatory standards are based on preventing harmful thermal effects.
  • Non-Thermal Effects: Research on non-thermal effects has produced mixed results. Some studies report biological changes, such as oxidative stress and DNA damage, while others do not find significant effects. The inconsistency in findings highlights the need for further research to clarify the potential non-thermal effects of 5G radiation.

Regulatory Standards and Safety Limits

International organizations have established safety guidelines for exposure to electromagnetic radiation to protect public health:

  • International Commission on Non-Ionizing Radiation Protection (ICNIRP): ICNIRP provides guidelines for limiting exposure to electromagnetic fields, based on scientific evidence and safety factors to prevent known health risks.
  • Federal Communications Commission (FCC): The FCC sets exposure limits for wireless devices in the United States, ensuring that devices operate within safe levels of electromagnetic radiation.

These guidelines focus primarily on preventing thermal effects and are periodically reviewed to incorporate new scientific findings.


Addressing Public Concerns

Common Myths and Misconceptions

Public concerns about 5G technology often stem from misinformation and myths:

  • Myth 1: 5G Causes Cancer: There is no conclusive evidence linking 5G technology to cancer. Most studies focus on the thermal effects of non-ionizing radiation, which are well-regulated and not linked to cancer development.
  • Myth 2: 5G and COVID-19: Claims that 5G technology contributes to the spread of COVID-19 are baseless and not supported by scientific evidence. The virus is transmitted through respiratory droplets, not electromagnetic radiation.

Educating the Public

Effective communication strategies are essential to address public concerns and dispel myths about 5G technology:

  • Providing Clear, Evidence-Based Information: Public health organizations and experts should communicate the scientific evidence regarding 5G and health in a clear and accessible manner.
  • Engaging with Communities: Building trust through community engagement and addressing specific concerns can help alleviate fears and misinformation.
  • Transparency in Research: Ongoing research and updates on findings should be communicated transparently to ensure the public is informed about the latest developments.

Future Research Directions

Areas of Uncertainty

While current evidence suggests that 5G technology is unlikely to pose significant health risks, there are areas that require further investigation:

  • Long-Term Effects: Long-term studies are needed to assess the potential health impacts of prolonged exposure to 5G frequencies. Understanding the cumulative effects of low-level exposure over extended periods is crucial.
  • Vulnerable Populations: Research should consider the effects of 5G radiation on vulnerable populations, such as children, pregnant women, and individuals with pre-existing health conditions. These groups may have different sensitivities to electromagnetic radiation.

Emerging Technologies

As new technologies and higher frequency bands are developed, ongoing research will be necessary to evaluate their safety and establish appropriate regulatory standards. Emerging technologies may introduce new exposure scenarios and potential health risks that need to be carefully assessed.


Conclusion

5G technology offers numerous benefits, including faster data speeds and improved connectivity, which have the potential to revolutionize various industries and enhance everyday life. While concerns about the potential health risks of 5G energy waves are understandable, current scientific evidence suggests that the technology is unlikely to cause significant harm when used within established safety guidelines.

Ongoing research is essential to address areas of uncertainty and ensure that 5G technology remains safe for public use. Effective public communication and education are crucial to dispel myths and build trust in the scientific evidence surrounding 5G and health. By continuing to study the effects of 5G radiation and updating safety standards as needed, we can ensure that the benefits of 5G technology are realized without compromising public health.

Review of the LG 49GR85DC-B Monitor

0

In the rapidly evolving world of gaming monitors, the LG 49GR85DC-B stands out as a unique offering. This monitor aims to cater to the needs of both avid gamers and professional users seeking a superior display experience. With its massive 49-inch curved screen, high refresh rate, and advanced features, the LG 49GR85DC-B promises to deliver an immersive and versatile viewing experience. This review delves into the various aspects of the monitor, including its design, performance, features, and overall value, to help you determine if it is the right choice for your needs.

Design and Build Quality

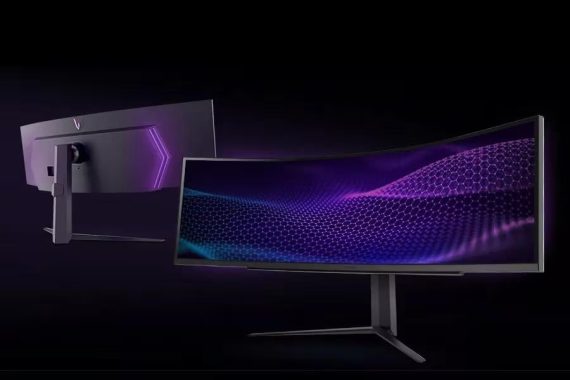
The design of the LG 49GR85DC-B is both striking and functional. The monitor features a sleek, modern aesthetic with thin bezels that maximize the screen real estate. The 49-inch curved display is designed to provide an immersive viewing experience, wrapping around your field of vision to reduce distortion and offer a more natural viewing angle.

LG 49GR85DC-B
LG 49GR85DC-B – images: LG

The build quality of the monitor is impressive, with a sturdy stand that offers excellent stability. The stand is fully adjustable, allowing users to tilt, swivel, and adjust the height of the monitor to find the most comfortable viewing position. The back of the monitor features a stylish, futuristic design with customizable RGB lighting that adds a touch of personalization and flair to your setup.

Display Performance

The display performance of the LG 49GR85DC-B is where this monitor truly shines. It features a 49-inch curved VA panel with a 32:9 aspect ratio and a resolution of 5120 x 1440 pixels. This ultra-wide resolution provides ample screen space for multitasking and a highly immersive gaming experience. The curvature of the screen further enhances the immersion, making it ideal for gaming, watching movies, or working with multiple applications simultaneously.

One of the standout features of this monitor is its high refresh rate of 240Hz. This ensures smooth and fluid motion, which is particularly beneficial for fast-paced gaming. Combined with a low response time of 1ms, the LG 49GR85DC-B minimizes motion blur and ghosting, providing a clear and sharp image even during intense action scenes.

The monitor also supports AMD FreeSync Premium Pro and NVIDIA G-Sync compatibility, ensuring tear-free and stutter-free gaming by synchronizing the monitor’s refresh rate with the GPU’s frame rate. This results in a more seamless and enjoyable gaming experience.

Color Accuracy and HDR

Color accuracy is another area where the LG 49GR85DC-B excels. The monitor boasts a wide color gamut, covering 98% of the DCI-P3 color space. This makes it suitable for color-critical work such as photo and video editing, as well as for gamers who appreciate vibrant and lifelike colors.

The monitor also supports High Dynamic Range (HDR) with HDR10 certification. HDR enhances the overall image quality by providing a higher contrast ratio and a wider range of colors. This results in more detailed and realistic images, with brighter highlights and deeper blacks. Whether you’re gaming, watching movies, or working on creative projects, HDR support adds an extra layer of visual fidelity to your experience.

Connectivity and Features

The LG 49GR85DC-B is well-equipped in terms of connectivity options. It features two HDMI 2.1 ports, one DisplayPort 1.4, and a USB hub with multiple USB 3.0 ports. This ensures compatibility with a wide range of devices, including gaming consoles, PCs, and other peripherals. The inclusion of HDMI 2.1 is particularly noteworthy, as it supports higher bandwidth and enables features such as Variable Refresh Rate (VRR) and Auto Low Latency Mode (ALLM), which are beneficial for gaming.

LG 49GR85DC-B
LG 49GR85DC-B

In addition to its impressive hardware, the monitor also comes with a variety of software features designed to enhance the user experience. The OnScreen Control software allows users to easily adjust monitor settings, create custom screen splits for multitasking, and access various gaming modes. The monitor also includes built-in speakers, which provide decent audio quality for casual use, though dedicated speakers or headphones are recommended for a more immersive audio experience.

User Experience and Ergonomics

The user experience with the LG 49GR85DC-B is highly positive, thanks to its combination of design, performance, and features. The large, curved screen provides an immersive and comfortable viewing experience, reducing eye strain during extended use. The high refresh rate and low response time make it a top choice for gamers, while the color accuracy and wide gamut support are beneficial for creative professionals.

Ergonomics are also well-considered, with the adjustable stand allowing users to find the optimal viewing position. The monitor’s on-screen display (OSD) is intuitive and easy to navigate, with a joystick control located at the bottom of the screen for quick and easy adjustments.

Gaming Performance

When it comes to gaming performance, the LG 49GR85DC-B is a formidable contender. The combination of a 240Hz refresh rate, 1ms response time, and support for AMD FreeSync Premium Pro and NVIDIA G-Sync provides a smooth and responsive gaming experience. Games run fluidly, with minimal input lag and no screen tearing or stuttering.

The ultra-wide aspect ratio and curved screen enhance the gaming experience by providing a wider field of view and a more immersive environment. This is particularly advantageous in first-person shooters, racing games, and simulation titles, where peripheral vision and situational awareness can make a significant difference.

Productivity and Multitasking

The LG 49GR85DC-B is not just a gaming powerhouse; it also excels in productivity and multitasking. The 32:9 aspect ratio and 5120 x 1440 resolution provide ample screen real estate, allowing users to work with multiple applications side by side without the need for multiple monitors. This can significantly enhance productivity, as it reduces the need to constantly switch between windows and allows for more efficient multitasking.

The monitor’s Picture-by-Picture (PBP) and Picture-in-Picture (PIP) modes further enhance its multitasking capabilities, allowing users to display content from two different sources simultaneously. This is particularly useful for professionals who need to monitor multiple inputs or work on different projects concurrently.

Color and Contrast Performance

In addition to its impressive gaming and productivity features, the LG 49GR85DC-B excels in color and contrast performance. The VA panel technology provides deep blacks and high contrast ratios, making it suitable for both dark and bright environments. The monitor’s HDR support enhances the overall image quality, providing more detail in shadows and highlights, and making images appear more lifelike and vibrant.

The wide color gamut coverage ensures that colors are accurate and true to life, making this monitor an excellent choice for creative professionals who require precise color reproduction. Whether you’re editing photos, creating digital art, or working on video projects, the LG 49GR85DC-B provides the color accuracy and consistency needed for professional work.

Software and On-Screen Control

LG’s OnScreen Control software is a valuable addition to the monitor’s feature set, providing users with easy access to various settings and customization options. The software allows users to adjust monitor settings, create custom screen splits for multitasking, and access different gaming modes with ease. This enhances the overall user experience, making it simple to tailor the monitor’s performance to your specific needs and preferences.

The monitor also includes several pre-set modes optimized for different types of content, such as gaming, cinema, and reading. These modes adjust the monitor’s settings to provide the best possible experience for each type of content, further enhancing its versatility and usability.

Audio Performance

While the primary focus of the LG 49GR85DC-B is its visual performance, the built-in speakers provide a decent audio experience for casual use. The speakers offer clear sound quality and sufficient volume for everyday tasks such as watching videos or listening to music. However, for a more immersive audio experience, especially during gaming or movie watching, it is recommended to use dedicated external speakers or high-quality headphones.

Pricing and Value

The LG 49GR85DC-B is positioned as a premium monitor, and its price($999.99) reflects its high-end features and performance. While it may be more expensive than some other monitors on the market, the combination of its large curved screen, high refresh rate, advanced gaming features, and excellent color accuracy makes it a worthwhile investment for gamers and professionals alike.

LG 49GR85DC-B is an outstanding monitor
49GR85DC-B monitor

Considering the monitor’s versatility and the quality of its performance, the LG 49GR85DC-B offers good value for its price. It provides a comprehensive package that caters to a wide range of users, from gamers seeking an immersive and responsive gaming experience to professionals requiring accurate color reproduction and ample screen space for multitasking.

Pros and Cons

Pros:

  • Large 49-inch curved screen provides an immersive viewing experience.
  • High refresh rate of 240Hz and 1ms response time for smooth and responsive gaming.
  • Excellent color accuracy with 98% DCI-P3 coverage.
  • Supports HDR10 for enhanced image quality.
  • AMD FreeSync Premium Pro and NVIDIA G-Sync compatibility.
  • Versatile connectivity options, including HDMI 2.1 and DisplayPort 1.4.
  • Fully adjustable stand for optimal ergonomics.
  • OnScreen Control software for easy customization and multitasking.

Cons:

  • Premium price may be a barrier for some users.
  • Built-in speakers offer only average audio quality.
  • Large size may not be suitable for all desk setups.

Conclusion

The LG 49GR85DC-B is an outstanding monitor that excels in multiple areas, making it a versatile choice for a wide range of users. Its large curved screen, high refresh rate, and excellent color accuracy provide an immersive and enjoyable experience for gamers and professionals alike. The monitor’s advanced features, such as AMD FreeSync Premium Pro and NVIDIA G-Sync compatibility, further enhance its appeal, ensuring smooth and tear-free gaming performance.

While the premium price may be a consideration for some, the overall performance, build quality, and feature set of the LG 49GR85DC-B justify the investment. Whether you’re a gamer seeking the ultimate immersive experience, a professional requiring precise color accuracy, or a multitasker needing ample screen space, the LG 49GR85DC-B is a top-tier monitor that delivers on all fronts.

The LG 49GR85DC-B is a remarkable monitor that combines cutting-edge technology with a sleek and functional design. Its performance in gaming, productivity, and color accuracy is exceptional, making it a standout choice in the ultra-wide monitor market. If you’re in the market for a high-end monitor that offers a comprehensive and immersive viewing experience, the LG 49GR85DC-B is an excellent option worth considering.

Introduction of the COLORFUL EPOCH Series AI Notebook

0

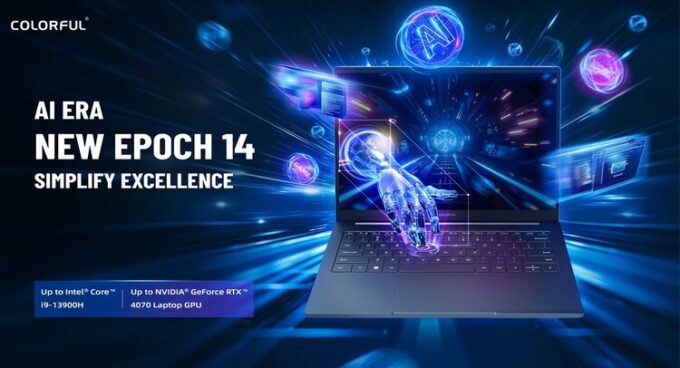
COLORFUL Technology is excited to unveil its latest EPOCH Series laptops, crafted specifically for business and content creation with a sleek and lightweight design. The COLORFUL EPOCH 14 boasts an all-metal chassis with a thickness of just 17.9mm and a weight of 1.5 kilograms. Its CNC-machined aluminum unibody chassis ensures exceptional durability and a premium aesthetic. The notebook also features a tempered glass touchpad and a white LED-lit keyboard with three brightness settings.

Tailored for creative workloads and enhanced by AI experiences, the EPOCH Series is powered by an Intel 13th Gen Core i9 processor and an NVIDIA® GeForce RTX™ 4070 Laptop GPU, delivering up to 686 AI TOPS. It includes dedicated AI hardware known as Tensor Cores, which utilize TensorRT software for further performance enhancement.

Available in Deep Ocean Blue and Silvery White, the COLORFUL EPOCH AI sports a 14” QHD (2560×1440) display with 100% DCI-P3 coverage and a peak brightness of 500 nits. An OLED screen option will be offered in the future. The EPOCH also features HDMI output and a high-speed USB-C port with 100W PD fast charging support for multi-monitor setups.

COLORFUL EPOCH 14
COLORFUL EPOCH 14 – images

Specifications

  • Model Name: COLORFUL EPOCH N14
  • Display: 14” QHD (2560×1600), 165Hz, 16:10
  • CPU: Intel® 13th Gen Core™ i9-13900H
  • GPU: Up to an NVIDIA® GeForce RTX™ 4070 Laptop GPU
  • Memory: 16GB/32GB LPDDR5 6400Mhz
  • Storage: NVMe PCIe Gen 4×4 1TB
  • WLAN: WiFi 6E, Bluetooth 5.2
  • Camera: 1.0MP HD video camera
  • Audio: Stereo Speaker
  • Dimensions: 313 x 224 x 17.9mm
  • Weight: <1.52kg
  • I/O Ports Left: DC IN x1, HDMI2.1 x1, USB A x1 (3.2 G2), USB C x1
  • I/O Ports Right: USB A x1, Audio Jack x1
  • Battery: 58Wh+
  • Adapter: 150W
  • OS: Windows 11

The COLORFUL EPOCH Series is designed to boost your computing experience with AI for gaming, creative work, business, and more. COLORFUL is currently developing their own AI software, set to be unveiled in the future.

Pricing The COLORFUL EPOCH N14 AI notebook starts at $1359.


Review of the COLORFUL EPOCH Series AI Notebook

The COLORFUL EPOCH Series AI Notebook is an impressive addition to the market, blending power, portability, and advanced AI capabilities. Its slim and lightweight design makes it an excellent choice for professionals on the go, while the robust construction ensures durability and a high-end feel.

Design and Build Quality The all-metal chassis and CNC-machined aluminum unibody give the notebook a sleek and modern look. At 17.9mm thick and weighing just 1.5 kilograms, it is incredibly portable without sacrificing build quality. The tempered glass touchpad and LED-lit keyboard add to the premium user experience.

COLORFUL EPOCH 14
COLORFUL EPOCH 14

Performance Equipped with an Intel 13th Gen Core i9 processor and NVIDIA® GeForce RTX™ 4070 Laptop GPU, the EPOCH Series handles demanding tasks with ease. The dedicated AI hardware, including Tensor Cores, ensures enhanced performance for AI-driven applications. Whether for business, creative work, or gaming, this notebook delivers exceptional performance.

Display The 14” QHD display with 100% DCI-P3 coverage and 500 nits brightness provides vibrant and accurate colors, making it ideal for content creation and media consumption. The promise of an upcoming OLED screen option is an exciting prospect for those looking for even better display quality.

Connectivity and Battery Life The inclusion of HDMI and high-speed USB-C ports with 100W PD fast charging support makes it easy to set up multi-monitor workstations. The 58Wh battery, combined with the efficient power management of the Intel and NVIDIA hardware, offers decent battery life for a full day of work or play.

Value for Money Starting at $1359, the COLORFUL EPOCH N14 AI notebook offers excellent value for its high-end specifications and advanced features. It competes well with other premium laptops in its category, providing robust performance and a high-quality build at a competitive price point.

Conclusion The COLORFUL EPOCH Series AI Notebook stands out as a powerful, stylish, and versatile option for professionals and creatives alike. Its advanced AI capabilities and strong performance make it a compelling choice for anyone looking to enhance their productivity and creativity.

Resolving Network Problems in Windows 10

0

This guide aims to assist in resolving common network issues in Windows 10 through systematic troubleshooting steps.

How to Fix Network Issues in Windows 10

  1. Remove the Network Card Definition

    A potential cause of network issues can be problematic network adapters. To address this:

    • Press Windows + X and select Device Manager.
    • In the Device Manager, find and expand Network adapters.
    • Right-click the problematic network adapter (whether it’s the wired or Wi-Fi adapter) and select Uninstall device.
    • Restart your computer. Windows will automatically attempt to reinstall the network adapter driver. If it doesn’t, you may need to manually install the driver using the manufacturer’s installation disk or downloaded drivers.
  2. Update the Network Card Driver

    Outdated drivers can cause network issues. To update your network card driver:

    • Ensure you have another way to connect to the internet, such as a different network card or another device.
    • Identify your network card type and download the latest drivers from the manufacturer’s website.
    • Transfer the downloaded driver to your computer and install it.

      Fix Network Issues in Windows 10
      photo: pixabay
  3. Manually Add a Network Connection

    If automatic connection methods fail:

    • Right-click the network icon in the taskbar and select Open Network & Internet settings.
    • Go to Network and Sharing Center and click Set up a new connection or network.
    • Choose Manually connect to a wireless network, then enter the network name, security type, and security key (if applicable). Follow the prompts to complete the setup.
  4. Restart Your Router

    Sometimes, the router might be causing the issue:

    • Turn off your router and unplug it for at least 10 minutes.
    • Plug it back in and restart it. This can reset the connection and resolve issues.
    • Ensure your router is in a well-ventilated area to prevent overheating, which can also cause connectivity problems.
  5. Run Network Commands
    • Open Command Prompt as an administrator.
    • Run the following commands:
      sh
      ipconfig /release
      ipconfig /renew
    • Restart both your computer and router. Wait for at least 30 seconds before turning them back on.
  6. Use the Windows Network Troubleshooter
    • Go to Settings > Update & Security > Troubleshoot > Additional troubleshooters.
    • Select Internet Connections and click Run the troubleshooter. Follow any recommendations provided.
  7. Boot in Safe Mode with Networking
    • Restart your computer in Safe Mode with Networking to see if the issue persists.
    • If the network works in Safe Mode, a program or service might be interfering with your network. Uninstall recently installed programs to identify the culprit.
  8. Reset Network Settings
    • Go to Settings > Network & Internet > Status.
    • Under Advanced network settings, click Network reset.
  9. Modify DNS Settings
    • Go to Control Panel > Network and Internet > Network Connections.
    • Right-click your network connection and select Properties.
    • Select Internet Protocol Version 4 (TCP/IPv4) and click Properties.
    • Choose Use the following DNS server addresses and enter:
      • Preferred DNS server: 8.8.8.8
      • Alternate DNS server: 8.8.4.4
    • Click OK and restart your computer.
  10. Reset TCP/IP and DNS
    • Open Command Prompt as an administrator.
    • Run the following commands:
      netsh int ip reset resetlog.txt
      netsh winsock reset
      ipconfig /flushdns
    • Restart your computer.
  11. Reinstall Network Driver
    • Open Device Manager.
    • Expand Network adapters, right-click your network adapter, and select Uninstall device.
    • Restart your computer to reinstall the driver.
  12. Check for VPN Services
    • If you use a VPN, make sure it’s properly disconnected.
    • Try reconnecting and then disconnecting the VPN to reset the network settings.
  13. Run System File Scan
    • Open Command Prompt as an administrator.
    • Run the following command:
      sh
      sfc /scannow
    • Wait for the scan to complete and restart your computer.

If none of these steps resolve the issue, consider resetting your PC while keeping your files. Go to Settings > Update & Security > Recovery > Reset this PC > Get started and select Keep my files.

How to Fix a PS5 Black Screen problem

0

The PlayStation 5 (PS5) is a highly anticipated and popular gaming console known for its impressive graphics, speedy performance, and an extensive library of games. However, like any advanced piece of technology, it is not without its issues. One common problem that many users encounter is the dreaded black screen. This guide will provide you with step-by-step instructions on how to diagnose and fix a black screen issue on your PS5, ensuring you can get back to your gaming adventures as quickly as possible.

What is a Black Screen?

A black screen on the PS5 typically means that the console is powered on, but there is no display output to the TV or monitor. This can be a frustrating issue, especially if you are in the middle of a gaming session or trying to access the console’s menu.

Common Causes of the Black Screen Issue

Several factors can lead to a black screen on your PS5. Understanding these causes can help you diagnose and fix the problem more effectively:

  • Faulty HDMI Cable or Port: A damaged HDMI cable or port can disrupt the signal between the PS5 and the display.
  • Power Supply Issues: Problems with the power supply can prevent the PS5 from booting up correctly.
  • System Software Glitches: Software bugs or outdated firmware can cause display issues.
  • Display Settings: Incorrect display settings on either the PS5 or the TV/monitor can lead to a black screen.
  • Hardware Failures: Internal hardware failures, though less common, can also result in display problems.

2. Initial Troubleshooting Steps

Checking the Power Supply

Before diving into more complex solutions, start with the basics:

  • Ensure the PS5 is Properly Plugged In: Check that the power cord is securely connected to both the PS5 and the power outlet.
  • Inspect the Power Outlet: Try plugging another device into the same outlet to ensure it’s working correctly.
  • Use a Different Power Cord: If possible, use another power cord to rule out any issues with the current one.

Inspecting the HDMI Connection

The HDMI connection is crucial for transmitting the video signal from your PS5 to your TV or monitor:

  • Check Both Ends of the HDMI Cable: Ensure the HDMI cable is securely connected to both the PS5 and the TV/monitor.
  • Try a Different HDMI Cable: A faulty HDMI cable can often be the culprit. Swap it out with a known working cable.
  • Inspect the HDMI Ports: Look for any visible damage or debris in the HDMI ports on both the PS5 and the TV/monitor.

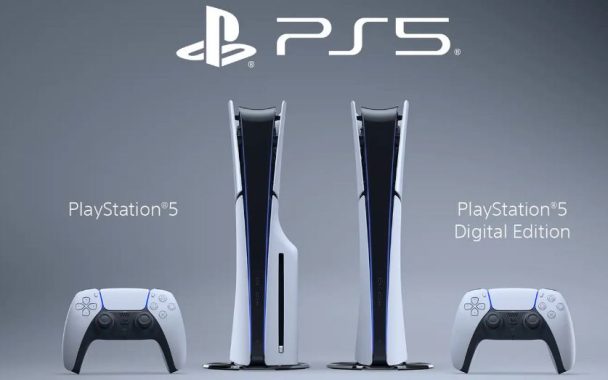
    PS5
    PS5 – photo 

Restarting the PS5

A simple restart can often resolve minor glitches:

  • Hold Down the Power Button: Press and hold the power button on the PS5 for about 10 seconds until the console powers off completely.
  • Unplug and Replug: Disconnect the power cord and HDMI cable, wait for a few minutes, then reconnect them.
  • Power On the PS5: Turn the console back on and check if the display issue is resolved.

3. Advanced Troubleshooting Techniques

Safe Mode Options

If the initial steps don’t work, booting the PS5 in Safe Mode can help:

  • Entering Safe Mode: Turn off the PS5 completely. Press and hold the power button, release it after hearing the second beep (approximately 7 seconds).
  • Option 1: Restart PS5: This is the simplest option and may resolve minor issues.
  • Option 2: Change Video Output: Select this option to change the resolution or reset the video output settings.
  • Option 5: Rebuild Database: This can fix corrupted data that might be causing the black screen.

Rebuilding the Database

Rebuilding the database is a deeper fix that can resolve more serious issues:

  • In Safe Mode: Select “Rebuild Database” from the Safe Mode menu.
  • Wait for the Process to Complete: This might take some time, but it can resolve many software-related problems.

Updating System Software

Ensuring your PS5 has the latest system software can prevent and fix many issues:

  • In Safe Mode: Select “Update System Software” from the Safe Mode menu.
  • Choose Update via Internet or USB: If your PS5 is connected to the internet, choose the internet option. Otherwise, download the update to a USB drive and select the USB option.

4. Hardware Checks and Fixes

Inspecting the HDMI Port and Cable

A closer inspection of the HDMI port and cable can sometimes reveal issues:

  • Check for Physical Damage: Look for bent pins or other visible damage in the HDMI port.
  • Try a Different HDMI Port: If your TV or monitor has multiple HDMI ports, try connecting the PS5 to a different one.

Checking the TV or Monitor

Sometimes the issue might lie with the display device:

  • Test with Another Device: Connect another device (like a laptop or Blu-ray player) to the same HDMI port to ensure the TV/monitor is working properly.
  • Check Display Settings: Ensure that the TV/monitor is set to the correct input source.

Testing Different Display Settings

Adjusting the display settings on the PS5 can sometimes fix the black screen issue:

  • Change Resolution: In Safe Mode, select “Change Video Output” and set it to a lower resolution.
  • Disable HDR: High Dynamic Range (HDR) settings can sometimes cause compatibility issues. Try disabling HDR in the video output settings.

5. Software Solutions

Factory Resetting the PS5

If all else fails, a factory reset might be necessary:

  • Backup Your Data: Use an external drive to back up any important data, as this process will erase everything on the PS5.
  • In Safe Mode: Select “Restore Default Settings” or “Reset PS5 (Reinstall System Software).”

Installing the Latest Firmware

Ensuring your PS5 has the latest firmware can prevent many issues:

  • Automatic Updates: Enable automatic updates in the system settings to ensure your PS5 is always up to date.
  • Manual Updates: If necessary, download the latest firmware from the official PlayStation website and install it via USB.

Ensuring Game Compatibility

Sometimes, specific games can cause issues:

  • Check for Game Updates: Ensure that all your games are up to date.
  • Reinstall Problematic Games: If a particular game is causing the issue, try reinstalling it.

6. Preventive Measures

Regular System Maintenance

Regular maintenance can prevent many issues:

  • Keep the System Clean: Dust can accumulate and cause overheating, leading to various problems.
  • Ensure Proper Ventilation: Make sure the PS5 is in a well-ventilated area to prevent overheating.

Proper Handling and Storage

Proper handling and storage of your PS5 can prolong its lifespan:

  • Avoid Physical Damage: Handle the console carefully to prevent damage to internal components.
  • Store in a Safe Place: Keep the PS5 in a stable, secure location to prevent it from falling or getting damaged.

Keeping the System Updated

Regular updates can prevent many issues:

  • Enable Automatic Updates: Ensure the PS5’s system software and games are always up to date.
  • Check for Updates Regularly: Even with automatic updates enabled, periodically check for any available updates manually.

7. When to Seek Professional Help

Recognizing When You Need Expert Assistance

Sometimes, the issue may be beyond your ability to fix:

  • Persistent Problems: If you’ve tried all the steps above and the issue persists, it might be time to seek professional help.
  • Hardware Failures: Issues like a consistently black screen even after multiple attempts at troubleshooting can indicate a hardware failure.

Contacting Sony Support

Sony’s customer support can provide additional assistance:

  • Visit the Official Website: The PlayStation support website offers a wealth of information and contact options.
  • Use the Support Chat or Hotline: Speak with a representative who can guide you through additional troubleshooting steps.

Authorized Repair Services

If your PS5 requires repair, it’s best to use authorized services:

  • Locate an Authorized Service Center: Use Sony’s website to find an authorized repair center near you.
  • Check Warranty Status: If your PS5 is still under warranty, repairs might be covered.

8. Conclusion

Recap of Key Points

Fixing a PS5 black screen issue can be a multi-step process, but with patience and careful troubleshooting, most users can resolve the problem. Key steps include:

  • Checking power and HDMI connections
  • Restarting the PS5
  • Utilizing Safe Mode options
  • Inspecting and testing hardware components
  • Keeping the system software and games updated

Encouragement to Maintain Regular Upkeep

Regular maintenance and staying up to date with system updates can prevent many issues from occurring. Proper handling and storage, along with periodic cleaning, will ensure your PS5 remains in good working condition.

By following this comprehensive guide, you can troubleshoot and fix the black screen issue on your PS5, ensuring a smooth and enjoyable gaming experience. Remember, when in doubt, seeking professional assistance can save time and prevent further damage to your console.

Easy Ways to Connect Your iPhone to a Samsung TV

0

To connect your iPhone to a Samsung TV using the Samsung Smart View app, follow these steps:

Step 1: Ensure Compatibility

  1. iPhone Requirements: Ensure your iPhone is running iOS 7.0 or later.
  2. Samsung TV Requirements: Check if your Samsung TV is a 2011 model or later.

Step 2: Prepare Your Devices

  1. Wi-Fi Connection: Make sure both your iPhone and Samsung TV are connected to the same Wi-Fi network.

Step 3: Download the Samsung Smart View App

  1. App Store: Open the App Store on your iPhone.
  2. Search for the App: Search for “Samsung Smart View”.
  3. Download and Install: Download and install the Samsung Smart View app.

Step 4: Connect Your iPhone to the Samsung TV

  1. Open the App: Launch the Samsung Smart View app on your iPhone.
  2. Permissions: Grant necessary permissions (e.g., accessing local network).
  3. Find Your TV: The app will automatically search for available Samsung TVs on the same network.
  4. Select Your TV: Tap on your Samsung TV from the list of available devices.
  5. Pairing: Follow the on-screen instructions to pair your iPhone with the Samsung TV. You may need to enter a PIN shown on your TV screen.

Step 5: Stream Content

  1. Media Selection: Use the app to browse your iPhone’s content library.
  2. Play on TV: Select the content you want to view on your TV and tap the cast icon or appropriate option to play it on the Samsung TV.

Troubleshooting Tips

  1. Ensure Both Devices Are Updated: Make sure your iPhone and Samsung TV have the latest software updates installed.
  2. Restart Devices: Restart both your iPhone and Samsung TV if the connection is not successful.
  3. Check Network: Ensure your Wi-Fi network is stable and both devices are properly connected.

Additional Features

  • Remote Control: Use the app as a remote control for your Samsung TV.
  • Mirror iPhone Screen: Some Samsung TVs support AirPlay, which can be used for screen mirroring directly from your iPhone without additional apps.

By following these steps, you should be able to connect your iPhone to your Samsung TV and enjoy streaming your favorite content seamlessly.

How to Connect iPhone to Samsung TV via HDMI Cable?

To connect your iPhone to a Samsung TV using an HDMI cable, follow these steps:

Step 1: Gather the Necessary Equipment

  1. Apple Digital AV Adapter: This is an adapter that connects your iPhone’s Lightning port to an HDMI cable.
  2. HDMI Cable: A standard HDMI cable to connect the adapter to the TV.

Step 2: Connect the Devices

  1. Connect the Adapter to the iPhone: Plug the Apple Digital AV Adapter into your iPhone’s Lightning port.
  2. Attach the HDMI Cable to the Adapter: Connect one end of the HDMI cable to the HDMI port on the adapter.
  3. Connect the HDMI Cable to the TV: Plug the other end of the HDMI cable into an available HDMI port on your Samsung TV.

Step 3: Switch to the Correct HDMI Input

  1. Turn on the TV: Make sure your Samsung TV is powered on.
  2. Select the HDMI Input: Use your TV remote to switch to the HDMI input where your iPhone is connected. This can usually be done by pressing the “Source” or “Input” button on the remote and selecting the appropriate HDMI port.

Step 4: Display iPhone Content on the TV

  1. Unlock Your iPhone: Ensure your iPhone is unlocked and on the home screen.
  2. Start Mirroring: Your iPhone screen should automatically mirror to the TV. If it doesn’t, check the connections and make sure the adapter and cable are properly connected.

Troubleshooting Tips

  1. Check Compatibility: Ensure that your iPhone and Apple Digital AV Adapter are compatible (iPhones with a Lightning port).
  2. Update Software: Make sure your iPhone has the latest iOS version installed.
  3. Secure Connections: Ensure all connections are secure and that the HDMI cable is properly connected to both the adapter and the TV.
  4. Restart Devices: If the connection is not working, try restarting your iPhone and your TV.

Additional Features

  • Charging While Connected: The Apple Digital AV Adapter has an extra Lightning port, allowing you to charge your iPhone while it is connected to the TV.

How to Connect iPhone to Samsung TV via AirPlay?

To connect your iPhone to a Samsung TV via AirPlay, follow these steps:

Connect Your iPhone to the Samsung TV
Connect Your iPhone to the Samsung TV – photo: pixabay

Step 1: Ensure Compatibility

  1. iPhone Requirements: Ensure your iPhone is running iOS 12.3 or later.
  2. Samsung TV Requirements: Make sure your Samsung TV supports AirPlay 2 (typically models from 2018 and later).

Step 2: Prepare Your Devices

  1. Wi-Fi Connection: Ensure both your iPhone and Samsung TV are connected to the same Wi-Fi network.
  2. Enable AirPlay on Samsung TV:
    • Press the Home button on your Samsung remote.
    • Navigate to Settings > General > Apple AirPlay Settings.
    • Turn on AirPlay.

Step 3: Connect Your iPhone to the Samsung TV via AirPlay

  1. Open Control Center: Swipe down from the upper-right corner of your iPhone screen (for iPhone X and later) or swipe up from the bottom edge of the screen (for iPhone 8 and earlier).
  2. Select Screen Mirroring: Tap on Screen Mirroring (the icon looks like two overlapping rectangles).
  3. Choose Your Samsung TV: From the list of available devices, select your Samsung TV.
  4. Enter the AirPlay Code: If prompted, enter the code displayed on your TV screen into your iPhone.

Step 4: Stream Content

  1. Stream Videos or Music:
    • Open the app you want to stream from (e.g., YouTube, Netflix, Apple Music).
    • Look for the AirPlay icon (a rectangle with an arrow pointing up) within the app.
    • Tap the AirPlay icon and select your Samsung TV from the list.
  2. Mirror Your iPhone Screen: To mirror your entire screen, use the Screen Mirroring feature from the Control Center as described above.

Troubleshooting Tips

  1. Check Network: Ensure both devices are on the same Wi-Fi network and the network is stable.
  2. Update Software: Make sure your iPhone and Samsung TV have the latest software updates installed.
  3. Restart Devices: Restart your iPhone and Samsung TV if the connection is not working.
  4. Reset Network Settings: If all else fails, you can try resetting the network settings on both devices.

Additional Features

  • Control Playback: You can use your iPhone to control playback, volume, and other settings while streaming content.
  • Stop Mirroring: To stop mirroring, open the Control Center on your iPhone, tap Screen Mirroring, and then tap Stop Mirroring.

How to Connect iPhone to Samsung TV via Tool?

To connect your iPhone to a Samsung TV using a third-party tool, you can use applications such as LetsView, ApowerMirror, or AnyCast. Below are the steps for connecting your iPhone to a Samsung TV using LetsView, which is a free and popular screen mirroring tool.

Step 1: Install LetsView on Both Devices

  1. On Your iPhone:
    • Open the App Store.
    • Search for LetsView.
    • Download and install the app.
  2. On Your Samsung TV:
    • Go to the TV’s app store (Samsung Apps).
    • Search for LetsView.
    • Download and install the app.

Step 2: Prepare Your Devices

  1. Wi-Fi Connection: Ensure both your iPhone and Samsung TV are connected to the same Wi-Fi network.

Step 3: Launch LetsView on Both Devices

  1. Open LetsView on Samsung TV: Launch the LetsView app on your Samsung TV.
  2. Open LetsView on iPhone: Launch the LetsView app on your iPhone.

Step 4: Connect Your iPhone to the Samsung TV

  1. Scan QR Code: On your iPhone, tap on the scan icon in the LetsView app and use it to scan the QR code displayed on your Samsung TV.
  2. Start Mirroring: After scanning the QR code, your iPhone screen should start mirroring to your Samsung TV.

Step 5: Stream or Mirror Content

  1. Stream Videos or Music:
    • Open the app you want to stream from (e.g., YouTube, Netflix, Apple Music) on your iPhone.
    • Play the content and it will be displayed on your Samsung TV.
  2. Mirror Your iPhone Screen: To mirror your entire screen, simply use the mirroring feature within LetsView.

Troubleshooting Tips

  1. Check Network: Ensure both devices are on the same Wi-Fi network and that the connection is stable.
  2. Restart Devices: Restart your iPhone and Samsung TV if the connection does not work.
  3. Update Software: Ensure that both your iPhone and Samsung TV have the latest software updates installed.
  4. Check Permissions: Make sure the LetsView app has the necessary permissions on both your iPhone and Samsung TV.

Additional Features

  • Annotations: LetsView allows you to annotate on your screen, which can be useful for presentations.
  • Control from PC: LetsView also offers the ability to control your iPhone from a computer if connected.

By following these steps, you should be able to connect your iPhone to your Samsung TV using LetsView or similar third-party tools, allowing you to stream and mirror content effortlessly.

Top Compression and Archival Tools: Features, Usage, and Advanced Tips

0

Compression and archival are two fundamental processes aimed at optimizing storage and ensuring data integrity over time. Compression refers to the reduction of file sizes through various algorithms, making them more manageable and faster to transfer. Archival, on the other hand, involves collecting multiple files into a single file or a directory, often compressing them in the process, to preserve them for long-term storage.

Importance and Benefits

The importance of compression and archival tools cannot be overstated in today’s data-driven world. These tools offer several key benefits:

  • Storage Efficiency: Compressing files significantly reduces the amount of storage space required, allowing for more efficient use of storage media.
  • Faster Transfers: Smaller files mean quicker uploads and downloads, which is crucial for both individual and enterprise-level data management.
  • Data Organization: Archival tools help in organizing data by bundling multiple files into a single archive, simplifying data management and retrieval.
  • Data Integrity and Security: Many tools offer encryption options, ensuring that archived and compressed files remain secure from unauthorized access.

    Compression
    zip-Compression tools – photo: pixabay

Overview of Popular Tools

There are numerous compression and archival tools available, each with its own set of features and benefits. Some of the most popular tools include WinRAR, 7-Zip, WinZip, tar, gzip, and bzip2. These tools cater to different user needs, from simple compression tasks to complex archival processes, and support a variety of file formats and compression algorithms.

2. Understanding Compression

What is Data Compression?

Data compression is the process of encoding information using fewer bits than the original representation. This is achieved through algorithms that reduce the redundancy of data, thereby minimizing the file size. There are two main types of compression: lossless and lossy.

Types of Compression (Lossless vs. Lossy)

  • Lossless Compression: This method compresses data without any loss of information. The original data can be perfectly reconstructed from the compressed data. Common lossless compression algorithms include ZIP, GZIP, and RAR.
  • Lossy Compression: This method reduces file size by permanently eliminating certain information, especially redundant information. It is commonly used for compressing multimedia files like images, audio, and video. Examples include JPEG and MP3 compression.

Common Compression Algorithms

  • Huffman Coding: A lossless data compression algorithm that uses variable-length codes to represent symbols based on their frequencies.
  • Lempel-Ziv-Welch (LZW): Another lossless compression algorithm used in GIF and TIFF image formats.
  • Run-Length Encoding (RLE): A simple form of lossless data compression where consecutive data elements are replaced by just one data value and a count.
  • Deflate: A lossless data compression algorithm that uses a combination of the LZ77 algorithm and Huffman coding. It is used in formats such as ZIP and GZIP.

3. Understanding Archival

What is Archival?

Archival refers to the process of gathering multiple files and directories into a single file or directory structure for long-term storage. This process often involves compression to save space and includes metadata to preserve file properties and facilitate future retrieval.

Differences between Compression and Archival

While compression focuses on reducing the size of individual files, archival is concerned with organizing and storing multiple files in a cohesive manner. Archival can include compression as part of the process, but its primary goal is to ensure data integrity and accessibility over time.

Use Cases for Archival

Archival is used in various scenarios, such as:

  • Data Backup: Creating compressed archives of important data for backup purposes.
  • Software Distribution: Packaging multiple software files into a single archive for easy distribution.
  • Data Preservation: Storing historical data in a compressed format to save space and ensure longevity.
  • File Organization: Bundling related files together for better organization and easier access.

4. Popular Compression and Archival Tools

WinRAR

WinRAR is a powerful compression tool known for its ease of use and support for a wide range of formats, including RAR, ZIP, and others. It offers robust features such as password protection, split archives, and recovery records.

7-Zip

7-Zip is a free and open-source compression tool that supports various formats, including its own 7z format, which offers high compression ratios. It is known for its efficiency and strong AES-256 encryption.

WinZip

WinZip is a popular tool that provides a user-friendly interface and extensive features for compression, encryption, and file sharing. It supports multiple formats, including ZIP, RAR, and LHA.

tar

The tar (tape archive) command is a Unix-based utility used to create archive files. It is often combined with gzip or bzip2 to compress the resulting archive.

gzip

Gzip is a Unix-based compression utility that is often used in conjunction with tar. It uses the DEFLATE algorithm and is known for its speed and efficiency.

bzip2

Bzip2 is another Unix-based compression tool that offers higher compression ratios than gzip at the cost of slower compression and decompression speeds. It uses the Burrows-Wheeler transform and Huffman coding.

Others (e.g., PeaZip, Bandizip)

Other notable tools include PeaZip, an open-source utility that supports a wide range of formats, and Bandizip, known for its speed and efficiency.

5. Detailed Overview of Top Tools

WinRAR

  • Features: WinRAR offers a user-friendly interface, support for various formats, password protection, split archives, and recovery records.
  • Supported Formats: RAR, ZIP, CAB, ARJ, LZH, ACE, TAR, GZip, UUE, BZIP2, ISO, and 7-Zip.
  • Installation and Setup: WinRAR can be easily downloaded from the official website and installed with a few clicks.
  • Usage Guide:
    • To compress files, select the files, right-click, and choose “Add to archive.”
    • Choose the desired archive format and compression level.
    • Click “OK” to create the archive.

7-Zip

  • Features: 7-Zip is known for its high compression ratio, strong AES-256 encryption, and support for multiple formats.
  • Supported Formats: 7z, ZIP, GZIP, BZIP2, TAR, and more.
  • Installation and Setup: 7-Zip can be downloaded from the official website and installed easily.
  • Usage Guide:
    • To compress files, select the files, right-click, and choose “7-Zip” > “Add to archive.”
    • Select the archive format and compression level.
    • Click “OK” to create the archive.

WinZip

  • Features: WinZip offers a user-friendly interface, cloud integration, encryption, and file sharing options.
  • Supported Formats: ZIP, RAR, 7Z, TAR, GZIP, and more.
  • Installation and Setup: WinZip can be downloaded from the official website and installed with a few clicks.
  • Usage Guide:
    • To compress files, select the files, right-click, and choose “WinZip” > “Add to Zip file.”
    • Choose the desired archive format and compression level.
    • Click “OK” to create the archive.

tar and gzip

  • Features: Tar and gzip are command-line utilities known for their efficiency and widespread use in Unix-based systems.
  • Supported Formats: tar, gz, tgz.
  • Installation and Setup: Tar and gzip are typically pre-installed on Unix-based systems.
  • Usage Guide:
    • To create a tar archive, use the command: tar -cvf archive.tar /path/to/files
    • To compress the tar archive with gzip, use: gzip archive.tar

bzip2

  • Features: Bzip2 offers higher compression ratios than gzip but at the cost of slower speeds.
  • Supported Formats: bz2.
  • Installation and Setup: Bzip2 is typically pre-installed on Unix-based systems.
  • Usage Guide:
    • To compress a file, use the command: bzip2 filename

6. Best Practices for Compression and Archival

Choosing the Right Tool

Selecting the appropriate compression and archival tool depends on factors such as file types, required compression ratio, and ease of use. For instance, 7-Zip is ideal for high compression ratios, while WinZip offers extensive features for file sharing and encryption.

Compression Settings and Optimization

  • Compression Level: Adjusting the compression level can balance between file size and compression speed.
  • File Types: Different file types compress differently. Text files compress more efficiently than already compressed files like JPEGs or MP3s.
  • Split Archives: For large files, creating split archives can make the files more manageable and easier to transfer.

Archival Strategies

  • Regular Backups: Schedule regular backups of important data to ensure data integrity and availability.
  • Organize Archives: Use clear and consistent naming conventions for archives to facilitate easy retrieval.
  • Retention Policies: Implement retention policies to manage the lifecycle of archived data effectively.

Security and Encryption

  • Password Protection: Use password protection to secure compressed and archived files from unauthorized access.
  • Encryption: Utilize encryption options provided by tools like 7-Zip and WinRAR to ensure data security.

7. Advanced Tips and Tricks

Automating Compression and Archival

  • Scripting: Use scripts to automate repetitive compression and archival tasks. For example, a simple shell script can automate the creation of tar.gz archives.
  • Scheduled Tasks: Set up scheduled tasks to perform regular backups and compression operations automatically.

Integrating with Other Tools

  • Cloud Storage: Integrate compression tools with cloud storage services for seamless file management and sharing.
  • Version Control: Use archival tools in conjunction with version control systems like Git to manage and compress repository data.

Performance Considerations

  • Hardware Resources: Ensure adequate CPU and RAM resources for efficient compression and archival operations.
  • Compression Algorithms: Choose compression algorithms based on the trade-off between compression ratio and speed.

Troubleshooting Common Issues

  • Corrupt Archives: Use recovery options provided by tools like WinRAR to repair corrupt archives.
  • Compatibility Issues: Ensure that the chosen tool supports the required file formats and operating systems.

8. Conclusion

Summary of Key Points

In this guide, we have explored the essentials of compression and archival, understanding the differences between the two processes, and delving into the features and usage of popular tools like WinRAR, 7-Zip, WinZip, tar, gzip, and bzip2. We have also discussed best practices, advanced tips, and troubleshooting strategies to help you make the most of these tools.

Future Trends in Compression and Archival

As data volumes continue to grow, the need for efficient compression and archival tools will only increase. Future trends may include advancements in compression algorithms, greater integration with cloud services, and enhanced security features to protect archived data.

Additional Resources

For further reading and exploration, consider the following resources:

  • Official documentation and user guides for WinRAR, 7-Zip, and WinZip.
  • Online forums and communities dedicated to data compression and archival.
  • Tutorials and courses on data management and file systems.

This comprehensive guide aims to equip you with the knowledge and tools needed to effectively manage and preserve your data through compression and archival. Whether you are a novice or an experienced user, the insights provided here will help you optimize your data storage and ensure the integrity of your valuable information.

Introducing the AI-Enabled ASUS NUC 14 Performance

0

ASUS has unveiled the ASUS NUC 14 performance, a versatile mini PC designed to combine efficiency and raw power, making it ideal for business environments. Equipped with Intel® Core™ Ultra 9 or 7 processors and NVIDIA® GeForce RTX™ 4070 or 4060 graphics, this compact powerhouse is built to handle AI-driven tasks seamlessly.

Enhanced AI Performance

The Intel Core 9 and 7 series processors incorporate advanced Intel technology, boosting computing performance by approximately 21.5% compared to previous generations while cutting power consumption by up to 40%. The inclusion of a Neural Processing Unit (NPU) significantly enhances energy efficiency and performance for AI applications, such as image generation and facial recognition.

ASUS NUC 14
ASUS NUC 14

Superior Graphics Capabilities

The NVIDIA GeForce RTX 4070 graphics card, based on the efficient NVIDIA Ada Lovelace architecture, along with up to 64 GB RAM, delivers rapid ray-tracing and accelerates the performance of multiple programs, providing a seamless and immersive user experience.

Extensive Multi-Display Support

The ASUS NUC 14 Performance supports up to five displays, utilizing an HDMI® 2.1 port, two DisplayPort™ 1.4a ports, and two Thunderbolt™ 4 ports (with an optional Thunderbolt splitter adapter). This configuration is perfect for AI developers, fintech professionals, lab technicians, and business leaders who require efficient multitasking across multiple real-time applications. Additionally, the mini PC is equipped with six USB ports for enhanced connectivity.

Customizable and Adaptable Design

The ASUS NUC 14 Performance is a NUC Kit, allowing for extensive customization as it comes without a pre-installed operating system, RAM, or SSD. This flexibility enables users to tailor the mini PC to their specific requirements. Its logo-free design permits the addition of corporate branding, and the included stand supports both vertical and horizontal placement for optimal positioning.

Specifications

ASUS NUC 14 Performance

CPU

  • Intel® Core™ Ultra 7 155H Processor
  • Intel® Core™ Ultra 9 185H Processor

Chipset

  • Integrated

Accessories

  • AC adapter and power cord
  • Warranty card
  • Quick start guide
  • Vertical stand

Graphics

  • Integrated: Intel® Arc™ Graphics
  • Discrete: NVIDIA® GeForce RTX 4060 / 4070

Wireless Data Network

  • Intel® Killer™ WiFi 6E (Gig+) 2×2 + Bluetooth® 5.3

LAN

  • 10/100/1000/2500 Mbps, 2.5 Gbps Intel® LAN

Audio

  • Realtek / ALC256

Front (Side) I/O Ports

  • 1 x SD Express 8.0 card reader (UHS-I support)
  • 2 x USB 3.2 Gen 2 Type-A
  • 1 x audio jack (Line out / Mic in / Headphone out / Headset)

Back I/O Ports

  • 1 x Thunderbolt™ 4/ USB4® port (supports DisplayPort™ 2.1 and 5 / 9 / 12 V fast-charging profiles)
  • 2 x USB 3.2 Gen2 Type-A
  • 2 x USB 2.0 Type-A
  • 1 x HDMI®
  • 2 x DisplayPort™ 1.4a
  • 1 x 2.5 Gbps RJ45 LAN
  • 1 x DC-in
  • 1 x Kensington lock slot

Power Supply

  • 330 W power adapter

Dimensions (W x D x H)

  • 270 x 180 x 50 mm (~2.5 liters)

Weight

  • 2.6 kg

Taking Screenshots on Android, iPhone, iPad, Mac, and Windows

0

Step-by-Step Guide: Taking Screenshots on Any Device.
Get clear instructions for taking screenshots on any device, including Android, iPhone, iPad, Mac, and Windows, in just a few easy steps.

How to Screenshot on an Android Device

  1. Using the Hardware Buttons:
    • Standard Method: Press the Power button and the Volume Down button simultaneously. Hold them for a couple of seconds until you see the screen flash or hear a camera shutter sound.
    • Older Devices (Pre-2016): Some older models may require you to press the Power button and the Home button simultaneously.
  2. Using Gestures:
    • On some Android devices, such as Samsung Galaxy phones, you can use gestures to take a screenshot. Swipe the side of your hand across the screen from left to right or right to left.
  3. Using Quick Settings:
    • Swipe down from the top of the screen to open the Quick Settings menu.
    • Look for the Screenshot icon (it might be labeled differently depending on your device) and tap it.
  4. Using Google Assistant:
    • Activate Google Assistant by saying “Hey Google” or pressing and holding the Home button.
    • Say “Take a screenshot.”

How to Screenshot on an iPad or iPhone

  1. Using the Hardware Buttons:
    • iPhone with Face ID / iPad Pro (without Home Button): Press the Side button (or Top button for iPad Pro) and the Volume Up button simultaneously. Release quickly.
    • iPhone with Home Button / iPad (with Home Button): Press the Home button and the Top (or Side) button simultaneously. Release quickly.
  2. Using AssistiveTouch:
    • Go to Settings > Accessibility > Touch > AssistiveTouch and turn on AssistiveTouch.
    • Tap the AssistiveTouch menu icon on the screen.
    • Tap Device > More > Screenshot.
  3. Using Siri:
    • Activate Siri by saying “Hey Siri” or pressing the Side/Home button.
    • Say “Take a screenshot.”

How to Screenshot on a Mac

  1. Capture Entire Screen:
    • Press Shift + Command (⌘) + 3.
    • The screenshot will be saved to your desktop.
  2. Capture a Portion of the Screen:
    • Press Shift + Command (⌘) + 4.
    • Your cursor will turn into a crosshair. Click and drag to select the area you want to capture. Release the mouse or trackpad button to take the screenshot.
    • The screenshot will be saved to your desktop.
  3. Capture a Window or Menu:
    • Press Shift + Command (⌘) + 4 and then press the Space bar.
    • Your cursor will change to a camera icon. Click on the window or menu you want to capture.
    • The screenshot will be saved to your desktop.
  4. Using the Screenshot App:
    • Press Shift + Command (⌘) + 5 to open the Screenshot app, which provides options for capturing the entire screen, a selected portion, or a specific window.
    • You can also set a timer and choose where to save your screenshots.

How to Screenshot on Windows 10 and 11

  1. Using the Print Screen (PrtScn) Key:
    • Entire Screen: Press the PrtScn key. This captures the entire screen and copies it to the clipboard. You can paste it into an image editor like Paint or a document.
    • Active Window: Press Alt + PrtScn to capture the currently active window. This also copies the screenshot to the clipboard.
    • Entire Screen to File: Press Windows key + PrtScn. This captures the entire screen and automatically saves it as a file in the Screenshots folder inside your Pictures library.
  2. Using the Snipping Tool:
    • Open the Snipping Tool from the Start menu.
    • Click New to start a new snip and select the area of the screen you want to capture.
    • You can choose from four snip types: Free-form, Rectangular, Window, and Full-screen.
    • After capturing, you can annotate and save the screenshot.
  3. Using Snip & Sketch:
    • Press Windows key + Shift + S. This opens a small menu at the top of the screen with options to capture a rectangular snip, freeform snip, window snip, or full-screen snip.
    • After selecting the type of snip, the screen dims, and you can make your selection.
    • The screenshot is copied to the clipboard and you can click on the notification that appears to open it in Snip & Sketch for annotation and saving.
  4. Using the Game Bar:
    • Press Windows key + G to open the Game Bar.
    • Click the Capture button (camera icon) in the Game Bar overlay or press Windows key + Alt + PrtScn to capture a screenshot of your active window.
    • Screenshots taken with the Game Bar are saved in the Captures folder, inside the Videos library by default.

      ShareX
      ShareX – free Screen capture, file sharing & productivity tool – images ShareX
  5. Using Third-Party Tools:
    • There are several third-party applications available that offer advanced screenshot capabilities, such as Lightshot, Greenshot, and ShareX. These tools often provide additional features like easy sharing, cloud storage, and more detailed editing options.