Home Blog Page 45

Ultimate Guide: How to Scan QR Codes Safely

0

QR codes, originally unveiled in the mid-1990s for tracking vehicles, have evolved into versatile tools for transmitting information, accessing digital content, and enhancing user experiences. Today, you can find these two-dimensional barcodes in various places, such as restaurant menus, advertisements, and official documents. They serve as modern-day keys to a wealth of information. However, before using QR codes, it’s important to understand their advantages, disadvantages, and how to use them safely. This guide will provide you with comprehensive information on scanning QR codes securely.

Understanding QR Codes

QR codes, also known as quick response codes, are two-dimensional barcodes featuring a pattern of black squares on a white background. These codes are designed to be easily scanned and interpreted by smartphones, tablets, or QR code readers. Initially used for tracking vehicles, QR codes have gained popularity in other sectors.

QR codes
photo: Pixabay

QR codes act as data banks, capable of storing various types of information, including URLs, contact details, and texts. When someone scans a QR code with a compatible device or application, the code is decoded, and the stored information is accessed or executed. This technology offers a convenient and efficient way to transmit data or access digital content without manual entry or typing. It bridges the gap between the physical and digital worlds, facilitating the transfer of information and enabling interactive experiences.

The rising popularity of QR Codes in the digital Age in recent years, QR codes have experienced a significant surge in popularity and have become increasingly ubiquitous in our digital age. The following factors have contributed to their widespread adoption and impact on various industries:

  • Enhanced Smartphone Usage: The widespread adoption of smartphones, equipped with high-resolution cameras and internet connectivity, has made scanning QR codes convenient and accessible. Users can simply point their smartphone camera at a QR code and decode the information using dedicated apps or built-in features.
  • Efficient and Contactless Interactions: The COVID-19 pandemic accelerated the adoption of QR codes as businesses sought ways to minimize physical contact. QR codes became vital for touchless menus, contactless payments, and digital check-ins. Scanning a code provided a safe and efficient alternative to traditional methods of accessing information or completing transactions.
  • Marketing and Advertising: QR codes have become valuable tools for marketers and advertisers, bridging the gap between online and offline experiences. Adding codes to advertisements, packaging, and promotional materials allows businesses to reach their target audience effectively. QR codes enable users to access additional product details, exclusive discounts, or video reviews, enhancing the customer experience and improving target achievement.
  • E-commerce and Payments: QR codes have transformed payment methods and e-commerce, making it easier for people to accept and transfer money. Mobile payment options and QR codes have made online shopping more convenient, enabling users to quickly add items to their carts by scanning codes.
  • Integration in Various Industries: QR codes are not limited to specific industries but are used across various sectors. They can be found in transportation systems for ticketing, museums for providing exhibit information, real estate for virtual tours, and healthcare for accessing patient data or facilitating prescription refills. The versatility of QR codes makes them adaptable to different scenarios, making them attractive for countless applications.


How to Protect Yourself from QR Code Fraud


As the popularity of QR codes continues to rise, so does the risk of QR code fraud. Cybercriminals are finding new ways to exploit this technology to deceive unsuspecting individuals and gain unauthorized access to personal information or financial accounts. To protect yourself from QR code scams and fraud, it’s essential to understand the risks and follow best practices. The following strategies will help you avoid QR code fraud and safeguard your digital security:

  1. Check for Signs of Tampering: Before scanning a QR code, inspect it for any signs of tampering. Fraudsters may overlay their own QR code sticker on top of a legitimate one, leading to unintended consequences. Look for irregularities in the design, such as misalignment or poor printing quality. If in doubt, find an alternative method to obtain the desired information or service.
  2. Enable Security Features on Your Device: Ensure that you have security features enabled on your smartphone or scanning device. Regularly update your operating system and apps to the latest versions, enable device lock screens with secure passwords or biometric authentication, and use reputable security software to protect against malware or phishing attempts.
  3. Stay Informed and Educated: Keep yourself informed about the latest QR code fraud techniques and scams. Stay updated on common types of QR code fraud, such as fake payment codes or malicious codes that lead to phishing websites. By remaining vigilant and informed, you can better protect yourself from falling victim to QR code scams.
  4. Use Trusted Scanning Apps: When scanning QR codes, ensure that you use a reputable and trustworthy scanning app from a reliable source. Stick to well-known apps from official app stores, as they are more likely to have robust security measures. Be cautious of unknown or third-party scanning apps that could be malicious and designed to exploit vulnerabilities in your device.
  5. Verify the Destination: Before scanning a QR code, carefully examine the destination it leads to. If the code is printed on a physical object or public space, ensure it is legitimate and authorized. Avoid scanning codes from unknown sources or suspicious websites, as they may redirect you to malicious websites or initiate unauthorized downloads.
  6. Be Cautious with Personal Information: Exercise caution when a QR code prompts you to enter personal information such as your name, address, or banking details. QR codes should typically be used for information retrieval rather than data submission. Avoid providing sensitive information unless you are confident in the legitimacy and security of the source.

QR codes FAQs

Does a QR code expire?  –  There is no actual expiry date associated with QR codes, but they might become outdated if the information they contain becomes obsolete.

Is it Possible to Scan a QR Code Without the Internet?   – No, to retrieve information or data from a QR code, you need to connect your device to an internet connection.

Where are QR Codes Commonly Used?   – QR codes can be found everywhere due to technological advancements. They are commonly used in museum exhibits, mobile payments, restaurant menus, and various other applications.

QR codes offer a wealth of benefits, including facilitating payments and e-commerce, accessing information quickly, and enhancing user experiences. However, it’s crucial to use them safely to avoid falling victim to QR code fraud. By following the recommended strategies and staying informed, you can securely scan QR codes and enjoy the convenience they offer.


Top Websites for Downloading Movie Subtitles

0

Although not everyone prefers subtitles, they serve an essential purpose for those who rely on them when watching movies. Subtitles significantly improve the understanding of dialogue, especially in foreign films or when the audio quality is subpar. If you require subtitles for a specific movie, it’s helpful to know where to find them without cost. Below, we provide a list of seven highly recommended websites where you can download subtitles in different languages, such as English, Japanese, or Chinese.

Subscene

Subscene.com stands out as one of the most popular subtitle download sites, boasting a vast database of movies and shows from around the world. Users and website administrators add subtitles daily, making them available in multiple languages. The site features a user-friendly interface that allows for easy filtering of subtitles by language. Additionally, if you can’t find the subtitle you’re looking for, Subscene offers a “Request Subtitle” feature to help you obtain subtitles not yet available in their database.

subtitle download sites
photo: Pixabay

YIFY Subtitles

YIFYsubtitles.com is another excellent website for downloading subtitles, regularly updated to include the latest releases. With its user-friendly interface, you can search for subtitles based on language and genre. The site offers an extensive collection of popular and recent movies. Keep in mind that when downloading subtitles, you will be redirected to a PDF download page, which may seem a bit cumbersome.

Subtitle Seeker

Subtitleseeker.in takes a different approach to subtitle downloads. Rather than hosting its own collection, this site aggregates results from over 20 subtitle download sites, making it a valuable resource if you’ve had trouble finding subtitles elsewhere. Subtitle Seeker boasts a simple and user-friendly interface, earning positive feedback from users. The main page features a search bar and sections displaying recent subtitles for both movies and TV shows.

Addic7ed

Addic7ed.com provides subtitles for the latest movies, TV series, box office trailers, and even news. This site offers subtitles in genres that may be harder to find elsewhere, including English, Telugu, Tamil, and more. While Addic7ed offers a subscription option, you can download subtitles without creating an account. The site also allows you to track ongoing shows and access completed movies.

TVSubtitle.net

TVSubtitle.net is another excellent website for downloading subtitles. Its clean and user-friendly interface categorizes subtitles into two main sections: Movies and TV shows. This makes it easy to locate the specific subtitles you’re looking for. Additionally, if you have a subtitle file you’d like to share with others, this site provides a convenient sharing feature.

OpenSubtitle

OpenSubtitle.org boasts one of the largest subtitle databases on the internet. Supporting multiple languages, OpenSubtitle offers subtitles in virtually any language you need. The site features an advanced search tool that allows you to filter results by year, country, genre, season, or episode. OpenSubtitle’s search functionality is considered one of the best tools available online.

Subtitlesbox

For those struggling to find subtitles for the latest movies, Subtitlebox.com is worth a try. This site offers DivX subtitles for the latest trailers, movies, and TV shows, all free of charge. Subtitlesbox.com features a clean website interface, devoid of ads, pictures, or movie posters. It provides a simple search bar and useful links for locating subtitles, movies, or streaming sites.

Undoubtedly, the internet offers numerous websites to download subtitles in any language. The aforementioned sites are highly recommended and can be shared with anyone seeking subtitles online.

Picture in Picture – PIP mode Not Working on Android – Solutions

0

Picture in Picture (PIP) mode is a useful feature that enhances multitasking on Android devices. However, it can sometimes encounter issues, causing inconvenience for users. If you’re experiencing problems with PIP mode on your Android phone, don’t worry. This article provides straightforward solutions to troubleshoot and resolve the PIP mode not working on Android issue. Let’s explore the steps to fix this problem.

Reasons why Picture in Picture PIP mode not working on Android:

PIP Mode is disabled on your Android device.
The app you’re trying to use doesn’t support PIP mode or is incompatible.
Corrupted cache is affecting PIP mode.
The app you’re using is outdated and requires an update.
The current version of your phone’s software doesn’t support PIP mode.

Android
Android – photo: Pixabay

How to Fix Picture in Picture Mode (PIP) Not Working on Android:

Solution 1: Enable Picture in Picture Mode

Open the Settings app on your Android device.
Navigate to Apps > Special App Access.
Select “Picture-in-Picture Mode.”
Check if the toggle next to the desired application is enabled. If not, tap the toggle to enable it.

Solution 2: Verify App Compatibility

Confirm if the app you’re using supports Picture in Picture (PIP) mode.
Visit the app’s official website for compatibility information.

Solution 3: Restart Your Device

Restarting your Android device can resolve temporary bugs and glitches.
Press and hold the power button until the Restart option appears.
Tap “Restart” and wait for your device to turn back on.
Check if the PIP mode not working issue has been resolved.

Solution 4: Clear App Cache

Open the Settings app on your Android device.
Go to Apps > All Apps and select the desired app.
Tap on “Storage and Cache.”
Select “Clear Cache.”
Relaunch the app and check if the PIP mode not working issue has been fixed.

Solution 5: Update Your Apps

Launch the Google Play Store on your Android device.
Tap your profile icon at the top right corner and select “Manage Apps & Device.”
Choose “Updates Available.”
Locate the app you want to update and tap “Update.”
After updating, try using Picture in Picture Mode to check if the issue is resolved.

Solution 6: Check for Software Updates

Open the Settings app on your Android device.
Go to System > System Update.
Your device will check for available updates.
If an update is available, download and install it.
Check if the issue has been resolved.

Solution 7: Reinstall the App

Open the App drawer on your Android device.
Locate the problematic app and press and hold its icon.
Tap “Uninstall” to remove the app.
Visit the Google Play Store, download the latest version of the app, and reinstall it.
Launch the app and check if the issue has been resolved.

Summary:
By following the above solutions, you can troubleshoot and fix the Picture in Picture PIP mode not working on Android device. If the problem persists, you may consider resetting your phone or waiting for an update. We hope this article has provided helpful guidance to restore your PIP mode functionality.

Discover the Hidden Features in iOS 17 and iPadOS 17

0

While certain prominent software features tend to dominate the spotlight (such as StandBy and NameDrop), there are numerous remarkable yet lesser-known features waiting to be discovered in iOS 17 and iPadOS 17. This article explores some of the best-hidden features in iOS 17 and iPadOS 17 that can transform you into a power user.

Automated Deletion of Email and Text Verification Codes

Verification emails and texts serve a valuable security purpose, but deleting them can be time-consuming or result in app clutter. In iOS 17, maintaining a clean device becomes simpler with the automatic deletion of email and text verification codes once they have been used. You can find this feature in Settings > Passwords > Password Options > enable Clean Up Automatically.

Autofill Verification Codes from Email

Previously, Apple introduced the ability to autofill verification codes sent via text messages, but email verification codes were left out. However, iOS 17 changes that by extending the intelligence that scans texts to also recognize verification codes in emails. Say goodbye to an additional hassle in maintaining strong security.

Collaborative Playlists in Apple Music

Sharing an Apple Music playlist with friends and family is great, but iOS 17 takes it a step further by enabling collaborative playlist creation. Now, assembling party or road trip playlists becomes effortless as everyone gets a chance to contribute their favorite songs.

Playlists in Apple Music
Playlists in Apple Music – Play music together
Now SharePlay makes it easier for everyone to control music in the car — even passengers in the back seat — so everyone can play their favorite music and contribute to what’s playing

Use FaceTime on Apple TV with iPhone

Transforming your Apple TV from a passive streaming device into a communication hub for FaceTime video calls seems like a logical step. Although Apple hasn’t added a camera to Apple TV, iOS 17 allows your iPhone to function as a FaceTime camera for Apple TV. Simply connect your iPhone to your Apple TV, position it near your TV, and enjoy full-screen FaceTime calls from the comfort of your living room.

FaceTime on Apple TV
FaceTime on Apple TV – 
Use your iPhone as a camera and start a call directly from the FaceTime app on Apple TV, or hand off the call from your iPhone to your TV – images: Apple

Live Voicemail Transcription on Lock Screen

Call screening receives a significant upgrade in iOS 17. When you send a call to voicemail and the caller starts leaving a message, your iPhone can display a live transcript of the message on your lock screen. If the message isn’t important, you can skip it and return the call later. However, if it turns out to be significant, you can accept the call directly from the lock screen and start conversing with the caller. You can enable or disable this feature in Settings > Phone > Live Voicemail.

Listen to Webpages in Safari

If you come across an article that you’re interested in but don’t have the time to read, iOS 17 provides an alternative. Safari introduces the “Listen to Page” feature, allowing you to have the article read aloud to you. To experience this, open a lengthy article in Safari, tap on “Aa” in the address bar, and select “Listen in Page.”

Secure Private Browsing with Face ID and Touch ID

Private Browsing becomes more secure in iOS 17 with the addition of biometric authentication. Previously, anyone who unlocked your iPhone or iPad could access any Private Browsing windows you had open. With the update, locking your device automatically locks Private Browsing windows, and they can only be unlocked using Face ID or Touch ID (depending on device capabilities). You can toggle this feature in Settings > Safari > Require Face ID to Unlock Private Browsing.

Offline Maps in Apple Maps

In iOS 17, Apple Maps introduces support for offline maps, catching up to Google Maps which has offered this feature for years. Now, you can download map data provided by Apple or third parties and use it without an internet connection. This is particularly useful in areas with poor network coverage or rural regions. Explore this feature in Apple Maps by tapping on your user profile icon and selecting “Offline Maps.”

Find a Lost Apple Watch with Control Center

If you misplace your Apple Watch, iOS 17 makes it easier to find with Control Center on your iPhone. You can trigger your Apple Watch to play a sound, aiding in its location. While Find My can also perform a similar task, having this feature in Control Center saves a few extra steps when searching for your Watch. To utilize this feature, go to Settings > Control Center > tap the “+” next to “Ping My Watch,” then open Control Center and tap on the watch icon.

Share Passwords and Passkeys with Trusted Contacts

Enhancing account security, iOS 17 offers an improved method for sharing passwords and passkeys with trusted contacts. You can now create multiple contact groups and share passwords within those groups using iCloud Keychain. This is particularly handy for sharing one set of passwords with your partner and children while sharing different passwords with coworkers. To set up and share passwords, navigate to Settings > Passwords > Get Started in the Family Passwords section, and follow the onscreen prompts to create a group and share passwords.

Please note that iOS 17 requires at least an iPhone XR or newer to be downloaded. The list of compatible devices also includes the second-generation iPhone SE and later.

If your device is compatible with the new versions of iOS and iPadOS, you will receive an alert when they become available. Alternatively, you can go to Settings > General > Software Update to check for an available update. If one is available, select “Download and Install.”

iOS 17 is compatible with these devices:

iPhone 14

iPhone 14 Plus

iPhone 14 Pro

iPhone 14 Pro Max

iPhone 13

iPhone 13 mini

iPhone 13 Pro

iPhone 13 Pro Max

iPhone 12

iPhone 12 mini

iPhone 12 Pro

iPhone 12 Pro Max

iPhone 11

iPhone 11 Pro

iPhone 11 Pro Max

iPhone XS

iPhone XS Max

iPhone XR

iPhone SE
(2nd generation or later)

VLC player – unable to open a network stream

0

If you’re experiencing issues with VLC player unable to open a network stream, there are several things you can try to resolve the problem:

Check the network stream URL: Make sure you have entered the correct URL for the network stream. Double-check for any typos or missing characters. Ensure that the URL is valid and accessible.

Disable the firewall: Sometimes, the firewall settings on your computer can block VLC from accessing network streams. Temporarily disable your firewall and try opening the network stream again. If it works, you can configure your firewall to allow VLC to access the network.

Update VLC player: Ensure that you are using the latest version of VLC player. Older versions may have bugs or compatibility issues that could prevent network streams from opening. Visit the official VLC website and download the latest version available for your operating system.

VLC
photo: VLC – unable to open a network stream

Clear VLC cache: VLC stores temporary files in its cache, which can sometimes cause issues with network streams. Clear the cache by going to VLC Preferences or Settings, finding the cache option, and clearing it. Restart VLC and try opening the network stream again.

Reset VLC preferences: If none of the above solutions work, you can try resetting VLC preferences to their default settings. Go to VLC Preferences or Settings and look for the option to reset preferences. This will restore VLC to its default configuration, and you can try opening the network stream again.

Try a different network protocol: If you are using a specific network protocol (such as HTTP or RTSP), try using a different one. VLC supports multiple network protocols, so experiment with different options to see if it resolves the issue.

Test the network stream on another device: If possible, try opening the network stream on another device or computer using VLC player. This will help determine if the issue is specific to your current setup or if it’s related to the network stream itself.

If none of these solutions work, you may need to check more specific details about the network stream, such as the URL or any error messages you encounter.

VLC player – network protocols for streaming media support

VLC player supports a wide range of network protocols for streaming media. Here are some of the commonly used protocols supported by VLC:

HTTP (Hypertext Transfer Protocol): VLC can play media streams over HTTP, which is the protocol used for transferring data over the web.

RTSP (Real-Time Streaming Protocol): VLC supports RTSP, a network protocol used for streaming media content, particularly for live streaming.

MMS (Microsoft Media Server): VLC is capable of playing media streams using the MMS protocol, which is commonly used for streaming Windows Media formats.

RTMP (Real-Time Messaging Protocol): VLC can handle RTMP streams, a protocol often used for streaming audio, video, and data over the internet.

FTP (File Transfer Protocol): VLC allows you to stream media files from FTP servers using the FTP protocol.

UDP (User Datagram Protocol): VLC can receive media streams over UDP, a lightweight protocol that offers low latency and is commonly used for live streaming and broadcasting.

RTP (Real-Time Transport Protocol): VLC supports RTP, a protocol used for delivering audio and video over IP networks, typically in real-time applications such as video conferencing and streaming media.

SFTP (SSH File Transfer Protocol): VLC can stream media files over SFTP, a secure file transfer protocol that provides encrypted communication between the client and server.

These are just a few examples of the network protocols supported by VLC player. VLC is known for its extensive compatibility and can handle various streaming protocols. If you have a specific network protocol in mind, you can check the VLC documentation or refer to the streaming source’s specifications to ensure compatibility.

Data Protection: Best Practices for Database Backup Security

0

In today’s digital landscape, data plays a critical role in ensuring the growth and continuity of organizations. With the constant generation, processing, and storage of large volumes of data, safeguarding it becomes paramount to mitigate the devastating repercussions of data loss in the event of a disaster. Without reliable database backups, recovering infrastructure and ensuring stability can be challenging, leading to application failures, downtime, and further data losses.

Unfortunately, many organizations often overlook the importance of database backups. IT specialists, prioritizing production tasks, may postpone the implementation of backup workflows. However, as organizations expand their operations and infrastructure, developing a comprehensive backup plan and establishing efficient backup security measures become increasingly crucial.

Database Backup Security
Database Backup Security – photo: Pixabay

Both small organizations and enterprises can benefit from a centralized solution, such as the Entrust, NordLayer, BigMIND Backup solution, to protect their database backups and environments. This ensures swift recovery whenever required. To increase your database backup security, it is essential to follow these best practices:

Cloud-Based Storage:
Leveraging cloud-based storage for your data backups offers reliability and efficiency. With a cloud backup storage platform, you can access and manage your backups from anywhere with an internet connection. Additionally, cloud storage providers prioritize the security of their services, offering an extra layer of protection. By combining the security capabilities of a modern backup solution with those of a cloud storage service, you can enhance backup protection and overall system reliability.

Implement Backup Encryption:
While encrypting production data is a common practice to prevent unauthorized access, backup data encryption is often overlooked. Hackers can target backup transfer workflows or storage repositories to steal data. Encrypting your backup data with robust encryption algorithms adds an additional layer of protection, making it challenging for hackers to crack the code. Look for a comprehensive backup solution that supports encryption features, including both in-flight (during transfer) and at-rest (storage period) encryption. Advanced Encryption Standard (AES 256) is a recommended encryption standard that ensures up-to-date backup protection against unauthorized access.

Restrict Access Rights:
Carefully managing access rights to data backups is crucial in reducing the chances of data loss or corruption resulting from human error or insider attacks. Modern data protection solutions offer features such as two-factor authentication (2FA) and Role-Based Access Control (RBAC) to enhance access security. By implementing these features, you can add an extra layer of protection during the login process and configure backup access rights for different employee groups, simplifying management workflows. Applying the principle of least privilege ensures efficient database backup security.

Maintain Backup Logs:
Keeping track of your data backup logs is essential. Regularly update and monitor your existing database backups, noting their creation dates, and regularly test their recoverability. Discovering that a backup is unrecoverable after losing the original data can be disastrous. Thoroughly tracking backups allows you to maintain control over the security of your data and facilitates faster recovery in emergency situations, minimizing downtime.

Utilize Multiple Storage Types:
While cloud storage services are gaining popularity, physical storage remains advantageous for database backup security. Physical storage provides an offline backup solution, ensuring data recovery even in the absence of internet access. It also offers faster recovery times compared to cloud-based services when copying data from directly attached physical disks. Additionally, physical disks can be easily transformed into air-gapped backup storage, providing high security for long-term data archiving purposes. Adhering to the reliable 3-2-1 backup rule is crucial, ensuring at least three copies of data on two different storage media, with one backup copy stored offsite or in the cloud. This strategy guarantees a functioning backup copy on site, maintaining control over critical data in case of a primary backup failure, such as after a ransomware attack.

Summary
Implementing regular database backup workflows is essential to secure your data and support production continuity. However, simply creating backups is not enough. To ensure comprehensive database backup security, you must carefully consider your backup storage and security approach. Cloud storage provides convenience and security, while backup encryption and access restriction prevent unauthorized access and minimize data loss. Tracking backups ensures data integrity and recoverability, while utilizing multiple storage types adheres to the 3-2-1 backup rule, ensuring reliable backup copies. By following these best practices, you can safeguard your data effectively.

ASUS ROG Swift PG48UQ OLED Monitor – 4K OLED…

0

Gaming monitors have been growing in size, and unfortunately, so has the price tag attached to them. The ASUS ROG Swift PG48UQ OLED Monitor is no exception, retailing at a hefty £1499. However, this monitor justifies its high price with an impressive array of features, making it a tempting choice for avid gamers.

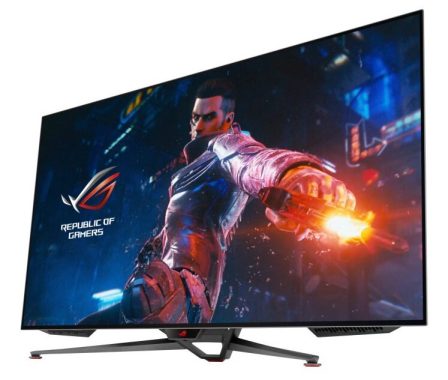
The standout feature of the PG48UQ is its massive 47.5-inch 4K OLED display. This display boasts a refresh rate of 138Hz (overclocked), a lightning-fast response time of 0.1ms, and G-Sync compatibility for tear-free gaming. The monitor also supports HDR10 and offers a peak brightness of 900 nits, delivering stunning visuals with vibrant colors and deep blacks. Additionally, it comes with HDMI 2.1 ports, allowing seamless connectivity with the latest gaming consoles.

ROG Swift PG48UQ OLED Gaming Monitor

In terms of design, the PG48UQ is undeniably a beast. Though its stand design allows for a relatively close placement to a wall, its large size can be overwhelming if you’re accustomed to smaller monitors. Setting it up might require assistance due to its weight of 16.2kg. The monitor features a pleasingly basic design, devoid of the usual Republic of Gamers RGB lighting. The thin black bezel and metallic finish of the stand give it an elegant look, focusing your attention on the impressive display rather than unnecessary lighting effects.

It’s important to note the difference between input lag and response time. While response time refers to how quickly a display can change pixels, input lag is the delay between a command and its execution on-screen. The PG48UQ excels in both areas. With an OLED panel, it achieves an incredible response time of 0.1ms, eliminating ghosting and tearing even at an overclocked refresh rate of 138Hz. During testing, the image quality was exceptional, passing all the benchmarks with flying colors. The 4K resolution enhances the clarity of text and the richness of colors, and the HDR support further elevates the visual experience.

To combat the risk of screen burn, which is a concern with OLED technology, ASUS has implemented helpful features. The Screen Protection settings offer options such as the auto static brightness limiter (ASBL) that dims the screen when static images are detected. Pixel Cleaning provides a screen cleaning option, and Screen Move slightly adjusts the screen periodically. Adjust Logo Brightness helps prevent static and bright logos from causing burn-in issues.

In terms of audio, the PG48UQ surprises with its decent built-in speakers. While they can’t match a dedicated speaker system or headset, the 2 x 10W speakers and 15W woofer provided by Harmon/Kardon offer a satisfactory listening experience.

ROG Swift PG48UQ OLED Gaming Monitor
ROG Swift PG48UQ OLED

Despite its steep price, the ASUS ROG Swift PG48UQ OLED Monitor delivers exceptional performance and an impressive set of features. The combination of a massive 4K OLED display, an incredibly fast response time, an overclocked refresh rate, and G-Sync support makes it a compelling choice for gamers seeking a premium gaming experience. The monitor also includes screen protection features to address OLED screen burn concerns. With its wide range of connections, including HDMI 2.1 ports for 4K console gaming, it caters to diverse needs. The inclusion of a remote control is a welcome addition, simplifying menu navigation. If you have the budget and desk space, the PG48UQ is definitely worth considering for its superb performance and immersive gaming possibilities.

One aspect that may be a drawback for some users is the limited adjustability of the stand. The PG48UQ lacks height and pivot functions, offering only a slight tilt adjustment. However, it is VESA mount compatible (300 x 300), allowing users to explore alternative mounting options. Even without the stand, the monitor weighs a substantial 15kg, highlighting the robust build quality.

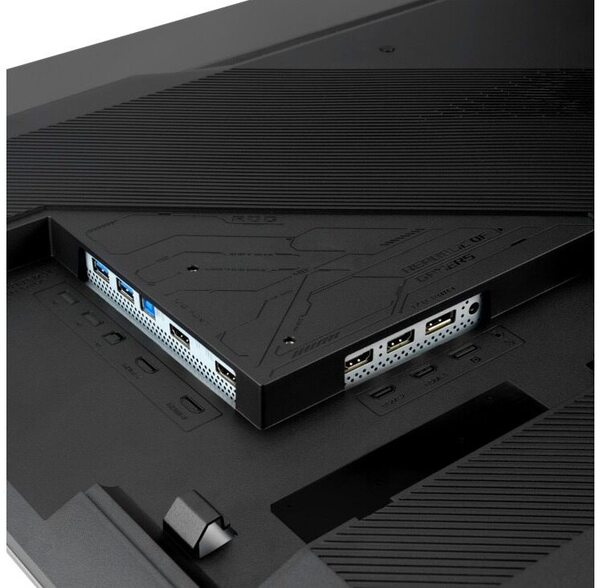
In terms of connectivity, the PG48UQ offers a generous selection of ports. With HDMI 2.1 compatibility, you can easily connect the latest gaming consoles to enjoy the full 4K gaming experience. The inclusion of DisplayPort 1.4 DSC ensures compatibility with a wide range of devices, further enhancing its versatility.

Navigating the monitor’s menu system is made more convenient with the addition of a remote control. This eliminates the need to rely solely on the joystick control, which can be fiddly at times. However, if you enjoy the challenge of mastering the joystick control, it is still available for those who prefer a more traditional approach.

ROG Swift PG48UQ OLED Gaming Monitor
ROG Swift PG48UQ OLED Gaming Monitor – images: Asus

Although the price tag of £1499 may seem daunting, the ASUS ROG Swift PG48UQ OLED Monitor excels in performance and features across the board. The combination of its massive 4K OLED display, blazing-fast response time, overclocked refresh rate, and comprehensive color reproduction provides a truly immersive gaming experience. The inclusion of screen protection features demonstrates ASUS’s commitment to addressing the potential drawbacks of OLED technology, further enhancing the monitor’s appeal.

ROG Swift PG48UQ OLED Gaming Monitor
ROG Swift PG48UQ Monitor

If you have the financial means and sufficient desk space, the PG48UQ is a top-tier choice for gamers who prioritize exceptional visuals, responsiveness, and immersive gameplay. While it may stretch the budget for some, the investment is rewarded with a monitor that delivers on its promises and elevates the gaming experience to new heights.

The ASUS ROG Swift PG48UQ is a 47.5-inch 4K OLED gaming monitor designed for immersive gaming and high-end performance. Below is a detailed breakdown of its pros and cons based on available information and reviews.
Pros

  1. Exceptional Image Quality:
    • The 4K (3840 x 2160) OLED panel delivers perfect black levels, infinite contrast, and vibrant colors with 98% DCI-P3 gamut coverage and true 10-bit color depth.
    • Pre-calibrated with Delta E < 2 for accurate colors, ideal for gaming and creative work.
    • HDR10 support with up to 900 nits peak brightness enhances detail in bright and dark scenes, making it excellent for HDR gaming.
  2. High Performance for Gaming:
    • Overclockable 138Hz refresh rate (default 120Hz) and 0.1ms gray-to-gray response time ensure smooth, low-latency gameplay, suitable for fast-paced titles.
    • G-SYNC compatibility and support for HDMI-VRR and AMD FreeSync Premium reduce screen tearing.
    • HDMI 2.1 ports (2x) support 4K 120Hz gaming on consoles like PS5 and Xbox Series X.
  3. Anti-Glare and Burn-In Mitigation:
    • Features an anti-glare micro-texture coating to reduce reflections, improving visibility in various lighting conditions.
    • Built-in screen protection features like pixel cleaning, screen move, and auto static brightness limiter (ASBL) help mitigate OLED burn-in risks.
  4. Robust Connectivity:
    • Offers extensive ports: 2x HDMI 2.1, 2x HDMI 2.0, 1x DisplayPort 1.4 with DSC, 4x USB 3.2, 1x USB Type-B, S/PDIF out, and a 3.5mm headphone jack.
    • Includes a tripod socket for webcam mounting, enhancing streaming setups.
  5. Impressive Audio:
    • Built-in 2.1 speaker system (2x 10W speakers + 15W woofer) with Harman Kardon tuning provides rich, high-quality sound for a monitor, suitable for gaming and media consumption.
  6. Versatile Features:
    • Supports multiple aspect ratios (24″, 27″, 34″) for smaller display sizes, adjustable vertically for flexibility.
    • Includes a remote control for easy menu navigation and settings adjustments.
    • Custom heatsink reduces panel temperatures by up to 8%, enhancing OLED longevity.
  7. Award-Winning Design:
    • Won the Taiwan Excellence Award 2023 and Good Design Award 2022 for its innovative design and performance.

Cons

  1. Large Size and Weight:
    • At 47.5 inches and 16.2kg (with stand), it requires significant desk space (1068 x 686 x 266mm) and may be impractical for smaller setups.
    • Setup can be challenging due to its size and weight, often requiring two people.
  2. Limited Stand Adjustability:
    • The stand only offers tilt adjustment (±5 degrees), lacking height or pivot options, which may require makeshift solutions like propping it up.
  3. High Price:
    • Priced at approximately £1499 or $1499, it’s expensive compared to alternatives like the LG 48C2 OLED TV, which offers similar performance for less.
    • The high cost may not justify the monitor-specific features for some users, especially when OLED TVs are cheaper.
  4. OLED Burn-In Risk:
    • Despite mitigation features, OLED panels are susceptible to burn-in with prolonged static images, a concern for PC use with taskbars or HUDs.
    • Users must be cautious with static content to avoid long-term damage.
  5. Firmware Issues:
    • Early firmware versions (e.g., V032) had HDR and power-related issues, requiring updates (e.g., V040) to fix washed-out HDR colors.
    • Some users reported color accuracy problems, particularly with SDR content in HDR mode.
  6. Matte Coating Trade-Off:
    • The anti-glare matte coating reduces reflections but may slightly dull contrast compared to glossy finishes, potentially affecting vibrancy in bright conditions.
    • Some users prefer glossy coatings for sharper reflections and contrast.
  7. Power Consumption:
    • Consumes up to 300W, higher than the 42-inch PG42UQ (<220W), which could impact energy costs.
  8. Text Fringing Concerns:
    • While the sub-pixel layout improves text clarity, some users report minor text fringing, which may affect programming or text-heavy tasks.
  9. Not Ideal for Close-Up Use:
    • Due to its size, it’s better suited for console gaming from a distance (e.g., a few meters) rather than close-up PC use, which may cause eye strain or discomfort.

Summary: The ASUS ROG Swift PG48UQ is a top-tier gaming monitor with stunning OLED visuals, fast performance, and robust features tailored for both PC and console gaming. Its large size, excellent color accuracy, and high refresh rate make it ideal for immersive gaming setups, but its high price, limited stand adjustability, and burn-in risks may deter some users. It’s best suited for those with ample desk space and a budget for premium OLED technology, but alternatives like the LG 48C2 may offer better value for similar performance.

ROG Swift PG48UQ OLED Gaming Monitor Specification

Display

Panel Size (inch) :   47.53
Aspect Ratio :   16:9
Color Space (DCI-P3) :   98%
Color Space (sRGB) :   133%
Panel Type :   OLED
True Resolution :   3840×2160
Display Viewing Area (HxV) :  1052.16 x 591.84 mm
Display Surface :   Non-Glare
Pixel Pitch :  0.27405mm
Brightness (Typ.) :   450cd/?
Contrast Ratio (Typ.) :   135,000:1
Contrast Ratio (HDR, Max) :  1,500,000:1
Viewing Angle (CR≧10) :  178°/ 178°
Response Time :  0.1ms(GTG)
Display Colors :  1073.7M (10 bit)
Flicker free :  Yes
HDR (High Dynamic Range) Support :  HDR10
Refresh Rate (max) :  138Hz


Video

Trace Free Technology :  Yes
Color Accuracy :  ?E< 2
GamePlus :  Yes
Low Blue Light :  Yes (Hardware Solution)
HDCP Support :  Yes, 2.3
Game Visual :  Yes
VRR Technology :  Yes (Adaptive-Sync)
HDR Mode :  Yes
Shadow Boost :  Yes
PIP (PBP) Technology : Yes


I/O Ports

DisplayPort 1.4 DSCx 1
HDMI (v2.0)x 2
HDMI (v2.1)x 2
Earphone jack : Yes
USB Hub :  4x USB 3.2 Gen 1 Type-A
SPDIF out (Optical Digital Audio Out):Yes

Audio

Speaker:  Yes(10Wx2)
Woofer:  Yes(15W)

What to Do When you’re unable to install an Android app?

0

There can be several reasons why you’re unable to install an Android app. Here’s a some of the possible causes:

Unknown sources: If you’re trying to install an app from outside the Google Play Store, you need to enable installation from unknown sources in your device settings.

Corrupted or incomplete APK file: The APK file you’re using for installation may be corrupted or incomplete. Try redownloading it from a reliable source.

Compatibility issues: The app you’re trying to install might not be compatible with your Android device. Check the app’s requirements and ensure they match your device’s specifications.

Insufficient storage space: If your device doesn’t have enough free storage space, you won’t be able to install new apps. Delete unnecessary files or apps to free up space.

Antivirus or security apps: Some antivirus or security apps can interfere with app installations. Temporarily disable them or add the APK file or installation process to the app’s exclusion list.

File manager conflicts: Certain file manager apps may have limitations or conflicts that prevent the installation of third-party apps. Try using a different file manager if you’re experiencing issues.

Device-specific issues: Occasionally, there may be device-specific problems or software glitches preventing app installation. Restart your device or seek technical support for further assistance.

unable to install an Android app
Android – photo: Pixabay


Unable to install Android application from Google Play Store?


If you’re experiencing difficulties installing an Android application from the Google Play Store, there are several steps you can try to troubleshoot the issue:

  • Clear Google Play Store cache and data: Go to your device’s Settings, then navigate to “Apps” or “Application Manager.” Locate Google Play Store and tap on it. From there, select “Storage” and choose “Clear cache” and “Clear data.” Restart your device and try installing the app again.
  • Check your internet connection: Ensure that you have a stable internet connection. You can try switching between Wi-Fi and mobile data or connecting to a different network to see if that resolves the problem.
  • Check available storage space: Verify that you have sufficient storage space on your device to accommodate the app you want to install. If your device’s storage is nearly full, consider removing unused apps or files to free up space.
  • Update Google Play Store: Make sure you have the latest version of the Google Play Store app installed on your device. You can do this by opening the Play Store, accessing the menu, and going to “Settings.” Scroll down to the “Play Store version” and tap on it to check for updates.
  • Check for disabled apps: Some devices allow users to disable specific apps, including the Google Play Store. Check if the Play Store has been disabled accidentally, and if so, enable it again.
  • Disable VPN or Proxy: If you’re using a VPN (Virtual Private Network) or a proxy server, try disabling it temporarily and then attempt the installation again.
  • Clear Google Play Store data via Recovery Mode (advanced): If the above steps don’t work, you can try clearing the Google Play Store data via Recovery Mode. This process may vary depending on the device you have, so I recommend searching online for instructions specific to your device model.

If none of the above solutions resolve the issue, you may want to consider reaching out to the app developer or contacting Google Play Store support for further assistance.


Unable to install APK file on my Andrid phone?


If you’re encountering difficulties installing an Android application from an APK file, here are a few troubleshooting steps you can try:

  • Enable APK installation from unknown sources: By default, Android devices are set to only allow app installations from the Google Play Store for security reasons. To install an APK file, you’ll need to enable installation from unknown sources. Go to your device’s Settings, then navigate to “Security” or “Privacy,” and enable the option to allow installations from unknown sources.
  • Verify the integrity of the APK file: Make sure the APK file you’re trying to install is not corrupted or incomplete. Try re-downloading the APK file from a reliable source or website.
  • Check for sufficient storage space: Ensure that you have enough storage space on your device to accommodate the app you’re trying to install. If your device’s storage is nearly full, consider freeing up space by deleting unused files or apps.
  • Disable antivirus or security apps temporarily: Some antivirus or security apps may interfere with the installation of APK files. Temporarily disable any such apps and attempt the installation again.
  • Try installing from a different file manager: If you’re using a file manager app to locate and install the APK file, try using a different file manager application. Sometimes, certain file managers may have compatibility issues with APK installations.
  • Restart your device: Sometimes, a simple device restart can resolve temporary glitches or conflicts. Try restarting your device and then attempt the installation again.
  • Try a different APK file: If possible, try installing a different APK file to check if the issue is specific to the particular file you’re trying to install. If other APK files install successfully, the problem may lie with the specific APK file you’re trying to install.

If none of these steps resolve the issue, it’s possible that the APK file is incompatible with your device or there may be an underlying issue with your device’s software. In such cases, you may want to seek assistance from the app developer or consult with technical support for your device.


Unable to Install Android third-party app? How to Fix the Issue?


If you’re having trouble installing a third-party Android app (an app that is not from the Google Play Store), here are some steps you can take to troubleshoot the issue:

  1. Enable installation from unknown sources: Android devices have a security setting that allows or blocks installation of apps from unknown sources (outside the Google Play Store). To enable it, go to your device’s Settings, then navigate to “Security” or “Privacy,” and enable the option to allow installations from unknown sources.
  2. Verify the APK file: Ensure that the APK file you’re trying to install is not corrupted or incomplete. Try downloading the APK file again from a reliable source, or check if there’s an updated version available.
  3. Check app compatibility: Confirm that the app you’re trying to install is compatible with your Android device. Some apps may have specific requirements, such as a minimum Android version or certain hardware specifications. Double-check the app’s documentation or the developer’s website to ensure compatibility.
  4. Free up storage space: Ensure that you have enough free storage space on your device to accommodate the app. If your device’s storage is nearly full, delete unnecessary files or apps to make room for the new installation.
  5. Disable antivirus or security apps temporarily: Antivirus or security apps can sometimes interfere with the installation of third-party apps. Temporarily disable any such apps, or add the APK file or the app installation process to the exclusion list of your antivirus/security app.
  6. Try a different file manager: If you’re using a file manager app to locate and install the APK file, try using a different file manager application. Some file managers may have limitations or conflicts that prevent the installation of third-party apps.
  7. Restart your device: Restarting your Android device can help resolve temporary glitches or conflicts. After the restart, try installing the app again.
  8. Use a different APK source: If you’re obtaining the APK file from a specific source or website, try downloading it from a different source. It’s possible that the source you used initially has a corrupted or modified APK file.

Remember, when installing third-party apps, read caution and ensure you trust the source of the APK file. Installing apps from unknown or untrusted sources can pose security risks to your device and personal information.

If the issue persists, you may want to reach out to the app developer or consult with technical support for your device for further assistance.

How to Download All Your Photos and Videos from Facebook?

0

If you’ve been using Facebook for a while, chances are you have a substantial collection of photos and videos stored on the platform. If you’re ready to part ways with Facebook and want to ensure you have a copy of all your media, here’s a step-by-step guide on how to download them.

Facebook
Facebook – photo: Pixabay
  1. Access Facebook’s Download Tool Facebook provides a built-in downloader tool that simplifies the process of downloading your entire history, including photos and videos. You can use this tool on both desktop and mobile devices.
  2. Downloading Data via the Facebook Mobile App
  • Open the Facebook app and tap the three-line hamburger menu.
  • Navigate to Settings & Privacy > Settings.
  • Scroll down and locate the “Your information” section, then tap “Download your information.”
  • On the next page, select “Request a download.”
  • You’ll be prompted to choose the accounts and profiles you want to include in your download. Note that if you have both a Facebook and Instagram account, you can request a download that includes information from both platforms.
  • Select “Complete copy” for a file that includes all available information, or choose “Select types of information” for a file that contains only specific information from your selected profiles.
  • Click “Submit request” on the following page.
  1. Closing Your Account Before you proceed with account deletion, make sure to gather any contact information you need from your Facebook friends, as you might lose access to it. If you have a business or personal page on Facebook, you’ll need to transfer ownership to someone else before deleting your account. Keep in mind that deleting your account will permanently remove your profile, photos, comments, posts, videos, and any other content you’ve added.

To delete your Facebook account:

  • It’s easiest to do this on a computer. Log into Facebook and click your profile picture in the top-right corner.
  • Tap “Settings & Privacy” > “Settings.”
  • In the “Accounts Center” block on the left side of the page, click “See more” in Accounts Center.
  • Under “Account settings,” click “Personal details.”
  • Click “Account ownership and control.”
  • Choose the account or profile you wish to delete.
  • Select “Delete account.”
  • Click “Continue” and follow the instructions to confirm the deletion.
  • Note that you have 30 days to change your mind and cancel the deletion process. After this period, you won’t be able to recover your account. To cancel deletion, log in to your Facebook account and click “Cancel Deletion.”

Please be aware that Facebook may take up to 90 days to completely delete all the content you’ve posted. During this time, your profile won’t be visible to other users. Additionally, Facebook reserves the right to retain your information for legal purposes or in cases of terms violations and other similar issues.

Epson EF-12 portable projector review – One of the best

0

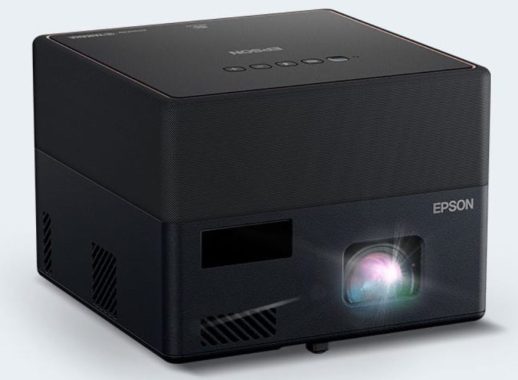
The Epson EF-12 is a compact and portable projector designed for home entertainment purposes.

Design: The Epson EF-12 has a sleek and modern design, featuring a white exterior with a built-in speaker. It is quite compact and lightweight, making it easy to carry around and set up in different locations. The projector has a convenient lens cover that automatically opens and closes when turning the device on and off.

Image Quality: The EF-12 offers a Full HD (1920 x 1080) resolution, which delivers sharp and detailed images. With a brightness of 1,000 ANSI lumens, it performs well in dimly lit rooms or shaded environments, but it may struggle in brightly lit areas. The projector utilizes Epson’s 3LCD technology, which produces vibrant and accurate colors. The contrast ratio is decent, although it may not match the deep blacks and high contrast levels of dedicated home theater projectors.

Epson EF-12
Epson EF-12

Connectivity and Features: The EF-12 offers various connectivity options, including HDMI, USB Type-C, and USB Type-A ports, allowing you to connect a wide range of devices such as laptops, gaming consoles, and streaming devices. It also supports wireless screen mirroring via Miracast, making it convenient for streaming content from compatible devices. The built-in Android TV platform allows you to access popular streaming services directly from the projector without the need for external devices.

Sound Quality: The projector features a built-in 5-watt speaker, which provides decent audio quality for casual viewing. However, for a more immersive audio experience, it is recommended to connect external speakers or a sound system to the projector via the audio-out port or HDMI ARC. The Epson EF-12 includes a Sound by Yamaha 2x 5W sound system, with the speakers positioned to cover the viewing area. HDMI ARC allows the use of a soundbar, and a 3.5mm audio-out socket is available for headphones. Epson has also added Bluetooth functionality, allowing the EF-12 to be used as a wireless speaker for music playback.

Ease of Use: Setting up and operating the Epson EF-12 is straightforward. It has a user-friendly interface and comes with a remote control that provides easy navigation through the menus. The projector has automatic keystone correction, which helps adjust the image to be square and proportional even when the projector is placed at an angle.

Portability: One of the key highlights of the EF-12 is its portability. It weighs around 2.7 pounds (1.2 kg) and comes with a built-in handle, making it easy to carry around and set up in different rooms or even take it on the go for outdoor movie nights.

Epson EF-12 portable projector
Epson EF-12 portable projector – images. Epson

Pros and cons of the Epson EF-12 portable projector:

Pros of the Epson EF-12:

  1. Portability: The EF-12 is compact and lightweight, making it easy to carry and set up in different locations.
  2. Image quality: It offers Full HD resolution and utilizes Epson’s 3LCD technology, delivering sharp, detailed, and vibrant images.
  3. Connectivity options: The projector has multiple ports, including HDMI, USB Type-C, and USB Type-A, allowing you to connect various devices. It also supports wireless screen mirroring via Miracast.
  4. Built-in Android TV: With the integrated Android TV platform, you can access popular streaming services directly from the projector without the need for additional devices.
  5. Automatic keystone correction: The projector automatically adjusts the image to be square and proportional, even when placed at an angle.

Cons of the Epson EF-12:

  1. Limited brightness: With 1,000 ANSI lumens, the EF-12 may struggle in brightly lit environments, and the image quality may be affected.
  2. Contrast ratio: While the projector offers decent contrast, it may not match the deep blacks and high contrast levels of dedicated home theater projectors.
  3. Audio quality: The built-in speaker provides average sound quality, but for a more immersive experience, connecting external speakers or a sound system is recommended.
  4. Lack of optical zoom: The EF-12 does not have optical zoom capabilities, which means you’ll need to physically adjust the projector’s distance from the screen to achieve the desired image size.
  5. Price: Compared to entry-level projectors, the EF-12’s price may be on the higher side, considering its specifications and performance.

It’s worth noting that individual preferences and specific use cases may influence how these pros and cons are weighed.

The Epson EF-12 is part of Epson’s lineup of 3LCD projectors, utilizing three 0.62-inch LCD panels to produce a Full HD image with a pixel count of 1920 x 1080. Its laser light source with 1000 lumens provides quick on/off functionality and an expected lifespan of up to 10 years. Additionally, the EF-12 operates quietly at just 27dB due to the absence of a mercury lamp that needs cooling.

Epson EF-12 portable projector

The Epson EF-12 portable projector runs on the Android TV OS, which offers limited settings but integrates well with the platform. While the available apps are important for the user experience, some popular services like Netflix, BBC iPlayer, All 4, and Now are missing. Although this is not uncommon for portable projectors, it may lead some users to consider a non-smart projector with an HDMI media streamer instead.

Fortunately, the EF-12 supports Chromecast and allows users to cast content from mobile devices or laptops. The Google voice search feature is also available, offering convenience in navigation.

Although not weather-proof, Epson suggests that the EF-12 is suitable for outdoor use. Its sturdy build provides protection, and while it lacks a built-in battery, it can be connected to a garden extension cable. Local film files can be played through the USB port or from the projector’s 10GB of internal storage. The EF-12 also features two HDMI sockets (including ARC and HDCP 2.3 compatibility).

The Epson EF-12 portable projector includes a row of buttons on the top surface for power, Bluetooth, and volume control, but the provided remote control offers comprehensive functionality, including autofocus, auto-keystone correction, and direct access to the app offerings.

The Epson EF-12 is a compact and versatile projector that offers good image quality and convenient features for home entertainment. While it may not match the performance of high-end home theater projectors, it provides a solid viewing experience, especially for casual use in smaller spaces or when portability is a priority. Priced at $699.99, the Epson EF-12 is considered one of the best portable projectors in its price range.