Home Blog Page 60

JVC KS-DR2104DBT Amplifier – Features, Installation, and More

0

The JVC KS-DR2104DBT amplifier is a compact and rugged 4-channel amp designed for use in cars, boats, and ATVs. With a maximum power output of 600 watts and Bluetooth remote control, this marine-rated amplifier is perfect for adding clarity and impact to your audio system. Learn more about the features and installation process of the KS-DR2104DBT.
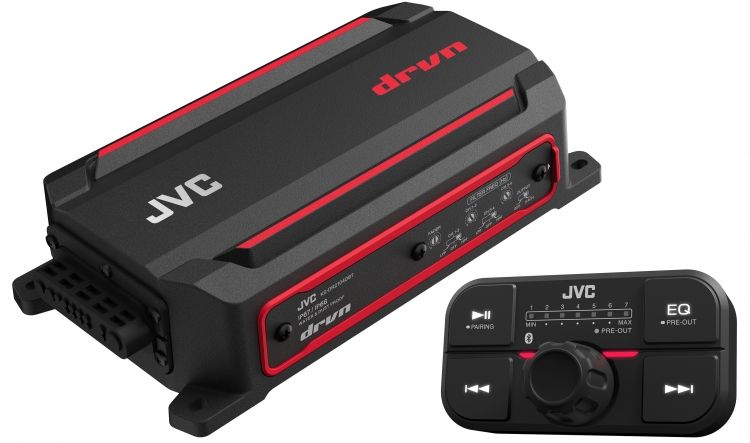
 JVC KS-DR2104DBT amplifier
JVC KS-DR2104DBT amplifier

The JVC KS-DR2104DBT is a Car, Marine, UTV and Motorcycle audio digital amplifier designed to enhance the sound quality of your car’s audio system. Here are some of its features:

  • Power output: The amplifier can deliver up to 600 watts of peak power across four channels, with a continuous RMS output of 45 watts per channel at 4 ohms.
  • Bluetooth connectivity: You can easily connect your Bluetooth-enabled device to the amplifier and stream audio wirelessly.
  • Digital signal processing: The amplifier features a built-in DSP that can adjust the sound settings to optimize the audio quality based on your preferences and the acoustics of your car.
  • Low-pass filter: The low-pass filter can help to eliminate unwanted high-frequency noise from your audio signal.
  • Compact design: The amplifier is designed to be compact and lightweight, making it easy to install in your car.

The JVC KS-DR2104DBT is a versatile and powerful amplifier that can significantly improve the sound quality of your Car, Marine, UTV audio system.

The KS-DR2104DBT amplifier from JVC’s drvn Series is a compact and versatile addition to your vehicle’s audio system. It is suitable for use on both land and water vehicles, and its compact size makes it easy to install in tight spaces. With an output of 50 watts RMS per channel, it provides twice the power of most factory radios or aftermarket marine receivers.

The KS-DR2104DBT features a robust all-weather chassis that is waterproof, dustproof, salt-spray rustproof, and resistant to damage from excessive vibrations. It is built to withstand tough environments, including power washing. The amplifier comes equipped with Bluetooth connectivity, allowing you to stream music directly from your phone or tablet. It also includes a Bluetooth remote control, which allows you to adjust the volume, EQ, and track selection.  photo: JVC JVC KS-DR2104DBT amplifier

The KS-DR2104DBT can operate in bridged 2-channel mode to power a pair of high-performance speakers with up to 150 watts RMS each. The amplifier includes separate low- and high-pass filters for the front and rear channels, which enables you to customize the sound for driving full-range, component midrange, or low-frequency speakers.

KS-DR2104DBT is a high-quality amplifier that delivers excellent sound quality and is built to withstand harsh environments. Its compact size and Bluetooth connectivity make it a great choice for anyone looking to upgrade their vehicle’s audio system.

The JVC KS-DR2104DBT amplifier has a maximum power output of 600 watts. This power output is divided among the four channels, with each channel capable of delivering up to 250 watts at peak power. However, the continuous RMS power output of the amplifier is 45 watts per channel at 4 ohms. This power output is sufficient to power most aftermarket car speakers and can significantly enhance the sound quality of your car’s audio system. It’s worth noting that the actual power output of the amplifier will depend on several factors, including the impedance of the speakers and the voltage of the power supply.

 JVC KS-DR2104DBT amplifier
JVC KS-DR2104DBT IP67/IP66 Waterproof & Dustproof

JVC KS-DR2104DBT amplifier is IP67/IP66 waterproof and dustproof. This means that the amplifier’s chassis is sealed and protected against the ingress of water and dust. The IP67 rating indicates that the amplifier is protected against the effects of immersion in water for up to 30 minutes, while the IP66 rating indicates that the amplifier is protected against water jets from any direction. These ratings ensure that the amplifier is well-suited for use in harsh environments and can withstand exposure to moisture, dust, and other elements. Additionally, the amplifier is also salt-spray rustproof and resistant to damage from excessive vibrations, making it ideal for use in marine and off-road applications.
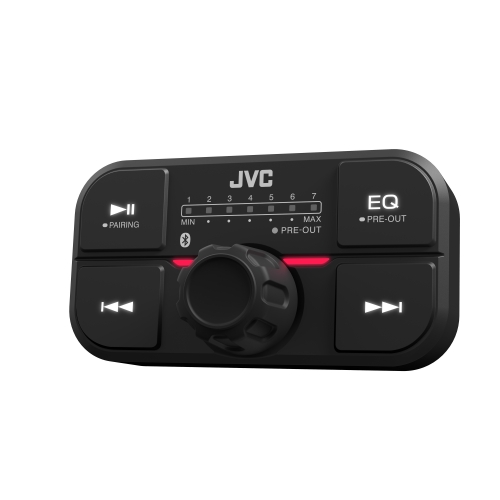
KS-DR2104DBT Remote Control
The JVC KS-DR2104DBT amplifier comes with a remote control that enables you to adjust the volume, EQ, and track selection from a distance. The remote control uses Bluetooth technology to communicate with the amplifier, allowing you to control your music playback from your smartphone or tablet. The remote control is small and easy to use, and it can be mounted in a convenient location in your vehicle for easy access. With the remote control, you can adjust the sound settings on the amplifier without having to reach for the amplifier itself, which can be particularly useful when driving.KS-DR2104DBT Remote ControlJVC KS-DR2104DBT

JVC KS-DR2104DBT Installation

The JVC KS-DR2104DBT amplifier is relatively easy to install, but it’s important to follow the manufacturer’s instructions carefully to ensure proper operation and to avoid damaging your vehicle or the amplifier itself. Here are some general steps to follow for installing the KS-DR2104DBT:
  1. Determine the location for the amplifier: The amplifier should be installed in a location where it will be protected from moisture, dust, and excessive vibrations. It’s also important to ensure that there is adequate ventilation to prevent the amplifier from overheating.
  2. Disconnect the battery: Before beginning the installation, disconnect the vehicle’s battery to prevent electrical shorts and other damage.
  3. Connect the power wires: Connect the power wire to the amplifier’s power input, and then connect the other end of the wire to the battery positive terminal. Be sure to fuse the power wire close to the battery terminal.
  4. Connect the ground wire: Connect the ground wire to the amplifier’s ground input, and then connect the other end of the wire to a clean metal surface on the vehicle’s chassis.
  5. Connect the speaker wires: Connect the speaker wires to the amplifier’s speaker outputs, being sure to observe correct polarity.
  6. Connect the signal wires: Connect the signal wires (usually RCA cables) to the amplifier’s input jacks. If your head unit doesn’t have RCA outputs, you may need to use a line output converter.
  7. Mount the amplifier: Mount the amplifier securely in its location, using the supplied mounting screws or brackets.
  8. Reconnect the battery: Reconnect the vehicle’s battery, being sure to observe correct polarity.
  9. Test the system: Turn on the amplifier and the head unit, and test the system to ensure that everything is working properly. Make any necessary adjustments to the sound settings to achieve the desired sound quality.

These are just general steps, and the specific installation process may vary depending on your vehicle and the equipment you are using. Always refer to the manufacturer’s instructions for detailed guidance on installing your amplifier. If you are unsure about any aspect of the installation, it’s best to consult a professional installer. 

JVC KS-DR2104DBT Specifications

Audio unit
Max Power Output600W
Rated Power OutputStereo (4Ω)50W x 4 (20Hz–20kHz, ≤1.0% THD)
Stereo (2Ω)75W x 4 (1kHz, ≤1.0% THD)
Bridged (4Ω)150W x 2 (1kHz, ≤1.0% THD)
Speaker Impedance4Ω (2Ω to 8Ω allowable)
(Bridged connection: 4Ω to 8Ω allowable)
Frequency response (+0, –3dB)10Hz–20kHz
Signal to noise ratio89dB
Low pass filter frequency (–12dB/oct.)50Hz–200Hz (variable)
High pass filter frequency (–12dB/oct.)50Hz–200Hz (variable)
Preout5V (Max)
Bluetooth
VersionBluetooth Ver.5.0
Frequency range2,402GHz–2,480GHz
RF output power (E.I.R.P.)+4dBm (Max.), Power Class 2
ProfileA2DP (Advanced Audio Distribution Profile)
AVRCP (Audio/Video Remote Control Profile)
General
Operating voltage12V DC car battery
Current consumption26A
Operational temperature range–10°C – 60°C
Dimensions (W × H × D)7-13/16″ x 1-15/16″ x 4-1/8″
Weight1.6kg (3.5lbs)
Waterproof & DustproofIP66, IP67

7 Best File Transfer Tools and Why You Need Them

2

Discover the top 7 file transfer tools to move your files quickly and efficiently between devices or share them with others. Find out what makes these tools essential for personal and professional use.

File transfer tools are software applications that allow users to transfer files from one device to another. These tools can be used to transfer files between computers, mobile devices, or even between cloud storage services. They provide a way to move files quickly and efficiently, without the need for physical storage devices or complicated network configurations. File transfer tools come in various forms, including cloud-based services, FTP clients, and peer-to-peer file sharing software. Some tools offer additional features such as encryption, remote file access, and collaboration tools, making them suitable for professional use. Ultimately, file transfer tools are essential for anyone who needs to move files between devices or share files with others.

Some of the Best File Transfer Tools

There are a variety of file transfer tools available that can be used to transfer files between devices or send files to other people. Here are some of the best file transfer tools:

  • Google Drive is a cloud-based file storage and synchronization service developed by Google. It allows users to store files on Google’s servers, access them from any device, and share them with others. With Google Drive, users can create and edit documents, spreadsheets, and presentations using Google Docs, Sheets, and Slides. It also integrates with other Google services, such as Gmail and Google Photos, and has a variety of sharing options, including the ability to share files with specific people or make them publicly available. Google Drive is free to use for up to 15GB of storage, with paid options available for additional storage.


  • Dropbox is a cloud-based file storage and sharing service that allows users to store files on its servers and access them from any device with an internet connection. It’s designed for collaboration and allows users to share files with others, edit documents together, and comment on files in real-time. Dropbox offers a variety of features, such as file versioning, automatic syncing, and backup and restore capabilities. It integrates with other popular applications, such as Microsoft Office and Adobe Creative Cloud, and has mobile apps for iOS and Android devices. Dropbox offers a free version with limited storage, and paid plans for individuals and businesses with larger storage requirements and additional features.

    Dropbox is a cloud-based file storage and sharing
    photo: Dropbox


  • WeTransfer is a file transfer service that allows users to send large files up to 2GB for free. It’s designed to be simple and easy to use, with no registration or software installation required. Users can simply upload their files to the WeTransfer website, add the recipient’s email address, and send the files. WeTransfer also offers a premium service called WeTransfer Pro, which allows users to send files up to 20GB and customize their transfers with personalized backgrounds and URLs. WeTransfer is commonly used by professionals in creative industries, such as designers and photographers, to send large files to clients or collaborators.


  • Send Anywhere is a cross-platform file transfer service that allows users to send files of any size without restrictions. It supports multiple platforms, including iOS, Android, Windows, macOS, and Linux, and doesn’t require an account to use. Send Anywhere uses a unique six-digit code to transfer files securely between devices, and also offers the ability to send files via email or link. It has a variety of features, such as a web interface, a desktop app, and a mobile app, and allows users to transfer files between devices on different networks. Send Anywhere also offers a premium service with additional features, such as unlimited file transfers and a higher file size limit.


  • FileZilla is a free, open-source, cross-platform FTP (File Transfer Protocol) client and server application that allows users to transfer files between computers or servers. It supports various file transfer protocols, including FTP, SFTP (Secure File Transfer Protocol), and FTPS (FTP over SSL/TLS), and offers a user-friendly interface that’s easy to navigate. FileZilla is widely used by web developers and system administrators to transfer files between local machines and remote servers. It has a variety of features, such as drag-and-drop support, file transfer queue management, and remote file editing. FileZilla is available for Windows, macOS, and Linux, and has a large user community that provides support and frequent updates.


  • Microsoft OneDrive is a cloud-based file storage and synchronization service developed by Microsoft. It allows users to store files on Microsoft’s servers, access them from any device, and share them with others. With OneDrive, users can create and edit documents, spreadsheets, and presentations using Microsoft Office apps, including Word, Excel, and PowerPoint. OneDrive integrates with other Microsoft services, such as Outlook and Skype, and has a variety of sharing options, including the ability to share files with specific people or make them publicly available. OneDrive is available for Windows, macOS, iOS, and Android, and has a mobile app that allows users to access their files on the go. OneDrive offers a free version with limited storage, and paid plans for individuals and businesses with larger storage requirements and additional features.


  • AirDrop is a wireless file transfer feature developed by Apple that allows users to share files between Apple devices such as iPhones, iPads, and Mac computers. It uses Bluetooth and Wi-Fi to establish a direct connection between the devices, allowing users to share files without the need for an internet connection or a physical cable. AirDrop supports various file types, including photos, videos, documents, and more. It also has a variety of sharing options, including the ability to share files with specific people or make them publicly available. AirDrop is easy to use and requires minimal setup, making it a popular feature among Apple users for sharing files quickly and securely.

6 top apps for photo editing

0
Looking to enhance your photos? Check out these 6 top photo editing apps that offer a range of advanced features and tools, including Adobe Lightroom, VSCO, Snapseed, Adobe Photoshop Express, Afterlight, and Facetune. Whether you’re a beginner or an experienced photographer, these apps can help you create beautiful and unique images with just a few taps on your device.

Photo editing apps work by providing users with a variety of tools and features that allow them to enhance and manipulate their photos. Here is a general overview of how photo editing apps typically work:

  • Importing a photo: The first step is to import a photo into the app. This can usually be done by selecting a photo from your device’s camera roll or by taking a new photo within the app itself.
  • Basic adjustments: Once you have imported a photo, you can begin making basic adjustments to it. This may include cropping the photo, adjusting the exposure, brightness, contrast, and saturation levels, and adjusting the color temperature.

    6 top app for photo editing
    photo: Pixabay
  • Advanced adjustments: Most photo editing apps offer advanced adjustments that allow you to fine-tune your photo. This may include adjusting the curves, levels, and sharpness of the photo.
  • Filters and effects: Many photo editing apps offer a range of filters and effects that can be applied to a photo to give it a unique look. These can include black and white filters, vintage filters, and more.
  • Retouching: Some photo editing apps also offer tools for retouching photos. This may include removing blemishes or wrinkles from a portrait, or removing unwanted objects from a photo.
  • Saving and sharing: Once you are happy with your edited photo, you can save it to your device’s camera roll or share it directly to social media platforms like Instagram or Facebook.

Photo editing apps offer a wide range of tools and features that allow users to create beautiful and unique photos with just a few taps on their phone or tablet.

There are many great photo editing apps available, but here are 6 top ones that you might find helpful:

  1. Adobe Lightroom: This app is widely regarded as one of the best photo editing apps on the market. It offers a wide range of advanced features, including the ability to adjust exposure, color, sharpness, and more. The app is free to download, but to access all the features you will need to sign up for a subscription.
  2. VSCO: This app offers a range of filters and editing tools to help you create beautiful photos. You can adjust the exposure, color, and sharpness of your photos, and you can also use the app to add text and other graphics to your images. VSCO also has a strong social community, which allows you to share your photos with other users.
  3. Snapseed: This is a powerful photo editing app that offers a range of advanced features, including selective adjustments, curves, and brushes. The app is free to download and easy to use, making it a great choice for beginners and experienced photographers alike.
  4. Adobe Photoshop Express: This app offers a range of powerful editing tools, including crop, rotate, and straighten. You can also adjust the exposure, color, and sharpness of your photos, and the app offers a range of filters and effects to help you create unique images.
  5. Afterlight: This app offers a range of filters and editing tools to help you create beautiful photos. You can adjust the exposure, color, and sharpness of your photos, and you can also use the app to add text and other graphics to your images.
  6. Facetune: This app is designed specifically for portrait editing, and it offers a range of powerful tools to help you enhance your selfies and portraits. You can use the app to smooth skin, whiten teeth, and adjust facial features like eyes and nose. The app is free to download, but to access all the features you will need to sign up for a subscription.

Discover the Best Medical Apps Available Now

0

Find the top medical apps currently available and get reliable information on drugs, diseases, procedures, and more. Access quick and dependable information at the point of care with these highly rated Android/iOS medical apps.

There are many great medical apps available now, and the best one for you will depend on your specific needs and interests. Here are some of the top medical apps that cover a wide range of medical specialties and functions:

  1. Medscape: This is a comprehensive medical reference app that provides up-to-date information on drugs, diseases, procedures, and news in the medical field. It also offers continuing medical education courses for healthcare professionals.

    Get quick access to clinical answers with Medscape – your go-to medical resource! This free app provides the latest news, expert commentary, clinical tools, drug and disease information, medical podcasts, CME/CE activities, and more to keep you informed and up-to-date. With over 450 medical calculators organized by specialty, finding the right tool is now quicker and easier than ever before. Check out useful resources such as the Drug Interaction Checker, Pill Identifier, and step-by-step procedural videos to assist with diagnoses and treatments.

    Medscape also offers the most current prescribing and safety information on over 9,200 prescription and OTC drugs, herbals, and supplements, ensuring that you have the latest information at your fingertips. Use Medscape to improve patient care and stay ahead of the latest developments in medicine.

  2. Epocrates: This app provides drug information, dosing, interactions, and pill identification tools for healthcare professionals. It also includes a diagnostic tool that helps physicians make quick and accurate diagnoses. Access reliable drug, disease, and diagnostic information right at the point of care with Epocrates apps! As the #1 mobile drug reference for U.S. physicians, Epocrates provides quick and dependable access to essential information to help save time in the prescribing moment.

    With Rx and OTC monographs, you can obtain pharmacology, prescribing, and safety information, adult and pediatric dosing, adverse reactions, contraindications, black box warnings, pregnancy and lactation considerations, and more. Prevent harmful drug interactions by using the drug interaction checker, which can detect interactions between up to 30 brand, generic, OTC, or alternative drugs. You can also use the pill identifier, which is organized by shape, color, imprint code, and other criteria. Epocrates offers over 600 dosing calculators, medical equations, and tools, along with formularies that provide drug coverage for 6,600+ U.S. insurance plans by state. Customizable home screens with drag-and-drop simplicity make it easy to access the information that matters most to you. Trust Epocrates for reliable, up-to-date medical information on-the-go.

  3. Figure 1: This app is a social network for healthcare professionals that allows them to share medical images and collaborate on cases. It also provides a library of medical images and cases for reference.

    Easily access medical knowledge, patient cases, research, podcasts, and more with Figure 1! This innovative app is revolutionizing healthcare by connecting millions of healthcare professionals worldwide to view, share, and discuss real-world patient cases. With thousands of cases ranging from common to rare, education and collaboration happen in real-time and always prioritize the patient’s needs. Figure 1 empowers healthcare professionals to stay up-to-date on the latest advancements in medicine, leading to better patient diagnosis, treatment, and outcomes on a global scale. Join the Figure 1 community and be at the forefront of medical knowledge and innovation.

  4. VisualDx: This app provides visual diagnostic support for healthcare professionals by allowing them to search a database of over 40,000 images of skin conditions and diseases. It also provides information on treatment options.

    VisualDx is a valuable tool for medical professionals that can improve patient engagement and satisfaction in and out of the exam room. This AI-powered visual reference tool comes with a comprehensive image atlas that helps clinicians make better medical decisions. With VisualDx, clinicians can create custom differentials across a wide range of medical fields, including dermatology, internal medicine, and pediatrics, while taking into account important patient information such as medical history, recent travel, and allergies. Additionally, VisualDx offers clinicians the ability to engage with patients by sharing images that reflect their disease presentation, with a particular focus on diverse skin types and dermatology.

    VisualDx also helps improve diagnostic accuracy and reduce implicit bias by providing access to data-driven differentials. Furthermore, clinicians can access therapy and best test options from VisualDx’s handbook-length summaries of over 3,200 diagnoses across all medicine.

    In addition to these benefits, VisualDx provides public health resources that help clinicians quickly recognize infectious diseases and travel-related illnesses. Finally, clinicians can earn 0.5 AMA PRA Category 1 Credits for internet point of care activity with every search. Overall, VisualDx is an indispensable tool for medical professionals seeking to improve patient outcomes and satisfaction.

  5. First Aid: American Red Cross: This app provides step-by-step instructions for common first aid situations, as well as information on how to prepare for emergencies and disasters.
  6. Ada: This app provides an AI-powered symptom checker that helps users evaluate their symptoms and receive personalized health advice. It also provides information on various health conditions and treatment options. Ada’s free symptom checker allows you to receive a health check and determine possible causes from the comfort of your own home, at any time of the day or night. Whether you are experiencing pain, headaches, anxiety, allergies, or food intolerance, Ada’s symptom checker can help you find answers.

    Ada’s AI has been trained by doctors over several years, allowing you to receive a pre-diagnosis within minutes. To use the free symptom checker, simply answer a series of simple questions about your health and symptoms. Ada’s AI then assesses your answers against its medical dictionary of thousands of disorders and conditions to provide you with a personalized assessment report that explains what could be wrong and what to do next. With Ada, you can expect smart results that connect medical knowledge with intelligent technology, as well as personalized health information that is tailored to your unique health profile. You can also track your symptoms and their severity in the app, and share your health assessment report with your doctor by exporting it as a PDF.

    Other features of the Ada app include data privacy and security, exclusive health articles written by experienced doctors, and 24/7 access to the free symptom checker from anywhere. With Ada, you can take control of your health and receive reliable information about your symptoms and possible causes.

    Ada This app
    Photo: Ada
  7. GoodRx: This app helps users find the lowest prices for prescription drugs at local pharmacies. It also provides information on discounts and coupons for medications.
  8. MyChart: This app allows users to access their electronic medical records, schedule appointments, and communicate with their healthcare providers. It also provides reminders for medications and appointments.

These are just a few of the many great medical apps you can find now. It’s important to do your own research and read reviews before choosing an app to ensure that it meets your specific needs and is reliable and accurate.

NAD T 778 AV receiver review – premium-quality!

0

The NAD T 778 is a high-end AV receiver manufactured by NAD Electronics. It is designed to deliver powerful and immersive home theater experiences with its advanced features and capabilities.

Some of the key features of the NAD T 778 include:

  • Power output: The NAD T 778 is capable of delivering up to 9 channels of amplification with a power output of 100 watts per channel. This makes it suitable for driving even the most demanding home theater setups.
  • Dolby Atmos and DTS:X support: The NAD T 778 supports both Dolby Atmos and DTS:X, which are the latest and most advanced surround sound technologies. This allows for a more immersive and lifelike audio experience.
  • 4K Ultra HD and HDR support: The NAD T 778 supports 4K Ultra HD video resolution and HDR (High Dynamic Range) content, which provides a more vivid and lifelike picture quality.
  • ESS Sabre DAC: The NAD T 778 is equipped with the latest ESS Sabre DAC, which provides high-quality digital-to-analog conversion for superior audio performance.
  • Streaming capabilities: The NAD T 778 supports a range of streaming services, including Spotify, Tidal, and Amazon Music. It also supports Apple AirPlay 2, which allows for seamless streaming from Apple devices.

The NAD T 778 is a high-end AV receiver that offers advanced features and capabilities for a powerful and immersive home theater experience.

NAD T 778 AV receiver- 9.2ch
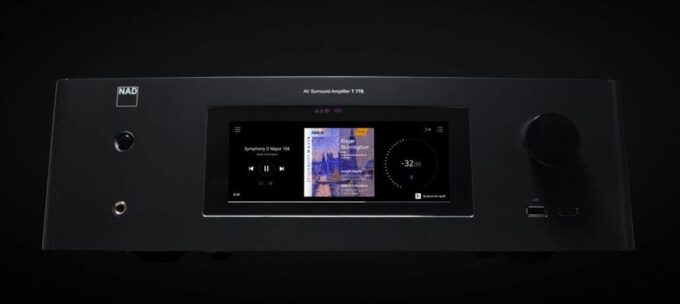
NAD T 778 AV receiver – superb Sound quality   –  photo: NAD Electronics

NAD T 778 AV receiver front-panel color touchscreen

The NAD T 778 AV receiver features a front-panel color touchscreen display. The display measures 7 inches diagonally and provides a user-friendly interface for controlling and adjusting the various features and settings of the receiver. The touchscreen display is designed to be easy to use and intuitive, allowing users to quickly access and navigate through the different menus and options. The display is also customizable, allowing users to adjust the brightness and contrast settings to suit their preferences. Overall, the front-panel color touchscreen display is a convenient and useful feature of the NAD T 778 AV receiver that enhances its user-friendliness and functionality.

BluOS module in NAD T 778 AV receiver

The NAD T 778 AV receiver comes with a BluOS module built-in, which allows for seamless integration with the BluOS wireless multi-room music system. BluOS is a high-resolution audio platform that allows users to stream music wirelessly throughout their home, with support for a wide range of audio formats including MQA, FLAC, WAV, and more.

With the BluOS module built-in, the NAD T 778 can act as a hub for the entire BluOS ecosystem, allowing users to stream music from a wide range of sources, including local network music libraries, online streaming services, and internet radio stations. The BluOS app provides a convenient interface for controlling the playback of music, creating playlists, and grouping multiple rooms together for synchronized playback.

The BluOS module also allows for voice control with Amazon Alexa or Google Assistant, giving users the ability to control their music playback with simple voice commands. The BluOS module in the NAD T 778 adds a significant amount of functionality and convenience to the AV receiver, making it a versatile and powerful addition to any home audio system.

NAD T 778 free BluOS mobile app

NAD offers a free BluOS mobile app that can be used with the NAD T 778 AV receiver. The BluOS app is available for both iOS and Android devices and can be downloaded for free from the respective app stores.

The BluOS app provides a user-friendly interface for controlling and managing the playback of music on the NAD T 778, as well as other compatible BluOS-enabled devices. With the app, users can easily access and play music from a variety of sources, including streaming services like Spotify and Tidal, local network music libraries, and internet radio stations.

The app also allows users to create and manage playlists, adjust the volume and playback settings, and group multiple rooms together for synchronized playback. Additionally, the app provides access to advanced features like MQA decoding, hi-res audio playback, and voice control with Amazon Alexa or Google Assistant. The free BluOS mobile app provides a convenient and powerful tool for controlling and managing the NAD T 778 AV receiver, as well as other compatible BluOS-enabled devices, from the palm of your hand.NAD T 778

Dirac Live in NAD T 778

The NAD T 778 AV receiver features Dirac Live room correction technology, which is a powerful tool for optimizing the audio performance of the receiver in a given room. Dirac Live uses advanced algorithms to analyze the acoustic characteristics of the listening room and then applies real-time corrections to the audio output of the receiver, in order to optimize the sound for the specific room environment.

Dirac Live is designed to correct issues like room modes, standing waves, and other room-related acoustic problems, which can otherwise distort the sound and reduce the overall audio quality. The system uses a special calibration process that involves measuring the sound at multiple locations in the room, and then using this data to create a precise correction filter for each channel of the receiver.

With Dirac Live enabled, users can experience improved clarity, detail, and spatial imaging in their music and movies, with a more natural and lifelike soundstage. The NAD T 778 includes a full version of Dirac Live with a user-friendly interface, making it easy to configure and customize the room correction settings to suit the user’s preferences. Dirac Live is a valuable feature of the NAD T 778 that enhances its audio performance and allows users to enjoy their music and movies in a more accurate and immersive way.

NAD T 778 AV receiver specs:

  • 8 Ohms   140W (21.5dBW)
  • 4 Ohms   170W (22.3dBW)
  • Full Disclosure Power    9 x 85W
  • IHF Dynamic Power
  • 8 Ohms   165W (22.2dBW)
  • 4 Ohms   280W (24.5dBW)
  • Total harmonic distortion at rated power     <0.08%
  • IM distortion at 1/3 rated power    <0.03%
  • Damping factor     >300 (20Hz-1kHz, 8 ohms)
  • Input sensitivity and impedance    1.12Vrms (ref. 8 Ohms, VOL at 0dB)
  • Frequency response   +0.3/-0.8dB (ref. 1kHz, 20Hz-20kHz)
  • Signal/noise ratio     >100dB (ref. rated power at 8 Ohms, A-Weighted)
  • Signal/noise ratio     >85dB (ref. 1W at 8 Ohms, A-Weighted)
  • LINE INPUT
  • Frequency response   ±0.3dB (ref. 20Hz – 20kHz)
  • Signal-to-noise ratio    >100dB (ref. 2V, A-Weighted)
  • Total harmonic distortion    <0.01%
  • Input sensitivity    245mVrms (ref. 2V)
  • Maximum output level    >4.5Vrms
  • PHONO INPUT
  • Input Sensitivity    6.2mVrms (ref. 2V)(ref. 20Hz – 20kHz)
  • Signal-to-noise ratio     >80dB (ref. 2V, A-Weighted)
  • Maximum Input Level    >90mVrms (1kHz)

How to Record eSports Live Streams with VLC and More: A Guide

0

Looking to record your favorite eSports events? Learn how to use VLC media player and discover other methods for recording live streams.

With this guide, you’ll learn step-by-step how to record eSports live streams using VLC media player. In addition, we’ll introduce you to other methods for recording gameplay footage, such as OBS Studio, ShadowPlay, XSplit Gamecaster, Game DVR for Windows 10, and Bandicam. Whether you’re a professional gamer, a casual fan, or just looking to capture some exciting moments, this guide has got you covered.

How to Record eSports Live Streams with VLC

Recording eSports live streams with VLC media player is a relatively simple process that involves a few steps. Here’s a step-by-step guide on how to do it:
  1. Download and install VLC media player: If you don’t have it already, you can download it for free from the official website.
  2. Open VLC media player: Once installed, launch VLC media player and click on “Media” from the top menu, then select “Open Network Stream.”
  3. Enter the URL of the live stream: Paste the URL of the eSports live stream you want to record into the “Network URL” field and click “Play.”
  4. Start recording: While the stream is playing, click on “View” from the top menu and select “Advanced Controls.” This will bring up a set of buttons at the bottom of the screen. Click on the red “Record” button to start recording the stream.
  5. Stop recording: When you’re finished recording, click on the red “Record” button again to stop the recording. The recorded video will be saved to your default video folder, which you can find by going to “Tools” from the top menu and selecting “Preferences.” From there, click on “Input / Codecs” and scroll down to the “Record directory or filename” section.

That’s it! You’ve successfully recorded an eSports live stream with VLC media player. Keep in mind that the quality of the recording will depend on the quality of the original stream, and that recording copyrighted content without permission is illegal.


Try some other methods to Record eSports Live Streams

Besides using VLC media player, there are several other methods you can use to record eSports live streams:
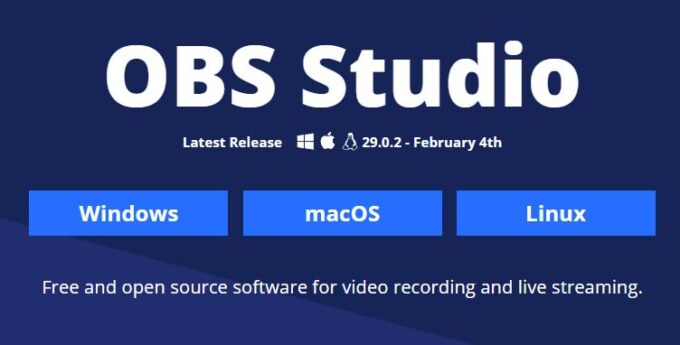
  1. OBS Studio: OBS Studio is a popular and powerful software that can be used for recording and streaming eSports events. It offers a lot of customization options, including the ability to add overlays and effects to your recording. You can download OBS Studio for free from the official website. The Windows release of OBS Studio supports Windows 10 and 11.

    OBS Studio
    OBS Studio – photo OBS
  2. ShadowPlay: ShadowPlay is a free recording software developed by NVIDIA for GeForce graphics card users. It allows you to capture and save gameplay footage with minimal impact on your computer’s performance. ShadowPlay also supports recording at high frame rates and resolutions.
  3. XSplit Gamecaster: XSplit Gamecaster is a software that allows you to record and stream your gameplay with ease. It offers a simple and intuitive interface, as well as a variety of customization options. You can download XSplit Gamecaster for free from the official website.
  4. Game DVR (Windows 10): If you have Windows 10, you can use the built-in Game DVR feature to record gameplay footage. Simply press Windows Key + G to bring up the Game Bar, then click on the “Record” button to start recording. You can also customize the settings to adjust the quality and length of the recording.
  5. Bandicam: Bandicam is a screen recording software that allows you to capture gameplay footage, as well as other activities on your screen. It offers a variety of recording modes and settings, including the ability to record at high frame rates and resolutions. You can download Bandicam for free from the official website, but the free version has a recording time limit.

These are just a few examples of the many methods available for recording eSports live streams. Be sure to choose the one that works best for your needs and system requirements.

How to Permanently Erase Data and Settings From iPhone Storage?

0

Learn how to permanently erase data and settings from your iPhone storage to keep your personal information secure. Follow these steps to wipe your iPhone clean and start fresh.

If you’re planning to sell or give away your iPhone, or simply want to start fresh with a clean slate, it’s important to permanently erase all data and settings from your device. This guide will show you how to do it step-by-step, using your iPhone, a Mac, or a Windows PC. We’ll also provide some tips for backing up your data before erasing your iPhone, so you can restore it later if needed. Keep reading to learn how to wipe your iPhone clean and keep your personal information secure.

permanently erase data from iPhone storage
photo: Pixabay


If you want to permanently erase all data and settings from your iPhone storage, you can follow these steps:

  • Backup your iPhone: Before you erase your iPhone, make sure to backup all your important data to iCloud or your computer, so you can restore it later.
  • Turn off Find My iPhone: You need to turn off Find My iPhone before you erase your device. Go to Settings > [Your Name] > Find My > Find My iPhone, and toggle off the switch.
  • Erase all data and settings: Go to Settings > General > Reset, and select Erase All Content and Settings. You will be asked to enter your passcode, and then confirm the erasure.
  • Confirm the erasure: Once you confirm the erasure, the process will begin, and it may take several minutes to complete. Your iPhone will be reset to its factory settings, and all your data and settings will be permanently erased.
  • Wait for the erasure to complete: Once the erasure is complete, your iPhone will restart and display the setup screen. You can set up your iPhone as a new device, or restore it from your backup.

Note that the data erased by this method is not recoverable, so make sure to backup all your important data before proceeding with the erasure.


How to permanently erase data from iPhone storage using a Mac or Windows PC?
If you want to permanently erase data from your iPhone using a Mac or Windows PC, you can use iTunes or Finder (on Macs running macOS Catalina or later). Here are the steps:
  1. Connect your iPhone to your computer using a USB cable.
  2. Launch iTunes or Finder (on macOS Catalina or later).
  3. Select your iPhone from the list of devices.
  4. Click on the “Restore iPhone” button.
  5. In the pop-up window, click on “Restore” again to confirm.
  6. Wait for iTunes or Finder to download and install the latest iOS software on your iPhone.
  7. When prompted, choose the option to set up your iPhone as new or restore from a backup.

This process will completely erase all data from your iPhone’s storage, including your apps, contacts, messages, and media files. It will also install the latest version of the iOS software on your device. The erasure is permanent and irreversible, so make sure to back up all your important data before proceeding with the process.

Effective Ways to Compress PDF Files on Phones, PC, and Mac

0

There are several reasons why you may want to compress PDF files:

  • Smaller file size: PDF files can be large, especially if they contain a lot of images or graphics. Compressing the file can reduce its size, making it easier to store, send, and share.
  • Faster uploading and downloading: Large PDF files can take a long time to upload or download, especially if you have a slow internet connection. Compressing the file can speed up the process, making it more efficient.
  • Save storage space: If you have limited storage space on your device or cloud storage, compressing PDF files can help you save space and keep your files organized.
  • Improved performance: Large PDF files can slow down your device or software, making it harder to work with the file. Compressing the file can improve performance and make it easier to navigate and work with.

Compressing PDF files can help you save time, space, and resources, making it an important step when working with large or complex PDF files.

How to compress PDF files
photo: Pixabay
How to compress PDF files size on Phones, PC, and Mac? There are several ways to reduce the size of a PDF file on phones, PCs, and Macs. Here are some methods you can try:

On Phones:

  1. Use an online PDF compressor tool like Smallpdf or PDF Compressor to reduce the size of the PDF.
  2. If you have an iPhone, you can use the built-in Files app to compress the PDF. Open the PDF in the Files app, tap on the Share icon, and select “Compress.”
  3. If you have an Android phone, you can download a PDF compressor app like PDF Compressor or PDF Converter to compress the file.

On PCs:

  1. Use an online PDF compressor tool like Smallpdf or PDF Compressor to reduce the size of the PDF.
  2. Use Adobe Acrobat Pro DC or other PDF editing software to compress the PDF. Open the PDF in Acrobat, select “File” > “Save as Other” > “Reduced Size PDF.”
  3. Use Microsoft Word to convert the PDF to a Word document, compress the images in the Word document, and then save it as a PDF.

On Macs:

  1. Use an online PDF compressor tool like Smallpdf or PDF Compressor to reduce the size of the PDF.
  2. Use Preview, the built-in PDF viewer on Macs, to reduce the size of the PDF. Open the PDF in Preview, select “File” > “Export,” and choose the “Reduce File Size” option.
  3. Use Adobe Acrobat Pro DC or other PDF editing software to compress the PDF. Open the PDF in Acrobat, select “File” > “Save as Other” > “Reduced Size PDF.”


The best sites you can use to compress PDF files on Android?
There are several websites that allow you to compress PDF files on Android devices. Some of the best options include:
  1. Smallpdf – Smallpdf is a popular website that offers a range of PDF tools, including a PDF compressor. You can access the website from your Android device’s web browser, upload your PDF file, and choose the compression level you want. The website will then compress the file and allow you to download it to your device.
  2. PDF Compressor – PDF Compressor is a website that specializes in compressing PDF files. You can upload your file, select the compression level you want, and then download the compressed file to your device. The website is mobile-friendly and works well on Android devices.
  3. PDF Converter – PDF Converter is another website that allows you to compress PDF files on Android devices. The website supports a range of compression levels and allows you to upload your file from your device’s storage or from a cloud storage service like Google Drive or Dropbox.
  4. ILovePDF – ILovePDF is a website that offers a range of PDF tools, including a PDF compressor. You can access the website from your Android device’s web browser, upload your PDF file, and choose the compression level you want. The website will then compress the file and allow you to download it to your device.

All of these websites are free to use and can help you reduce the size of your PDF files on your Android device.

What is: VRR, FreeSync, G-SYNC, and Adaptive Sync?

0
Learn about the display technologies of VRR, FreeSync, G-SYNC, and Adaptive Sync, which are designed to eliminate screen tearing, stuttering, and other visual artifacts in video games. Discover how these technologies work, what their differences are, and which monitors and graphics cards are compatible with them.
What is Variable Refresh Rate?
Variable Refresh Rate (VRR) is a display technology that allows a monitor to dynamically adjust its refresh rate to match the frame rate of the content being displayed. Traditional displays have a fixed refresh rate, usually 60Hz or 120Hz, which means that the display refreshes the screen at a fixed rate regardless of the content being displayed.

With VRR, the monitor refreshes the screen only when a new frame is available, resulting in smoother and more responsive gameplay with reduced screen tearing, stuttering, and input lag. This technology is particularly useful for gaming, where fast-moving scenes and unpredictable frame rates can cause visual artifacts and input lag, impacting the overall gaming experience.

VRR is available on some newer gaming monitors and compatible graphics cards, such as AMD FreeSync or NVIDIA G-Sync, which synchronize the monitor’s refresh rate with the graphics card’s output to provide a smoother gaming experience. VRR is also becoming more prevalent in the TV industry, with the introduction of technologies such as HDMI 2.1 and VESA Adaptive-Sync.


What is Adaptive Sync?

Adaptive Sync is a display technology that allows a monitor to dynamically adjust its refresh rate to match the frame rate of the content being displayed. This technology is similar to FreeSync and G-SYNC and is sometimes referred to as “generic VRR” or “VESA Adaptive-Sync.”

Adaptive Sync is an open standard developed by the Video Electronics Standards Association (VESA), which means it can be implemented by any display manufacturer and is not restricted to a single graphics card manufacturer. This technology is designed to eliminate screen tearing and stuttering in video games, resulting in a smoother and more responsive gaming experience.

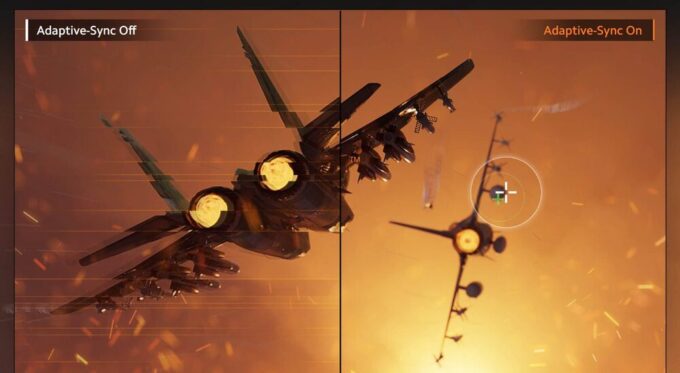
Adaptive Sync works by synchronizing the monitor’s refresh rate with the frame rate of the graphics card, which ensures that each frame is displayed at the right time. This technology is especially useful for gaming, where fast-moving scenes and unpredictable frame rates can cause visual artifacts and input lag.

Adaptive-Sync technology
Monitor with Adaptive-Sync technology – Mi 2K Gaming Monitor

To use Adaptive Sync, you need a compatible monitor and graphics card that support the technology. The latest versions of HDMI and DisplayPort standards support Adaptive Sync, and many newer gaming monitors and graphics cards are compatible with this technology.


What is FreeSync + FreeSync premium?

FreeSync is a variable refresh rate (VRR) technology developed by AMD (Advanced Micro Devices) that is designed to eliminate screen tearing and stuttering in video games. FreeSync synchronizes the refresh rate of the monitor with the frame rate of the graphics card, which results in smoother and more responsive gameplay.

In traditional displays, the monitor has a fixed refresh rate, and the graphics card produces a varying number of frames per second, which can cause screen tearing, stuttering, and other visual artifacts. FreeSync eliminates these issues by allowing the monitor to change its refresh rate dynamically, ensuring that each frame is displayed at the right time.

FreeSync is an open standard and is supported by a growing number of monitors and graphics cards. To use FreeSync, you need a compatible AMD graphics card and a monitor that supports FreeSync. Once both components are connected, FreeSync is automatically enabled and synchronized to deliver smooth, tear-free gameplay.

FreeSync Premium is a certification program developed by AMD to indicate that a monitor meets certain requirements for variable refresh rate (VRR) technology.

To qualify for the FreeSync Premium certification, a monitor must meet or exceed the following specifications:

  • A variable refresh rate range of at least 120Hz at the monitor’s maximum resolution
  • Low framerate compensation (LFC) support, which allows VRR to work effectively even at lower framerates
  • A minimum 300 nits of peak brightness
  • Support for at least 8 bits per color channel
  • Minimum refresh rate support at 2.5:1, ensuring that the VRR range is wide enough to provide a smooth experience

Monitors that meet these requirements are certified by AMD as FreeSync Premium and are expected to provide a high-quality gaming experience with smooth, tear-free gameplay and reduced input lag.

It’s important to note that not all monitors that support FreeSync technology will have the FreeSync Premium certification. However, monitors that have the FreeSync Premium certification will offer the best possible experience when used with compatible AMD graphics cards.

What is G-SYNC?

G-SYNC is a variable refresh rate (VRR) technology developed by NVIDIA, designed to eliminate screen tearing, stuttering, and other visual artifacts in video games. Similar to AMD’s FreeSync technology, G-SYNC synchronizes the monitor’s refresh rate with the frame rate of the graphics card to deliver smooth, responsive, and tear-free gaming experiences.

G-SYNC uses a specialized module installed in the monitor to synchronize the monitor’s refresh rate with the output of NVIDIA graphics cards, ensuring that each frame is displayed at the right time. This technology also provides additional benefits, including reduced input lag, decreased motion blur, and improved image quality.

G-SYNC is available on a growing number of monitors and graphics cards from NVIDIA, and it is typically more expensive than AMD’s FreeSync technology. However, NVIDIA’s G-SYNC provides more advanced features, such as ULMB (Ultra Low Motion Blur) and HDR (High Dynamic Range) support, which can provide even better image quality and performance. To use G-SYNC, you need a compatible NVIDIA graphics card and a G-SYNC compatible monitor. Once both components are connected, G-SYNC is automatically enabled and synchronized to provide a smooth, responsive, and tear-free gaming experience.

Each of these technologies has its own unique features and benefits, and choosing the right technology for your gaming setup depends on your preferences, graphics card, and monitor. Some monitors and graphics cards are compatible with multiple VRR technologies, allowing you to choose the technology that best suits your needs.

Easy Tips to boost the performance of your Windows 11 PC

0

In order to boost the performance of your Windows 11 PC, there are a number of tips and tricks you can employ. Although Windows 11 already speeds up performance compared to Windows 10, it is possible to achieve even faster results. As PCs tend to slow down over time, it is important to implement these tips to ensure that your device stays speedy. The following are some tips for optimizing Windows 11 performance:

  1. Disable programs that run on startup: Your PC can become sluggish if programs you do not use are running in the background. To fix this, launch the Task Manager by pressing Ctrl-Shift-Esc, right-clicking the lower-right corner of your screen and selecting Task Manager, or typing task manager into the Windows 11 search box and pressing Enter. Once the Task Manager is open, click the Startup apps icon on the left side of the screen. This displays a list of programs and services that launch when you start Windows. To stop a program or service from launching at startup, right-click it and select Disable.
  2. Use Efficiency Mode: Efficiency Mode, which is new to Windows 11 22H2, can help speed up your PC and improve laptop battery life. It does this by lowering the process priority of background applications. To put an app or process into Efficiency Mode, launch the Task Manager and click the Processes icon on the left side of the screen. Click the app or process you want to put into Efficiency Mode, then click the Efficiency mode icon at the top right of the screen and confirm that you want to turn on Efficiency Mode for the app.
  3. Use automatic Windows maintenance: Windows 11 constantly performs maintenance on your PC in the background, such as security scanning and performing system diagnostics. This helps your PC run at peak performance. The automatic maintenance runs every day at 2:00 a.m. if your device is plugged into a power source and is asleep. To ensure it is turned on, go to the Control Panel app, select System and Security > Security and Maintenance, and click Start maintenance. To make sure that it runs every day, click Change maintenance settings and select the time you want maintenance to run.
  4. Kill adware and bloatware: If your PC is slow, it may be due to bloatware or adware. To fix this, use a reputable adware or malware removal tool to scan your PC and remove any unwanted software.

     in Windows 11
    photo: Pixabay
  5. If you have an older or slower PC, you may want to disable Windows 11’s shadows, animations, and visual effects. These eye-catching features don’t usually affect performance on faster machines, but they can cause a slowdown on older ones. To turn them off, search for “sysdm.cpl” in the Windows 11 search box and click the corresponding icon to open the Control Panel’s System Properties dialog box. Then, click the Advanced tab, select Settings in the Performance section, and go to the Visual Effects tab. Here, you can deselect various animations and effects to improve your PC’s performance.
  6. Changing your PC’s power settings can also help boost its performance. If you’re currently using the “Power saver” plan, you’re sacrificing performance for energy savings. Switching to the “High performance” or “Balanced” plan can give you an instant performance boost. To do this, search for “control” in the Windows 11 search box, open the Control Panel app, select Hardware and Sound, and then choose Power Options. Depending on your PC’s make and model, you may see additional plans beyond the default “Balanced (recommended)” and “Power saver.” To access the “High performance” option, click the down arrow by “Show additional plans” and select the plan you prefer.
  7. Windows 11 may offer you tips and suggestions based on your activity, but you may find these notifications intrusive and unhelpful. Disabling them can improve your PC’s performance and privacy. To do this, click the Start button, select Settings, go to System, and click Notifications. Scroll down to Additional settings and uncheck the box marked “Get tips and suggestions when using Windows.”
  8. Another feature that can affect your PC’s performance is Game Mode, which optimizes your system for gaming by prioritizing resources for games and reserving some resources for future gaming sessions. While this is useful for serious gamers, it can slow down your PC when you’re not playing games. Turning off Game Mode can provide a quick performance boost. To do this, go to Settings, select Gaming, and click Game Mode. Then, move the Game Mode slider to Off.

By following these tips, you can ensure that your Windows 11 PC stays speedy and performs at its best.