Home Blog Page 69

Why and How To Launch a Video Podcast?

0

What is a Video Podcast?

A video podcast is a type of podcast that includes video content in addition to audio. Video podcasts can be downloaded and played on a computer or mobile device, or they can be streamed online. They are similar to traditional podcasts, which are audio-only, but offer a visual element as well. Video podcasts can cover a wide range of topics and formats, including news, interviews, tutorials, and entertainment. They are typically delivered through a feed that can be subscribed to using a podcast player, such as Apple Podcasts or Spotify.

How To Launch a Video Podcast?

Here are some steps you can follow to launch a video podcast:

Choose a topic and format: Decide on a subject that you are passionate about and that you think will be of interest to your audience. Consider what format you want your podcast to take, such as interviews, panel discussions, or solo shows.

Plan your content: Create a schedule for your podcast, outlining the topics you will cover and the format of each episode. Consider how often you will release new episodes and how long they will be.

Gather your equipment: You will need a microphone, camera, and lighting to record your podcast. You may also want to invest in a tripod and a pop filter to improve the quality of your audio and video.

What is a Video Podcast
photo: Pixabay

Create a website: Set up a website for your podcast where you can post episodes and show notes, and where listeners can find information about your show.

Record and edit your episodes: Use your chosen recording and editing software to capture and edit your audio and video. Make sure to test your equipment and sound levels before you start recording.

Publish your episodes: Use a hosting service, such as Libsyn or Blubrry, to publish your episodes and create an RSS feed. Submit your podcast to directories, such as Apple Podcasts and Spotify, so that people can find and subscribe to it.

Promote your podcast: Use social media and other marketing channels to promote your podcast and encourage people to listen. Consider creating a trailer or teaser to introduce your show to potential listeners.

How to Promote your video podcast?

Here are some additional ways you can promote your video podcast:

  • Use video platforms: In addition to audio podcast directories, submit your video podcast to video platforms, such as YouTube and Vimeo.
  • Create a video trailer: In addition to an audio trailer, create a video trailer for your podcast that introduces your show and encourages people to watch.
  • Promote on video-sharing websites: Share your video podcast on video-sharing websites, such as Reddit and TikTok, to reach a wider audience.
  • Create social media graphics: Use graphic design tools, such as Canva or Adobe Photoshop, to create social media graphics that promote your video podcast.
  • Use paid advertising: Consider running paid ads on video platforms, such as YouTube or Facebook, to promote your video podcast.
  • Collaborate with influencers: Partner with influencers or other content creators who have a large following on video platforms and ask them to promote your podcast.
  • Optimize your titles and tags: Use relevant and descriptive titles and tags for your video podcast to make it easier for people to find it when searching online.
  • Use transcripts and captions: Provide transcripts and captions for your video podcast to make it accessible to a wider audience and improve its search ranking.
  • Embed your videos on your website: Embed your video podcast episodes on your website so that people can watch them directly from your site.
  • Promote on your email list: If you have an email list, include links to your video podcast in your newsletters and encourage subscribers to watch.

How to Script your video podcast?

Here are some tips for scripting your video podcast:

Define your purpose: Before you start scripting, determine the purpose of your podcast. What do you want to achieve with your show? What message do you want to convey to your audience?

Outline your content: Create an outline of your podcast, breaking it down into sections or segments. This will help you organize your thoughts and ensure that your content flows logically.

Write a compelling introduction: The introduction is the first thing that your audience will hear, so it’s important to make a strong first impression. Introduce yourself and your guests, and give a brief overview of what the podcast will cover.

Use a conversational tone: A podcast is a casual, informal medium, so try to write in a conversational tone. Avoid using too much jargon or technical language, and aim for a friendly, approachable style.

Include transitional statements: To help your podcast flow smoothly, use transitional statements to move from one topic to the next. This can be as simple as saying “Next, we’ll talk about…” or “Now, let’s move on to…”

Add visuals and sound effects: If you are creating a video podcast, consider adding visual elements, such as graphics or stock footage, to enhance your content. You can also use sound effects or music to help set the mood or break up your show.

Edit and revise: Don’t be afraid to revise and edit your script as you go. It’s okay to make changes or cut out sections that aren’t working. The goal is to create a podcast that is enjoyable and engaging for your audience.

What is a real benefits about video podcast?

There are several benefits to creating a video podcast:

Increased engagement: A video podcast can be more engaging than an audio-only podcast because it adds a visual element. This can make it easier to hold the attention of your audience and keep them interested in your content.

Greater reach: Video is more accessible than audio, as it can be watched on a wider range of devices, including smartphones, tablets, and smart TVs. This means that your video podcast has the potential to reach a larger audience.

Improved SEO: Videos are more likely to rank higher in search results than audio-only content. By creating a video podcast, you can improve the visibility of your show and make it easier for people to discover it.

Enhanced credibility: A video podcast can help to establish your expertise in your field, as it allows you to showcase your knowledge and personality in a more dynamic way.

More opportunities for monetization: There are more opportunities to monetize a video podcast, as you can include ads or sponsorships in your videos, or sell access to premium content.

Greater flexibility: A video podcast gives you greater flexibility in terms of format and content. You can include a wide range of visual elements, such as demos, interviews, and slideshows, to make your show more dynamic and engaging.

Top 3 recommendations for keyboards for office use

0

There are several factors to consider when choosing a keyboard for office use. Some important things to consider include:

  1. Ergonomics: If you are going to be using the keyboard for long periods of time, it is important to choose one that is comfortable to use and reduces fatigue on the hands and wrists. Ergonomic keyboards are designed to help reduce strain on the body and can be helpful for people who experience discomfort while typing.
  2. Wireless connectivity: A wireless keyboard can be a convenient choice for office use, as it allows you to easily switch between devices and eliminates the need for a messy tangle of cords.
  3. Size and layout: Consider the size of the keyboard and the layout of the keys, as well as any additional features such as a numeric keypad or media control keys.
  4. Durability: Choose a keyboard that is made with high-quality materials and is built to last, as it will be subjected to frequent use in an office setting.
  5. Compatibility: Make sure that the keyboard is compatible with the devices you will be using it with.
  6. Price: Determine your budget and look for a keyboard that offers the features you need at a price that is within your budget.

Here are my top three recommendations for keyboards for office use:

  1. Logitech K810: This is a wireless keyboard that can be easily paired with multiple devices, including computers, tablets, and smartphones. It has backlit keys, making it easy to use in low light environments, and a sleek design that takes up minimal space on a desk.
  2. Microsoft Sculpt Ergonomic Keyboard: This keyboard is designed to be ergonomic, which can help reduce fatigue and strain on the hands and wrists during long typing sessions. It also has a separate numeric keypad, which can be helpful for people who frequently use spreadsheet software.
  3. Logitech K270: This is a wireless keyboard that has a long battery life and can be easily paired with multiple devices. It has a compact design that takes up minimal space on a desk, and includes a built-in palm rest to help reduce fatigue during long typing sessions.

Here are some advantages of the Logitech K810 keyboard:

  1. Wireless: The Logitech K810 is a wireless keyboard, which means that it can be easily paired with multiple devices, including computers, tablets, and smartphones. This makes it a convenient choice for people who need to switch between devices frequently.
  2. Backlit keys: The K810 has backlit keys, which makes it easy to use in low light environments. This can be helpful for people who work late at night or in dimly lit office spaces.
  3. Sleek design: The K810 has a sleek and slim design, which takes up minimal space on a desk. This makes it a good choice for people who have limited desk space or who want a keyboard that is easy to transport.

    Logitech K810 keyboard
    photo: Logitech
  4. Multiple device pairing: The Logitech K810 can be easily paired with multiple devices, allowing you to quickly switch between them with the press of a button. This can be helpful for people who use multiple devices for work or who frequently work on different projects.
  5. Durable: The K810 is made with high-quality materials and is built to last, making it a reliable choice for office use.

Here are few advantages of the Microsoft Sculpt Ergonomic Keyboard:

  1. Ergonomic design: The Sculpt Ergonomic Keyboard is designed to be ergonomic, which can help reduce fatigue and strain on the hands and wrists during long typing sessions. It has a split design and a natural arc layout, which allows you to place your hands in a more comfortable position while typing.
  2. Separate numeric keypad: The Sculpt Ergonomic Keyboard has a separate numeric keypad, which can be helpful for people who frequently use spreadsheet software or who need to enter a lot of numbers.

    advantages of the Microsoft Sculpt Ergonomic Keyboard
    photo: Microsoft
  3. Wireless: The Sculpt Ergonomic Keyboard is a wireless keyboard, which means that it can be easily paired with multiple devices and is easy to transport.
  4. Durable: The Sculpt Ergonomic Keyboard is made with high-quality materials and is built to last, making it a perfect choice for office use.
  5. Compact design: The Sculpt Ergonomic Keyboard has a compact design that takes up minimal space on a desk. This can be helpful for people who have limited desk space or who want a keyboard that is easy to transport.

The main advantages of the Logitech K270 keyboard:

  1. Wireless: The K270 is a wireless keyboard, which means that it can be easily paired with multiple devices and is easy to transport.
  2. Long battery life: The K270 has a long battery life, which means that it can be used for extended periods of time without needing to be recharged.
  3. Compact design: The K270 has a compact design that takes up minimal space on a desk. This can be helpful for people who have limited desk space or who want a keyboard that is easy to transport.

    K270 Wireless Keyboard
    photo: Logitech
  4. Built-in palm rest: The K270 includes a built-in palm rest, which can help reduce fatigue during long typing sessions, which is ideal for office use.
  5. Durable: The K270 is made with high-quality materials and is built to last, making it a reliable choice for office use.
  6. Multiple device pairing: The K270 can be easily paired with multiple devices, allowing you to quickly switch between them with the press of a button. This can be helpful for people who use multiple devices for work or who frequently work on different projects.

All of these keyboards are reliable and durable, making them a good choice for office use.

Dimensions of TVs and viewing distance

0

There are a few factors to consider when determining the appropriate size of a TV for a particular viewing distance.

Viewing angle: The ideal viewing angle for a TV is around 30 degrees, which corresponds to a distance of about 1.6 times the diagonal size of the TV for a 1080p HDTV and about 2.1 times the diagonal size for a 4K UHD TV. For example, for a 65-inch 1080p HDTV, the ideal viewing distance would be about 104 inches (8.7 feet), while for a 65-inch 4K UHD TV, the ideal viewing distance would be about 136 inches (11.3 feet).

Resolution: The resolution of the TV also plays a role in determining the ideal viewing distance. Higher resolution TVs can be viewed from closer distances without the individual pixels being noticeable, so you can sit closer to a 4K TV than you could to a 1080p TV and still get a good viewing experience.

Personal preference: Ultimately, the ideal viewing distance is a matter of personal preference and may depend on the specific needs and preferences of the viewer. Some people may prefer to sit closer to the TV and have a more immersive viewing experience, while others may prefer to sit farther back and have a more relaxed viewing experience.

appropriate size of a TV for a particular viewing distance
photo: Pixabay

How a distance affects the image’s quality
In the past, if you parked too near an old tube TV, you would end up seeing scan lines. Similar to this, rows and columns of pixels, the small dots that make up your image, would be visible on HDTVs operating 1080p or lower. With 4K, both of those issues have long since been resolved. More of a problem is sitting too far away and losing the details and visual quality you paid for than it is getting too close.
HDTV resolution is much lower than that of 4K Ultra HD TVs, which can display up to four times as much detail as a 1080p screen. Even when you are directly in front of the panel, it is challenging to distinguish individual UHD pixels because to their small size. With an 8K TV, you can get even closer. This allows you the opportunity to sit as close as you’re comfortable.

But you can absolutely move further away from the TV if you must. A 4K TV will still appear reasonably sharp even if you sit further away than the suggested distances. Currently, practically all 4K TVs are HDR-compatible, extending the contrast and color gamuts of content that has HDR-encoded. Even from across the room, HDR’s advancements are rather evident.
The ideal viewing distance for a 4K UHD TV will depend on the size of the TV and the resolution of the content being viewed. Generally, the ideal viewing distance for a 4K TV is around 2.1 times the diagonal size of the TV. For example, for a 65-inch 4K UHD TV, the ideal viewing distance would be about 136 inches (11.3 feet).
The ideal viewing distance for a 32-inch TV will depend on the resolution of the TV and the specific needs and preferences of the viewer. Here are some general guidelines for determining the ideal viewing distance for a 32-inch TV:

For a 1080p HDTV: The ideal viewing angle for a 1080p HDTV is around 30 degrees, which corresponds to a distance of about 1.6 times the diagonal size of the TV. For a 32-inch 1080p HDTV, this would be a viewing distance of about 51 inches (4.3 feet).

For a 4K UHD TV: The best viewing angle for a 4K UHD TV is also around 30 degrees, which corresponds to a distance of about 2.1 times the diagonal size of the TV. For a 32-inch 4K UHD TV, this would be a viewing distance of about 67 inches (5.6 feet).

25″-39″ TVs are generally best for small to medium-sized rooms and for viewing from a relatively close distance. These TV sizes are typically recommended for viewing distances of around 4-6 feet, which corresponds to a viewing angle of about 30 degrees, which is generally considered the ideal viewing angle for a TV.

These TV sizes are well-suited for use in a bedroom, kitchen, or home office, or for use as a secondary TV in a living room or den. They may also be suitable for use in a small apartment or dorm room.

When choosing a TV in this size range, it’s important to consider the resolution of the TV, as well as any additional features that may be important to you, such as smart TV capabilities, high dynamic range (HDR) support, and connectivity options.

40″-59″ TVs are generally best for medium to large-sized rooms and for viewing from a moderate to relatively far distance.
These TV sizes are well-suited for use in a living room, den, or media room, or for use as the primary TV in a home theater setup. They may also be suitable for use in a larger bedroom or in a shared space such as a dorm room or common area.

60″-79″ TVs are generally best for large-sized rooms and for viewing from a moderate to far distance.
These TV sizes are well-suited for use in a large living room, home theater, or media room, or for use as the primary TV in a home theater setup. They may also be suitable for use in a shared space such as a dorm room or common area, or in a commercial setting such as a conference room or restaurant.

80″+ TVs are generally best for very large-sized rooms and for viewing from a far distance. These TV sizes are well-suited for use in a home theater or media room, or for use as the primary TV in a home theater setup. They may also be suitable for use in a shared space such as a conference room or auditorium, or in a commercial setting such as a sports bar or entertainment venue.

The picture on your TV may be impacted by ambient light from your windows, candles, or lamp. Absolutely fine is a little bit. It can ease eye strain and improve your ability to perceive deeper blacks. But if you do it too much, you’ll get glare. That could obstruct the action on the screen or merely make your TV look lamely faded and washed out.

If your entertainment room receives a lot of light, you might want to consider purchasing an LED TV because they are generally brighter than OLEDs and have anti-reflective panels.

How to Cancel, Paused or Change Hulu subscription Plan

0

To cancel your Hulu subscription, follow these steps:

  1. Go to the Hulu website and sign in to your account.
  2. Click on your name in the top right corner of the page, and then click “Account” from the drop-down menu.
  3. Scroll down to the “Your Subscription” section and click the “Cancel Subscription” button.
  4. Follow the prompts to confirm the cancellation of your subscription.

Please note that once you cancel your subscription, you will lose access to all of the content on Hulu. If you want to continue watching Hulu after canceling, you will need to resubscribe.

Hulu
Hulu – photo source

To pause your Hulu subscription, follow these steps:

  1. Go to the Hulu website and sign in to your account.
  2. Click on your name in the top right corner of the page, and then click “Account” from the drop-down menu.
  3. Scroll down to the “Your Subscription” section and click the “Pause or Cancel” button.
  4. Follow the prompts to pause your subscription.

Please note that while your subscription is paused, you will not have access to any of the content on Hulu. If you want to continue watching Hulu during the pause, you will need to resubscribe.

If you are having trouble pausing your subscription or have any other questions, you can contact Hulu’s customer service team through the website or by calling the Hulu support hotline.

To cancel your Hulu subscription on the web, follow these steps:

  1. Go to the Hulu website and sign in to your account.
  2. Click on your name in the top right corner of the page, and then click “Account” from the drop-down menu.
  3. Scroll down to the “Your Subscription” section and click the “Cancel Subscription” button.
  4. Follow the prompts to confirm the cancellation of your subscription.

To choose a cheaper Hulu subscription plan, follow these steps:

  1. Go to the Hulu website and sign in to your account.
  2. Click on your name in the top right corner of the page, and then click “Account” from the drop-down menu.
  3. Scroll down to the “Your Subscription” section and click the “Change Plan” button.
  4. Select the plan that you want to switch to from the list of available options.

Hulu offers several subscription plans, including a basic plan that includes only on-demand content and a more expensive plan that includes live TV channels in addition to on-demand content. The basic plan is generally the cheapest option, although the exact price may vary depending on your location and any promotions that are currently available.

If you are having trouble switching to a different subscription plan or have any other questions, you can contact Hulu’s customer service team through the website or by calling the Hulu support hotline.

Impressive sound – Denon DM41 Hi-Fi mini system specs

0

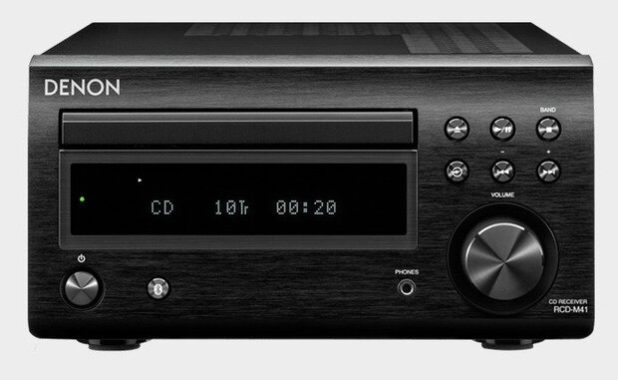
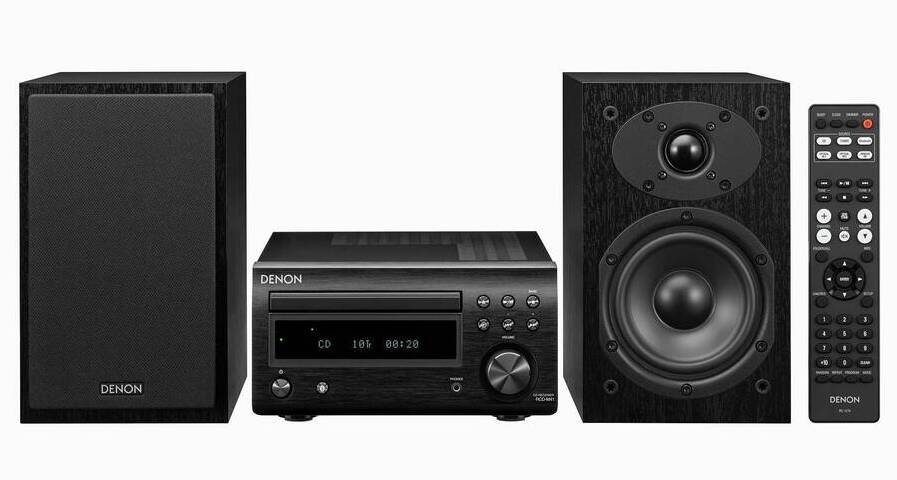
The Denon DM41 is a compact, high-quality bookshelf speaker system that is designed for use with a home theater or audio system. It features a pair of 3.5-inch full-range drivers and a 1-inch soft dome tweeter, which provide a wide frequency response and clear, detailed sound. The DM41 is equipped with a bass reflex design, which helps to extend the low frequency response, and it has a frequency response range of 60 Hz to 20 kHz. The speakers are housed in a sleek, modern cabinet and are available in a black or white finish. They can be placed on a shelf or mounted on a wall using the included mounting brackets. The DM41 is a versatile and stylish addition to any home audio setup.

Denon DM41
Denon DM41

The Denon DM41 is generally well-regarded for its sound quality and overall performance. It is designed to provide a wide frequency response and detailed, clear sound, and it is equipped with high-quality drivers and a bass reflex design to enhance the low frequency response. Many users have praised the DM41 for its ability to produce a rich, full-bodied sound that is well-suited for music and movie audio. It is also noted for its ability to produce a wide soundstage and deliver an immersive listening experience. For fast wireless connectivity, Bluetooth is built-in. When needed, the Bluetooth circuitry’s on/off selector provides a simple wireless connection, and when it’s not in use, enhanced sound from other sources like CD, FM, or digital in.


Denon DM41 DAB 
Mini System

That being said, it’s worth noting that the sound quality of any speaker system can be affected by a variety of factors, including the room it is placed in, the source material being played, and the individual listener’s preferences. As with any audio system, it’s important to consider the DM41’s capabilities and limitations in relation to your specific listening needs and preferences.

The DM41 DAB continues Denon’s tradition of putting sound quality first in their compact Hi-Fi systems. For sound clarity and very low levels of distortion, the “Simple & Straight” circuit design reduces distortion from the input selector, electronic volume control, and power amp. Triple Noise Reduction Design (TNRD), which supports this, aims to maintain the signal quality for the most precise, realistic sound.

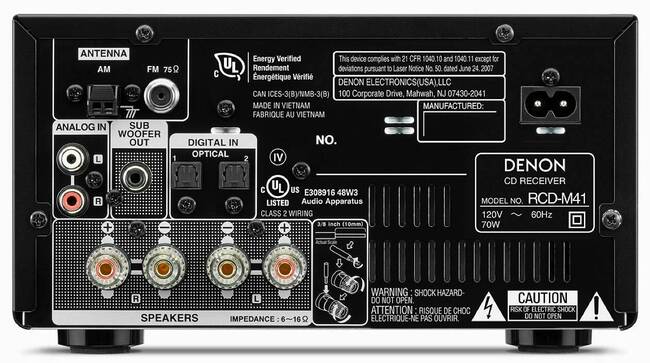
The DM41 features a pair of stereo RCA inputs, which can be used to connect it to a variety of audio sources, including a TV, a Blu-ray player, a CD player, or a turntable. It also has a 3.5mm auxiliary input, which can be used to connect a portable audio device, such as a smartphone or MP3 player.Denon DM41

In addition to these wired connectivity options, the Denon DM41 also has Bluetooth connectivity, which allows it to wirelessly stream audio from a compatible device, such as a smartphone or tablet. This makes it easy to listen to music or other audio content from a wide range of sources without the need for cables. Photo: Denon

Overall, the Denon DM41 offers a wide range of connectivity options that make it easy to integrate into a variety of home audio setups.

Denon DM41 general specs:

High Quality Power Output2 X 30
CD Compatibility: CD / CD-R/RW / WMA / MP3Yes / Yes / Yes / Yes
USB Audio (Front) / Made for iPod / Made for iPhoneNo / Yes / Yes
Tone Control: Bass / Treble / BalanceYes / Yes / Yes
ClockYes
Sleep TimerYes
Programmable Timer: Once / DailyYes / Yes
Analog In/out1/0
Digital Optical In / Out2 / No
iPod / iPhone compatible USB inputNo
Subwoofer PreOutYes
Speaker Terminal: Click Fit / ScrewNo / Yes
Headphone OutYes
Power Output (6 ohm, 1kHz)30 W
Number of channels2
Freq. Response (Analog In)20 Hz-20 kHz
Frequency Range FM87.5 Mhz-107.9 MHz
Frequency Range AM520 kHz-1710 kHz

Denon DM41 DAB 
Mini System

Available colors: BlackYes
Remote ControlRC-1214
Power Consumption in W70
Standby Consumption in W0.3
Maximum Dimensions (W x D x H) in inches8.27 x 12.13 x 4.53
Weight in LBS8.82

Android Phone Freezing Up – How to fix

0

There are several steps you can try if your Android phone is freezing up:

  1. Restart your phone: This is the first thing you should try because it can often fix minor issues. To restart your phone, press and hold the power button until the power off options appear, then tap “Restart.”
  2. Close all open apps: If your phone is freezing when you’re using a particular app, try closing it and any other apps that are open. To do this, tap the recent apps button (usually a square icon) and swipe the app to the right or left to close it.
  3. Clear the cache: Sometimes, the cache (a temporary storage area for app data) can become corrupt or full, which can cause problems with the app. To clear the cache for a specific app, go to Settings > Apps & notifications > [App name] > Storage > Clear cache.

    Android Phone Freezing
    photo: Pixabay
  4. Update your apps: Outdated apps can sometimes cause problems on your phone. To check for app updates, go to the Google Play Store and tap the hamburger menu (three horizontal lines) in the top left corner. Then, tap “My apps & games” and look for any apps that have an update available.
  5. Check for system updates: It’s also a good idea to check for any available system updates, as these can fix bugs and improve the performance of your phone. To check for system updates, go to Settings > System > Advanced > System update.
  6. Factory reset: If none of the above steps have fixed the problem, you may need to perform a factory reset. This will erase all the data on your phone, so make sure to back up any important files first. To factory reset your phone, go to Settings > System > Advanced > Reset options > Erase all data (factory reset).

I hope these steps help! If your phone is still freezing up after trying these steps, it may be a hardware issue and you may need to take it to a repair shop or contact the manufacturer for further assistance.

Why my Android Phone Freezing?

There are many possible reasons why an Android phone might freeze or become unresponsive. Some common causes include:

  • Insufficient memory: If your phone’s memory is full, it may struggle to run certain apps or perform certain tasks, which can cause it to freeze or crash.

    Android Phone Freezing
    photo: Pixabay
  • Outdated software: If your phone is running an outdated version of the Android operating system, it may be more prone to freezing or other performance issues.
  • Corrupted or full cache: The cache is a temporary storage area for app data, and it can become corrupt or full, which can cause problems with the app and lead to freezing or crashing.
  • Malware or viruses: If your phone has been infected with malware or a virus, it can cause freezing, crashing, or other performance issues.
  • Hardware problems: In some cases, freezing or other performance issues may be caused by hardware problems, such as a faulty battery or damaged internal components.

How to View Your iPhone or iPad’s Location History

0

To view your location history on an iPhone or iPad, you can use the built-in Maps app. Here’s how:

  • Open the Maps app on your iPhone or iPad.
  • Tap the “History” tab at the bottom of the screen.
  • Your location history will be displayed on the map. You can tap on any location to view more details about when you were there.

Note: To view your location history, you must have location services enabled on your device. You can check this by going to “Settings” > “Privacy” > “Location Services.” Make sure that “Location Services” is turned on.

You can also view your location history in the Google Maps app if you have it installed on your device. To do this, follow these steps:

  1. Open the Google Maps app on your iPhone or iPad.
  2. Tap on the three horizontal lines in the top left corner of the screen to open the menu.
  3. Tap on “Your Timeline” to view your location history.

Note: To view your location history in the Google Maps app, you must have signed in with your Google account and have location history enabled. You can check this by going to “Settings” > “Personal Content” > “Location Settings” and making sure that “Location History” is turned on.

location history on an iPhone or iPad
photo: Pixabay

How to enable location history on iPhone or iPad

To enable location history on an iPhone or iPad, you will need to turn on location services for your device. Here’s how:

  1. Go to “Settings” on your iPhone or iPad.
  2. Tap on “Privacy.”
  3. Tap on “Location Services.”
  4. Make sure that “Location Services” is turned on.

Once location services are turned on, you can also enable location history for specific apps that request access to your location. To do this, follow these steps:

  1. Go to “Settings” on your iPhone or iPad.
  2. Tap on “Privacy.”
  3. Tap on “Location Services.”
  4. Scroll down and tap on the app for which you want to enable location history.
  5. Tap on “While Using the App” or “Always” to grant the app access to your location.

Note: If you want to view your location history in the Google Maps app, you will need to sign in with your Google account and enable location history in the app’s settings. To do this, follow these steps:

  1. Open the Google Maps app on your iPhone or iPad.
  2. Tap on the three horizontal lines in the top left corner of the screen to open the menu.
  3. Tap on “Settings.”
  4. Tap on “Personal Content.”
  5. Tap on “Location Settings.”
  6. Make sure that “Location History” is turned on.

Solar energy basic tips, benefits and potential drawbacks

0

Solar energy is a form of renewable energy that is produced by converting sunlight into electricity. Solar panels, which are made up of photovoltaic (PV) cells, are used to capture the sun’s energy. When the PV cells are exposed to sunlight, they generate an electric current. This current can be used to power homes and businesses, or it can be stored in a battery for later use.

A battery is an important component of a solar energy system, as it allows excess solar energy to be stored and used later when the sun is not shining. There are several types of batteries that can be used in a solar energy system, including:

  • Lead-acid batteries: These are the most common type of battery used in solar energy systems. They are relatively inexpensive and have a long lifespan, but they can be heavy and require maintenance.
  • Lithium-ion batteries: These batteries are lighter and more efficient than lead-acid batteries, but they are also more expensive. They have a longer lifespan and require less maintenance, making them a popular choice for some solar energy systems.
  • Nickel-cadmium batteries: These batteries are similar to lead-acid batteries in terms of efficiency and lifespan, but they are more expensive and have a higher environmental impact due to the use of cadmium.
  • Flow batteries: These batteries store energy in a liquid electrolyte that is circulated through a cell stack to generate electricity. They have a longer lifespan than other types of batteries and can store large amounts of energy, but they are also more expensive.

When selecting a battery for a solar energy system, it is important to consider factors such as cost, lifespan, maintenance requirements, and environmental impact. It is also important to ensure that the battery is compatible with the solar panels and other equipment in the system.

There are several benefits to using solar energy. One of the main benefits is that it is a clean and renewable energy source. Solar panels do not produce any greenhouse gases or other harmful pollutants, so they do not contribute to climate change or air pollution. Additionally, solar energy is abundant and widely available, making it a reliable source of power.

Solar panels can be installed on rooftops, on the ground, or in large solar farms. They can be used to power a single building or a whole community. Solar energy is an increasingly popular choice for homes and businesses looking to reduce their carbon footprint and save on energy costs.

There are a few potential drawbacks to using solar energy:

  1. Initial cost: Solar panels and other equipment required to generate solar energy can be expensive to install. However, the cost of solar has been steadily decreasing over the years, and many states and localities offer financial incentives to encourage the use of solar energy.

    Solar energy basic tips
    photo: Pixabay
  2. Dependence on weather: Solar energy production depends on the availability of sunlight, which means it can be affected by weather conditions. On cloudy or rainy days, solar panels may not produce as much energy.
  3. Limited energy storage: Currently, it is difficult to store large amounts of excess solar energy, so it must be used immediately or fed back into the grid. This means that solar energy systems may not be able to meet a home or business’s energy needs during times of peak demand.
  4. Land use: Large-scale solar farms can take up a significant amount of land, which can be a concern in areas with limited space.

Overall, solar energy is a clean, renewable energy source that can provide significant benefits. However, it is important to carefully consider the potential drawbacks and how they may impact your specific situation before making a decision to switch to solar energy.

Solar panels

Solar panels are devices that convert sunlight into electricity. They are made up of photovoltaic (PV) cells, which are made of layers of semiconductor materials such as silicon. When sunlight hits the PV cells, it knocks electrons loose from the silicon atoms, creating an electric current. This current is then captured and converted into useable electricity.

Solar panels
photo: Pixabay

Solar panels are typically mounted on rooftops or on the ground, and they can be used to power homes, businesses, and other buildings. Solar panels are a key component of a solar energy system, which also includes other equipment such as inverters, batteries, and charge controllers.

There are two main types of solar panels: monocrystalline and polycrystalline. Monocrystalline solar panels are made from a single, pure crystal of silicon and are typically more efficient at converting sunlight into electricity. Polycrystalline solar panels are made from multiple crystals of silicon and are generally less efficient, but they are also typically less expensive.

Solar panels have become more affordable and efficient in recent years, making them an increasingly popular choice for homes and businesses looking to reduce their carbon footprint and save on energy costs.

The list of top ten Twitter tips and techniques

0

Here is a list of our top ten Twitter tips and hacks. These techniques can improve your Twitter experience and help you gain more followers.

  1. Use hashtags to increase the reach of your tweets and make them more discoverable by other users. 

    Hashtags on Twitter are used to group and categorize tweets by topic or theme. By adding a hashtag to your tweet, you can make it more discoverable by other users who are searching for or following that particular hashtag. This can help increase the reach and visibility of your tweets, as they will be seen by more people who are interested in that topic.

    Hashtags can also be used to join conversations and participate in events or campaigns that are using a specific hashtag. For example, if there is a trending hashtag about a news event or a popular TV show, you can use that hashtag in your tweets to join the conversation and share your thoughts and opinions with other users who are also tweeting about the same topic.

    In summary, using hashtags on Twitter can help you connect with a larger and more relevant audience, and participate in online conversations and events.

    Twitter tips and techniques - more followers
    photo: Pixabay
  2. Use Twitter Lists to curate and organize the accounts you follow, making it easier to find and engage with specific types of content. 

    Twitter Lists are a way to curate and organize the accounts you follow on Twitter. You can create lists for different topics or themes, and add accounts to each list that are relevant to that theme. This can make it easier to find and engage with specific types of content, as you can view the tweets from the accounts in each list separately, rather than having to scroll through your timeline to find what you’re looking for.

    Lists can also be useful for following accounts that you don’t want to see in your main timeline, but still want to keep track of. For example, you might create a list for accounts that post content about a particular industry or topic, but don’t want to see their tweets mixed in with your other personal and professional updates.

    Twitter Lists are a useful tool for organizing and filtering the accounts you follow, and for finding and engaging with specific types of content on Twitter.

  3. Twitter Polls are a way for users to quickly gather feedback or opinions from their followers on a particular topic or question. They allow you to create a simple poll with up to four options, and your followers can choose the option that best reflects their opinion.

    There are several ways in which Twitter Polls can be useful:

    • Engagement: Polls are a simple and fun way to engage with your followers and get them to interact with your content.
    • Feedback: Polls can be used to gather feedback on a particular product, service, or topic, and get a better understanding of what your followers think.
    • Research: Polls can be used to gather data and insights on a particular topic or issue, and can be a quick and easy way to conduct market research.
    • Entertainment: Polls can be used for entertainment purposes, such as asking your followers to vote on their favorite options or predictions for an upcoming event.
    • Use Twitter Polls to quickly gather feedback or opinions from your followers.

      Twitter Polls are a useful tool for gathering feedback and insights from your followers, and for engaging with them in a fun and interactive way.

  4. Use Twitter Moments to curate and share a series of tweets on a specific topic or event. 

    Twitter Moments are a way to curate and share a series of tweets on a specific topic or event. They allow you to gather tweets from different accounts and create a timeline or story around a particular theme or topic. This can be useful for highlighting important events, news stories, or conversations that are taking place on Twitter.

    There are several ways in which Twitter Moments can be useful:

    • Storytelling: Moments allow you to gather tweets and create a narrative or story around a particular theme or topic. This can help make complex or technical information more accessible and engaging for your audience.
    • Engagement: Moments can be used to engage with your followers and get them to interact with your content. You can ask for contributions or submissions to be included in your Moments, which can encourage participation and engagement.
    • Visibility: Moments can be shared and promoted on Twitter, which can help increase the visibility and reach of your content.
    • Collaboration: Moments can be created in collaboration with other users or organizations, which can help build relationships and expand your network.
  5. Use Twitter Analytics to track the performance of your tweets and get insights into your followers.

    Twitter Analytics is a tool that allows you to track the performance of your tweets and get insights into your followers. It provides data and metrics on the reach, engagement, and impact of your tweets, as well as demographics and interests of your followers.

    Twitter Analytics can be useful for several purposes:

    • Tracking the performance of your tweets: You can use Twitter Analytics to see how many people have seen your tweets, how many people have engaged with them (e.g., liked, retweeted, replied), and how much impact they have had (e.g., clicks, visits to your website). This can help you understand which types of tweets are performing well and which ones may need improvement.
    • Understanding your audience: Twitter Analytics provides data on the demographics and interests of your followers, such as their location, gender, and language. This can help you better understand your audience and tailor your content to their interests and needs.
    • Identifying trends and patterns: Twitter Analytics can help you identify trends and patterns in your tweet performance and follower demographics, which can help you make more informed decisions about your Twitter strategy.
    • Optimizing your content: By analyzing the data and insights provided by Twitter Analytics, you can identify opportunities to optimize your content and improve the performance of your tweets.
  6. Use Twitter Advanced Search to find tweets based on specific keywords, hashtags, or locations.

    Twitter Advanced Search is a tool that allows you to find tweets based on specific keywords, hashtags, or locations. It provides more advanced search options and filters than the regular Twitter search, which can help you find more specific and relevant results.

    Twitter Advanced Search can be useful for several purposes:

    • Finding tweets by keyword: You can use Advanced Search to find tweets that contain specific keywords or phrases. This can be useful for finding tweets on a particular topic or by a specific user.
    • Finding tweets by hashtag: You can use Advanced Search to find tweets that contain a specific hashtag. This can be useful for finding tweets related to a particular event or campaign, or for finding tweets on a particular topic.
    • Finding tweets by location: You can use Advanced Search to find tweets that have been sent from a specific location. This can be useful for finding tweets from a particular event or area.
    • Finding tweets by language: You can use Advanced Search to find tweets written in a specific language. This can be useful for finding tweets in a particular language or for finding tweets written by users who speak a particular language.
  7. Use Twitter Cards to add media, such as images or videos, to your tweets and make them more engaging.

    Twitter Cards are a way to add media, such as images or videos, to your tweets and make them more engaging. There are several types of Twitter Cards, including Summary Cards, Summary Card with Large Image, and App Cards.

    Twitter Cards can be useful for several purposes:

    • Increasing engagement: Adding media to your tweets can make them more visually appealing and can help increase engagement with your content.
    • Driving traffic: Twitter Cards can include a link to your website, which can help drive traffic to your site.
    • Promoting your content: Twitter Cards can be used to promote your content, such as blog posts, articles, or videos.
    • Promoting your brand: Twitter Cards can help promote your brand by including your logo or branding elements in the media attached to your tweets.

    To use Twitter Cards, you’ll need to add a few lines of HTML code to the header of your website. This will allow Twitter to recognize and display the media attached to your tweets when they are shared.

  8. Use Twitter Lead Generation Cards to collect email addresses from your followers and turn them into leads.

    Twitter Lead Generation Cards are a type of Twitter Card that allows you to collect email addresses from your followers and turn them into leads. These cards are designed to be easy for users to fill out, as they only require users to enter their email addresses and click a button to sign up.

    Twitter Lead Generation Cards can be useful for several purposes:

    • Building your email list: You can use Lead Generation Cards to collect email addresses from your followers and build your email list.
    • Driving traffic: Lead Generation Cards can include a link to your website, which can help drive traffic to your site.
    • Promoting your content: Lead Generation Cards can be used to promote your content, such as blog posts, articles, or videos.
    • Promoting your brand: Lead Generation Cards can help promote your brand by including your logo or branding elements in the card.

    To use Twitter Lead Generation Cards, you’ll need to have a Twitter Ads account and create a Lead Generation Card campaign. You’ll also need to have a form on your website that allows users to sign up for your email list.

  9. Use Twitter App Cards to promote your mobile app and drive downloads.

    Twitter App Cards are a type of Twitter Card that allows you to promote your mobile app and drive downloads. These cards include a link to the App Store or Google Play Store, where users can download your app.

    Twitter App Cards can be useful for several purposes:

    • Promoting your app: You can use App Cards to promote your app to your followers and drive downloads.
    • Driving traffic: App Cards can include a link to your website, which can help drive traffic to your site.
    • Promoting your content: App Cards can be used to promote your content, such as blog posts, articles, or videos.
    • Promoting your brand: App Cards can help promote your brand by including your logo or branding elements in the card.

    To use Twitter App Cards, you’ll need to have a Twitter Ads account and create an App Card campaign. You’ll also need to have a mobile app that is available for download in the App Store or Google Play Store.

    In summary, Twitter App Cards is a great way for promoting your mobile app and driving downloads on Twitter.

  10. Use Twitter Promote Mode to automatically promote your best tweets and get more reach and engagement.

    Twitter Promote Mode is a paid service that allows you to automatically promote your best tweets and get more reach and engagement. When you enable Promote Mode, Twitter will automatically promote your tweets to a targeted audience, based on your chosen targeting options. You can set a budget for your Promote Mode campaign, and Twitter will adjust your promotion based on the budget and the performance of your tweets.

    Promote Mode can be useful for several purposes:

    • Increasing reach and engagement: By promoting your tweets to a targeted audience, you can increase the reach and engagement of your content on Twitter.
    • Building your following: Promote Mode can help you attract new followers and grow your audience on Twitter.
    • Driving traffic: Promote Mode can help drive traffic to your website or other online properties by promoting your tweets to a targeted audience.
    • Promoting your brand: Promote Mode can help promote your brand by increasing the visibility of your tweets and attracting new followers.

    To use Promote Mode, you’ll need to have a Twitter Ads account and set up a Promote Mode campaign. You’ll also need to set a budget for your campaign and choose your targeting options.

    In summary, Twitter Promote Mode is a paid service that allows you to automatically promote your best tweets and increase the reach and engagement of your content on Twitter.

27″ Cooler Master Tempest GP27U – made for gaming

0

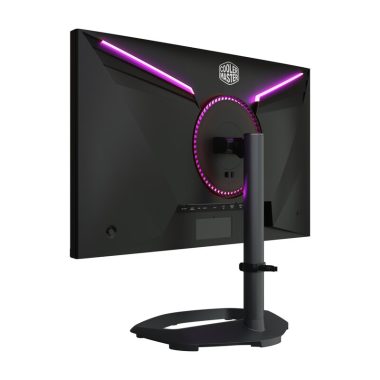
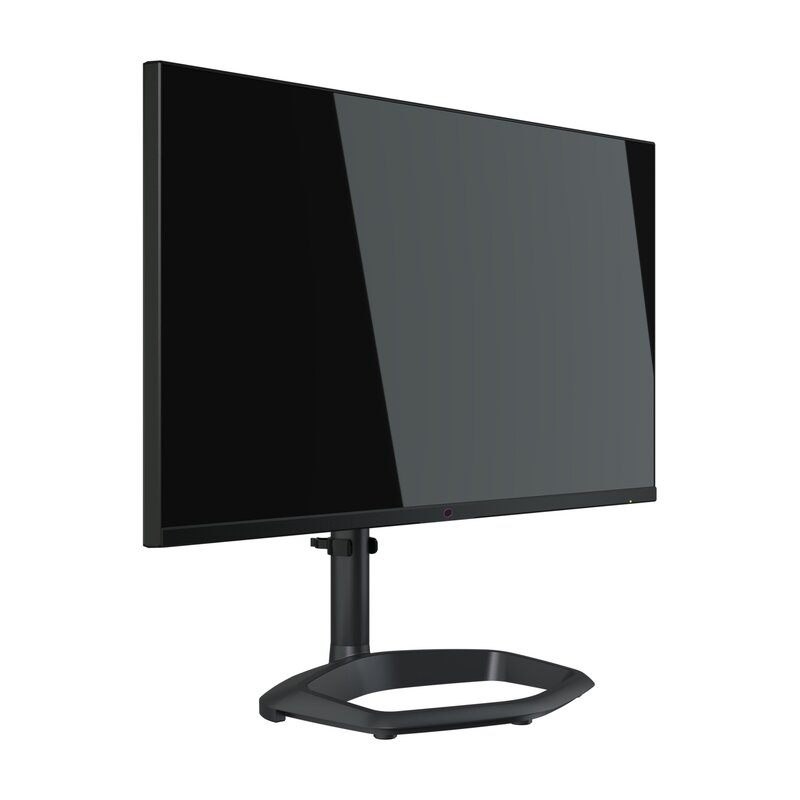
The Cooler Master Tempest GP27U is a gaming monitor that was released in 2022. It has a 27-inch display with a 1440p resolution and a refresh rate of 165Hz. It also has AMD FreeSync technology to help reduce screen tearing and improve the overall gaming experience. The monitor has a 1ms response time and supports HDR for enhanced image quality. It has a sleek design and thin bezels for a modern look, and it has a built-in USB hub for convenience. The Cooler Master Tempest GP27U is suitable for gaming, as well as general use such as work and entertainment.

The Cooler Master GP27U is a great moitor for gaming. With HDMI 2.1 bandwidth and 4k resolution, you can play games with fine detail and make the most of the Xbox Series X or PS5. Additionally, it supports VRR to lessen screen tearing on AMD and NVIDIA graphics cards. Motion appears seamless at any refresh rate because to the extremely minimal input lag and quick response time. Last but not least, because of its decent local dimming capability for deep blacks, it’s a wonderful option for gaming in a dark environment.

Cooler Master Tempest GP27U

The Cooler Master Tempest GP27U could potentially be a good monitor for use in an office setting, depending on your specific needs and preferences. The 27-inch display size and 1440p resolution provide a clear and detailed image, which can be helpful for tasks such as reading documents and working with spreadsheets. The monitor’s 1ms response time and 165Hz refresh rate may also be beneficial for fast-paced tasks or for those who are sensitive to screen flickering.

However, it’s worth noting that the Cooler Master Tempest GP27U is primarily marketed as a gaming monitor, so it may not have all the features that you would need for an office setting. For example, it may not have as wide of a viewing angle as some other monitors, and it may not have features such as a built-in document holder or adjustable height. It’s important to consider your specific needs and preferences when choosing a monitor for office use.

Ergonomics is the study of how to design and arrange equipment and environments in a way that minimizes the risk of injury or discomfort and maximizes comfort and efficiency. When it comes to monitors, good ergonomics can help reduce the risk of eye strain, neck and back pain, and other issues that can arise from prolonged use.

The Cooler Master Tempest GP27U has some features that may contribute to good ergonomics:

Adjustable stand: The monitor has a stand that allows you to adjust the height, tilt, and swivel of the display to find a comfortable viewing angle.

Low blue light mode: The monitor has a low blue light mode that reduces the amount of blue light emitted by the display, which can help reduce eye strain and improve sleep patterns.

However, it’s worth noting that the Cooler Master Tempest GP27U may not have all the features that you would need for optimal ergonomics. For example, it may not have a fully adjustable height or the ability to pivot into portrait orientation, which can be helpful for reducing neck strain. It’s important to consider your specific ergonomic needs when choosing a monitor.

An adequate native contrast ratio is provided by the Cooler Master GP27U. Its IPS panel, which has a low natural contrast, is primarily to blame, but the full-array Mini LED local dimming feature further enhances it.Cooler Master Tempest GP27UThe Local Contrast is the contrast between the white and black levels closer to the cave, whereas the Contrast uses the average black levels of the four black corners. Since they were evaluated differently and the checkerboard pattern responds to local dimming differently than actual content, these data cannot be compared to the review’s results. Photo: Cooler Master

The Cooler Master Tempest GP27U is a gaming monitor that supports HDR (High Dynamic Range) for enhanced image quality. HDR technology allows the monitor to display a wider range of colors, higher contrast, and brighter highlights than traditional monitors, which can result in more realistic and immersive visuals.

When using the Cooler Master Tempest GP27U with HDR content, you can expect to see improved detail, more accurate color representation, and better contrast compared to non-HDR displays. The overall visual experience may be more pleasing and lifelike, with greater detail in both the highlights and shadows of an image.

Keep in mind that to fully benefit from HDR on the Cooler Master Tempest GP27U, you will need to use it with an HDR-compatible device and content. Not all devices and content support HDR, so it’s important to check for compatibility before attempting to use it. Additionally, the quality of the HDR experience may vary depending on the specific content and the display settings you use.

Despite not having NVIDIA or AMD certification, the Cooler Master GP27U’s VRR functionality is compatible with both brands of graphics cards. Additionally, Low Framerate Compensation is supported, allowing the VRR to function even when the frame rate goes too low. It also supports the full range of refresh rates for G-SYNC and FreeSync across HDMI and DisplayPort.
Initially, you couldn’t enable local dimming and VRR at the same time, but starting on November 25, 2022, you can. Both VRR and HDR are supported simultaneously.

The Cooler Master Tempest GP27U is a gaming monitor with a sleek design and thin bezels. It does not have any physical slots or openings on the front or back of the display, so it is not equipped with any additional ports or features beyond what is listed in its specifications.

The Cooler Master Tempest GP27U has the following ports:

HDMI 2.0: This port allows you to connect the monitor to a device with an HDMI output, such as a computer, gaming console, or Blu-ray player.

DisplayPort 1.4: This port allows you to connect the monitor to a device with a DisplayPort output, such as a computer or graphics card.

USB-A 3.2: The monitor has two USB-A ports that allow you to connect devices such as a mouse, keyboard, or external hard drive.

Headphone jack: The monitor has a 3.5mm headphone jack that allows you to connect a headset or headphones for audio output.

If you need additional ports or features beyond what is offered by the Cooler Master Tempest GP27U, you may need to use an external device, such as a USB hub or docking station.

Cooler Master Tempest GP27U calibration

Calibrating a monitor involves adjusting the display settings to ensure that the colors and contrast are accurate and consistent. Calibrating a monitor can help improve the overall image quality and ensure that the colors you see on the screen match the intended colors of the content you are viewing.

To calibrate the Cooler Master Tempest GP27U, you can follow these steps:

Make sure that the monitor is in a well-lit room and that it is positioned at a comfortable viewing distance and angle.

Connect the monitor to your device and ensure that it is set to the correct resolution and refresh rate.

Adjust the brightness and contrast settings of the monitor to your personal preference. You can use a brightness and contrast test pattern or a colorimeter tool to help you find the optimal settings.

If the monitor has a color temperature setting, set it to a value that is comfortable for your eyes. A value of around 6500K is generally considered neutral and is suitable for most tasks.

If the monitor has a color management system, use it to fine-tune the color settings to your personal preference. You can use a color calibration tool or a color chart to help you find the optimal settings.

Keep in mind that the optimal calibration settings may vary depending on the specific content you are viewing and your personal preferences. It’s important to experiment with different settings and adjust them as needed to find the best image quality for your needs.

Cooler Master Tempest GP27U gaming advantages

The Cooler Master Tempest GP27U is a gaming monitor that is designed to provide a high-quality gaming experience. Some of the advantages of using the Cooler Master Tempest GP27U for gaming include:

High refresh rate: The monitor has a refresh rate of 165Hz, which means that it can display up to 165 frames per second (fps). A high refresh rate can help reduce screen tearing and improve the overall smoothness and fluidity of the gameplay.

Low response time: The monitor has a response time of 1ms, which means that it can display changes in the image very quickly. A low response time can help reduce ghosting and improve the overall clarity and accuracy of the gameplay.

AMD FreeSync technology: The monitor supports AMD FreeSync technology, which helps to synchronize the refresh rate of the display with the frame rate of the GPU (graphics processing unit). This can help reduce screen tearing and improve the overall gaming experience.

HDR support: The monitor supports HDR (High Dynamic Range) for enhanced image quality. HDR allows the monitor to display a wider range of colors, higher contrast, and brighter highlights, which can result in more realistic and immersive visuals.

Overall, the Cooler Master Tempest GP27U is a capable gaming monitor that is designed to provide a smooth and immersive gaming experience. It is suitable for a wide range of games and should be able to handle fast-paced gameplay with ease.
The price of the Cooler Master Tempest GP27U may vary depending on your location and the retailer you purchase it from. The suggested retail price for the Cooler Master Tempest GP27U is $799.00 in the United States. However, you may be able to find it for a lower price at certain retailers or during sales events. It’s worth shopping around and comparing prices from different retailers to find the best deal.Cooler Master Tempest GP27U

It’s also worth noting that the price of the Cooler Master Tempest GP27U may fluctuate over time due to various factors, such as market demand and availability. It’s a good idea to check the current price before making a purchase to ensure that you are getting a good deal.

Panel Type                     Flat Series
Ratio            16:9
Screen Size     27″
Panel   Ultra-Speed IPS 1.07B colors w/Quantum Dot
Resolution   UHD 3840×2160
Frame Rate   160 Hz
Contrast Ratio   1000:1
Viewing Angle (H/V)   178°/178°
Brightness600 nits (SDR), 1200 nits (HDR Peak)
DisplayHDR1000   Compatible
Color GamutAdobe RGB 99%, DCI-P3 98%
I/O – DP1
I/O – HDMI 2.12
I/O – USB Type C1 (PD 90W + DP ALT + USB data)
I/O – USB 3.0 Type B1
I/O – USB 3.2 Type A2
I/O – Speaker2 (3W)
Local DimmingMiniLED 576 zone
VRR TechnologyAdaptive Sync (Up to 144Hz),

FreeSync Range: Yes, G-Sync Range: Yes

Response Time1 ms
Eye ProtectionLow Blue Light
Overdrive TechnologyYes
LightingRear Cover Lighting
Delta E <2Yes
Firmware UpdateYes (USB)
Power Consumption47.7W
VESA100×100 mm
Height Adjustment0-110 mm
Tilt Adjustment-5°~+20°
Swivel Adjustment   ±15°
Pivot Adjustment   0° ±90°
Warranty   3 years