In general, Samsung TV series currently include the majority of video codecs since Samsung TV uses the most recent technology to guarantee successful audio and video playing. If your video or audio codecs are not supported by Samsung TV, there may be some limitations. If you run into this issue, this guide may be of assistance. We’d like to demonstrate how to resolve the Samsung TV “Audio Codec Not Supported” issue. You can still play back video files on Samsung TV series despite the audio codec not being supported by Samsung TV. In truth, these videos could be played again on a Samsung TV, but the sound might not work. What are the root causes of this problem?
Although the majority of video file types, including MP4, WMV, and others, are accepted, recognized, and played on Samsung TVs, some file formats may not be supported. A video file’s final product is data that has been compressed using specific codecs. Make sure the video files are in the format and codec that Samsung TV supports before attempting to play back a video or movie on the device. Otherwise, Samsung TV won’t deliver audio or playback video.
photo: Pixabay
Media files are built around codecs. It tests if your media devices are capable of playing back source video files properly. There are various codecs incorporated into Samsung TV.It just selects the suitable codec file to use for decompressing your video file before playing it each time you open a file. Your media player generates an error if the proper codecs are not installed or discovered.
Unquestionably, the majority of media players and devices only play back full, typical media files. Most media players and devices do not detect damaged video files. Some media players will attempt to ignore or fix minor mistakes in videos, but others won’t, especially if the file is seriously defective. You or an infection on your device may be the direct source of file corruption.
In some cases, outdated Samsung TV hardware or firmware is to blame for the “Samsung TV Audio Codec Not Supported” problem. To resolve this problem, you must update your Samsung TV.
By understanding the potential reasons of the Samsung TV play video – Audio Codec Not Supported issue, we can then move on to the fixes for the audio codec not supported on Samsung TV problem that are provided below.
Let’s then concentrate on the fixes for the issues with Samsung TV play video no sound and audio codec not supported on Samsung TV. The following are at least some of the answers, in accordance with its potential causes:
Your Samsung TV can be equipped with a variety of amazing media players, such as the VLC media player, which is compatible with Windows, Mac, Linux, Android, and other platforms. Almost all video and audio codecs are pre-installed in the VLC media player. Therefore, you might just download VLC media player and install it on your Samsung TV to fix this problem.
Some older Samsung TV series, as well as some more recent Samsung TV series, might not be able to recognize new codecs. If this is the case, you could consider updating the hardware or firmware to fix the issue.
There are many specialized tools available for recovering or restoring damaged video files. If your video files are damaged, you might try using third-party video repair apps to fix them. Many tools, like Windows Media Player, VLC media player, etc., are capable of doing this.
Additionally, converting video files to Samsung TV compatible files would be a fantastic decision. You may quickly convert your video files to Samsung TV video files with the video and audio codecs optimized for Samsung TV sets using video converter software.
Over time, a laptop’s battery life decreases. Its lifespan is influenced by how frequently we charge it and how long we let it charge. As a result, we might see that our laptop’s battery life is decreasing. We’ll demonstrate how to manually charge a laptop battery to increase its lifespan. How to manually increase battery life The window with advanced settings from Windows power options must first be opened. In order to change advanced power settings, open Control Panel and go to Hardware and Sound > Power Options > Change settings for the selected plan.
By doing this, a new window will open, displaying the choices and settings available under the power plan that we have chosen on the computer. To make the following adjustments, we must locate the Battery option and the Display option there.
photo: Pixabay
We’ll set the critical battery level to 5% or even less and signal that the computer will go into hibernation in the critical battery level action. When the adjustments are made, we plug in the laptop for the following two hours while charging the battery till it reaches 100%. Although we are free to use the equipment while it is loading, it is advisable that we avoid doing so whenever possible.
Now that the charger has been turned off, we will leave the device on until it automatically goes into hibernation, which will occur when the battery level hits 5% or according to the prior configuration. It is crucial to set the laptop’s sleep, screen, and hibernation settings to Never if we intend to use it during this period. When the laptop’s battery is entirely useless, we allow it to shut off automatically. Then, we put the laptop back into the mains so that the battery may fully recharge. To bring everything back to normal and ready to use once the laptop battery has been fully charged, we make sure to reset the power settings to default as well as the power and sleep configurations.
This procedure calibrates the laptop’s battery without the help of third-party apps, and it is one that we may execute on a regular basis, say roughly every two months, in an effort to increase the battery life of our device. How to check laptop battery life in Windows OS The battery in laptops breaks down over time, just like that in mobile phones. No matter how much we manually calibrate the battery, after a year we will undoubtedly discover that it lasts considerably less than it did when we first purchased the laptop.
Although Windows doesn’t specifically state how much the laptop battery has decreased, HWinfo32, an easy free utility, makes it simple to find out. When we run this tool, we will see a section on the left labeled “Smart Battery” among all the other technical details of our laptop. We can see all the data relevant to our laptop battery in this part.
One of the aspects that we are interested in learning more about is the “Wear Level,” which will show the battery’s percentage of weakening. Additionally, the “Designed capacity” and “Full Charged Capacity” sections let us know the battery’s overall capacity when it was brand-new and fully charged, respectively. No matter how much we calibrate, we won’t be able to do much if the laptop battery has a lot of degradation. The only options left to us are to purchase a new battery or try to execute a warranty.
The battery itself can be one of the most crucial components when working with a laptop, as I’m sure many of you already know. We must properly care for it because it is the one that gives us the autonomy that this particular type of equipment requires.
We have many applications at our hands for all of this that will be quite useful for this kind of operation. At the same time, it might be informative to know that Windows itself offers a built-in feature that will enable us to compile an extensive report on how the laptop’s battery is being used. This one is slightly hidden, but we can see it with our own eyes. So, the first step is to launch a command prompt window if we want to check that report to verify if we are using it properly. We are able to do this thanks to the CMD command. As a result, once we are in a window of this kind, we need type: powercfg/batteryreport
As a result, we will learn detailed and really helpful information about the laptop battery as well as its usage.
Garmin (NYSE: GRMN) is proud to announce that its Automotive OEM group has been recognized by BMW Group with a coveted 2022 Supplier Innovation Award in the customer experience category. The annual program recognizes suppliers that successfully collaborate with the automaker to drive developments forward and enable the use of outstanding technologies in BMW vehicles.
“This award is a testimony to our commitment to BMW and its customers around the world,” said Garmin Automotive Group Managing Director Matt Munn. “We believe every day is an opportunity to innovate, and we are honored by the confidence BMW Group has entrusted in Garmin as we design, produce and deliver high-quality infotainment solutions for the BMW lineup of vehicles.”
Garmin was lauded for its contribution to the Theatre Screen, a private back-seat movie lounge experience introduced in the all-new BMW 7 Series. With a click of a button, a 31-inch panoramic display descends from the headliner, blinds are closed, and lighting is automatically adjusted to transform the second row into a private cinema on wheels. Garmin’s custom designed computing module manages all the software and customer interfaces to enable the BMW Theatre Screen experience.
photo: Garmin
“Innovations are key to the success of our transformation towards electromobility, digitalization and sustainability. Our award ceremony recognizes innovation and cooperative partnership with our suppliers – especially in challenging times,” said Joachim Post, member of the Board of Management of BMW AG responsible for Purchasing and Supplier Network.
The BMW Group Supplier Innovation Awards were presented Nov. 17 at the 2022 BMW Welt conference in Munich. Winners were announced in a total of six categories: drive train and e-mobility, sustainability, digitalization, customer experience, newcomer of the year and exceptional team performance.
BMW appointed Garmin as its lead tier-one supplier of in digital cockpit computing modules for future BMW models. To expand its production capability and capacity, Garmin invested in a new 29,000-square meter state-of-the-art automotive OEM manufacturing and distribution facility in Wroclaw, Poland as well as expansions to manufacturing at its U.S. headquarters in Olathe, Kan.
Garmin Automotive OEM has cultivated key relationships with leading automobile manufacturers to provide a variety of integrated in-vehicle hardware and software solutions including embedded computing models, infotainment, integrated cameras, navigation, precise positioning technology and advanced driver-assistance systems (ADAS). Garmin Auto OEM has dedicated offices throughout the Americas, Europe and Asia.
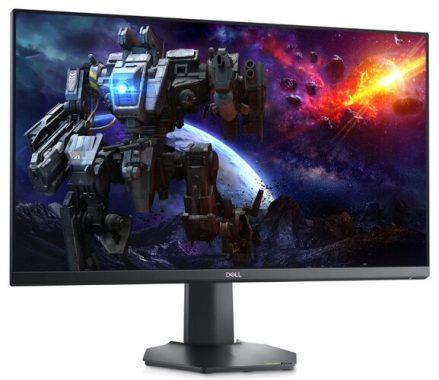
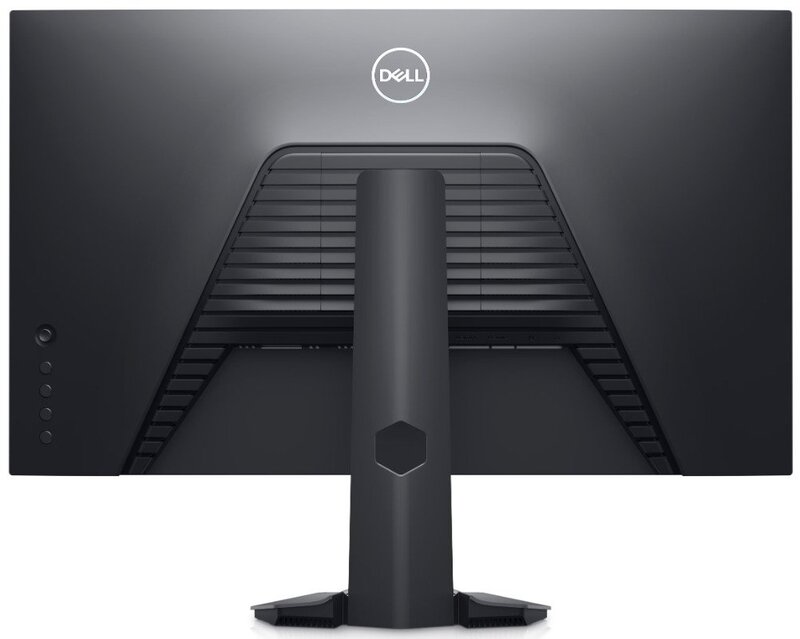
The Dell G2722HS has a hexagonal stand and an all-black body for a design that attracts to gamers. It is plain-looking and won’t stand out too much if you use it in an office setting because it has narrow borders on three sides. The ergonomics of the stand aren’t terrible, but they’re not as adaptable as those of other Dell monitors, such the Dell S2721DGF. If the screen is in front of you, you can easily change it, but you cannot swivel the screen to share it with another person. The stand also features a notch for cable management.
The Dell G2722HS’s sharpness right out of the box is excellent. Since there is no sRGB option, colors are not restricted to the sRGB color space and appear oversaturated. The color temperature is very near to the aim of 6500K, and the white balance is outstanding. The sRGB target curve is decently followed by gamma, but dark pictures are too dark and bright ones are too bright. Incredible SDR color gamut is provided by the Dell G2722HS. The sRGB color space, which is utilized for the majority of web content, is perfectly covered. However, it only covers a small portion of the Adobe RGB color space, which is utilized by several photo- and video-editing software.
Dell G2722HS monitor
Special game modes for first-person shooters (FPS), role-playing games, and sports simulations were added to the new Dell G2722HS monitor. By removing frame tearing, AMD FreeSync Premium and NVIDIA G-Sync Compatible serve to enhance the quality of your gaming experience. Users have been aware of Dell’s ComfortView Plus technology package for a while now: The TUV Low Blue Light features of the Flicker-Free tool lessen the intensity of hazardous radiation in the blue portion of the spectrum. “Play all day with Dell ComfortView Plus, the always-on, built-in TUV low blue light hardware solution that reduces harmful blue light without sacrificing true-to-life colours”. The gradient is excellent. There is 8-bit banding throughout due to the highest signal it can accept, which is most obvious in darker hues. Both DisplayPort and HDMI connections are compatible with the variable refresh rate support across the whole range, and both AMD and NVIDIA graphics cards are supported. Two HDMI 2.0 interfaces and a DisplayPort 1.2 connector are included in the set of connectors. There is also a 3.5mm headphone jack.
The Dell G2722HS is a great gaming monitor. In order to decrease screen tearing, it has a high 165Hz refresh rate, native FreeSync support, and G-SYNC compatibility. Because of its quick response time at any refresh rate and little input latency for a responsive experience, motion also appears fluid. Unfortunately, the low contrast ratio makes blacks appear gray, making it unsuitable for gaming in darkly lit environments.
The Dell G2722HS is a highly respected for office use. Because of its excellent handling of reflections and good peak brightness, visibility is not a problem, making it suitable for bright offices. However, the stand cannot swivel. It also has acceptable viewing angles if you need to share your screen with someone seated next to you. For content producers, the Dell G2722HS is adequate. It shows a wide spectrum of colors in SDR, but they look oversaturated, therefore calibration is required to get the most accurate image. Even though the screen is only 27 inches in size and only has a weak 1080p resolution, you can still see more of your work area at once. Although it has limited ergonomics and is difficult to put in an ideal viewing posture, the wide viewing angles are beneficial if you wish to share your screen with another person. Photo: Dell
Among gaming monitors, the Dell G27722HS is entry-level. For gaming, it has a 27-inch screen with a 1080p resolution and a refresh rate of 165Hz. To eliminate screen tearing in games, it is certified to be G-SYNC compatible and offers native support for FreeSync. It is a member of Dell’s G Series gaming monitor series, which also includes the comparably sized 24″ Dell G2422HS. Due to the absence of a USB hub, HDR support, and speakers, it has few additional functions. Moreover, you can change the stand’s height and tilt, but you are unable to swivel or rotate it into portrait orientation.
If you’re looking for a budget-friendly performer for competitive tasks or intense gaming, the Dell G2722HS monitor is a good option. Incredibly responsive for a cheap model, its IPS panel makes it ideal for fast-paced games. Although it is not accurate right out of the box, the 100% sRGB coverage will make visuals look colorful and rich.
Pricing:
The Dell G2722HS is competitively priced, often found around $200 (during sales), making it an attractive option for budget-conscious gamers.
Conclusion:
If you’re seeking a budget-friendly gaming monitor with a high refresh rate, good color accuracy, and don’t mind the lower pixel density of a 27-inch 1080p display, the Dell G2722HS is a solid choice. However, if sharper image quality is a priority, you might consider a 24-inch 1080p monitor or a 27-inch 1440p monitor for better pixel density.
It is not an ideal gaming monitor, nevertheless, as a result of price reductions and exclusions. Its contrast could be better, and some people would consider the absence of some feature comforts to be a deal-breaker. Basically, if you want a high-performance gaming monitor without going over budget, this is a great purchase.
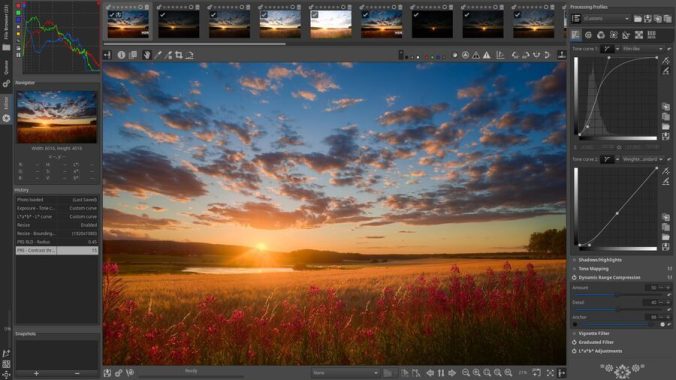
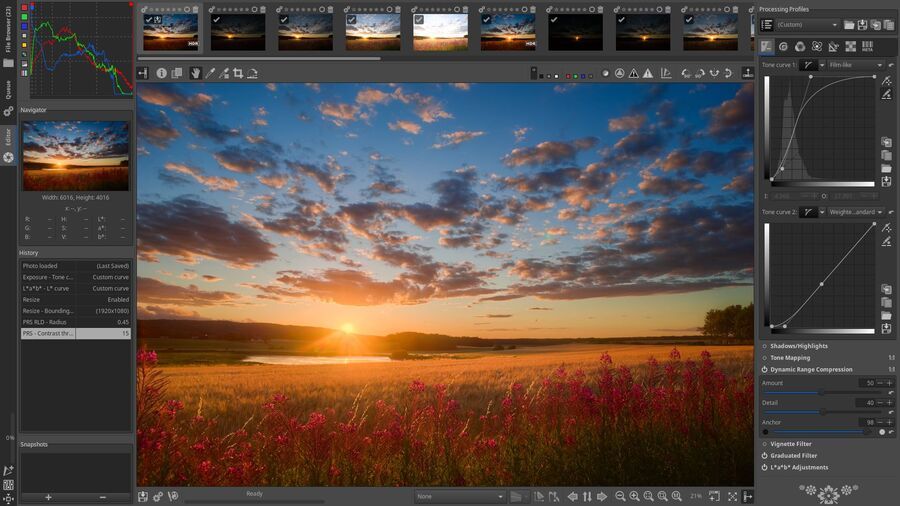
Quickly, RawTherapee program jumped to the top of our list of preferred free raw image processing program programs. It is available for Windows, MacOS, and Linux and is free and open source. It offers some wonderful capabilities for processing RAW files, including picture optimization and a variety of tools that make editing photos much simpler. The options for shadow and gradient filters, as well as the contrast, saturation, and brightness control tools, are all quite helpful in our opinion. Its color control, especially the white balance, is something else We truly like. This platform for image processing incorporates with other forums. The raw image is processed by RawTherapee to create a more attractive picture.
The idea behind this program is to give the user control over non-destructive editing. You can use any editing tools you choose throughout this procedure, but the changes won’t show up on your photo right away. Instead, they can be observed as dimension changes in a sidecar file.
RawTherapee
The exportation procedure is where the actual image modifications may be visible. In other words, unless you export the file from RawTherapee, you can view the image in its original form.
The majority of raw picture formats, including X trans and Canon Dual-Pixel sensors, are supported. The program is an adjusted and improved RAW version of the draw code that offers better user outcomes. High-quality images You have access to the best tools to create photographs of the highest quality from your raw files thanks to a non-destructive, 32-bit (floating point) processing engine, contemporary demosaicing techniques, and sophisticated color and detail editing (including High Dynamic Range DNG). The user interface of the application is made up of numerous windows and tabs that offer all the functions to the user. In RawTherapee, several filters are also available. The editing process can also be done in batches, which is more user-friendly and convenient.
If your CPU can handle the strain, you may even use this software to process one photo while making adjustments to another. If not, you’ll be powerless to manage anything and will be stuck with this feature. You may use two demosaicing techniques on the same image with RawTherapee, compose pixel-shift raw files with automatic ghost masking, work with multiple-frame raw files, perform dark frame subtraction, correct flat fields, and fix hot/dead pixels.It is targeted toward users from enthusiast beginners who want to further their understanding of how digital imaging works to expert photographers and is built for developing raw files from a variety of digital cameras.
Software RawTherapee – easy editing your images
With the help of the robust toolset that RawTherapee offers, you may create stunning images that express your creativity. Software RawTherapee is open-source and free. This means that as long as you follow by the copyleft GPLv3 license, you are allowed to use it however, wherever, and at no cost. Download the source code, edit it, and contribute to its advancement.
Download RawTherapee, raw image processing program- Free and Open Source software HERE
VPS hosting options are in high demand from both both individuals and companies for their online projects. This is due to the fact that it combines the most advantageous aspects of both shared and dedicated hosting.
We’ll go through the advantages and disadvantages of virtual servers in this post so you can decide if it’s the best option for your online activities.
Advantages of VPS Hosting Take into account these advantages of using VPS
photo: Pixabay
Worth the money VPS server hosting is much more expensive than the shared alternatives, but it is cheaper than dedicated hosting. This is a fantastic compromise option that will save you money if you’re torn between shared and dedicated choices. The best substitute for dedicated hosting for consumers on a low budget is VPS. You may add more disk space or bandwidth whenever you need to with the majority of virtual private server providers. A larger VPS account is simple to upgrade to as your business grows. If you discover that you need more storage space or are getting more website visits, you can always upgrade to a more powerful setup.
More Protective Than Shared When compared to shared hosting, VPS offers additional security features. You won’t have to be concerned about being forced into a dangerous environment as a result of the behavior of others because you will have total control over how you keep your piece of the server secure. You may rest easy knowing that your primary platform is protected because the majority of DDoS attacks and security exploits are reduced by employing VPS. If you select a VPS, your hosting will function without your involvement. You don’t need to bother about maintenance or updates. That will be done mostly by company.
Simple to Set Up Compared to a dedicated solution, which needs physical building and setup, VPS hosting may be set up much more efficiently. This means that you may quickly have your VPS up and running with all the required software loaded.
Easy to Operate and Use VPS currently outweigh dedicated alternatives. They resemble ordinary cloud web services, which explains why. This guarantees that there is always a functionally and cost effective solution available. You will be granted complete admin access. You’ll be able to perform stuff like:
Installing new software and modules Control the OS as if it were a dedicated, independent server, and more. Easy To Upgrade It is easy and quick to increase your plan’s allocation of those resources because you are only using a small portion of the main server’s power. On a dedicated option, the hardware won’t be operational until it has been configured.
Greater Effectiveness VPS has excellent performance, and it also has fast speed. Your site will load and function considerably more quickly than the shared alternative. In terms of search engine optimization, VPS is significantly more advanced than shared.
VPS Hosting Disadvantages The following are a few disadvantages of using VPS
More Expensive Than Shared Hosting Compared to the shared option, VPS is more expensive. In most circumstances, managed VPS is more expensive than its unmanaged version. The return on investment is greater despite the higher initial cost.
Limited Intent VPS hosting, a substitute for dedicated hosting, has its own set of restrictions. You’ll need to either upgrade your plan or switch to a dedicated option in this situation. These limitations are more flexible than shared hosting.
Dedicated Servers are more secure. While dedicated servers give the highest level of protection, virtual private servers (VPS) offer a good middle ground. A dedicated server is far more suitable for a large corporate webpage that will be hosting numerous users, hosting multiple forums, sending thousands of emails every day, and running multiple resource-intensive apps concurrently. However, a VPS may be just what you need for a personal blog or maybe some resource-intensive software.
Greater Level of Technical Knowledge is Required If you contrast VPS with other cloud-based solutions, you’ll see that the former needs more technical skills from you. The success of a site depends heavily on its level of security. To continue surprise and satisfying your customers and clients, you must ensure that they have a safe and reliable online experience.
If you want to monetize your site, optimize its SEO, or are concerned about the security of your site’s data, a VPS hosting is a perfect option.
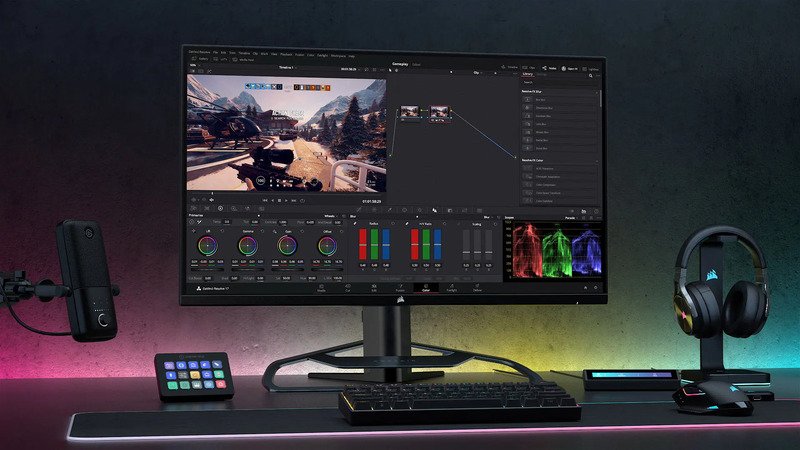
The Corsair XENEON 32QHD165 monitor offers a basic, modern design, a stand with a highly unique style, and excellent construction. One of the finest cable management systems we have ever seen is in place there. It features a surprisingly straightforward design, with a sleek finish on the back and no RGB lighting or other gamer aesthetic, except from the stand. The stand is quite original in its design, however it takes up a lot of room. You can’t easily put other items in front of the monitor because of the two-tiered stand blocking the front of the monitor. It is quite sturdy and provides good monitor support.
The Corsair XENEON 32QHD165 monitor is a really well constructed. The aluminium stand has a high-end look. It is quite strong and supports the monitor with little to no movement. Sadly, the display itself, which seems to be totally plastic, lacks the stand’s premium construction. It flexes a little bit, and the bottom bezel is a little bit uneven. Even while the display is actually quite good, it feels notably less high-end than the stand, which is unexpected if you planned to VESA install it.
Corsair XENEON 32QHD165 monitor
With the help of the iCUE software, you can adjust every aspect of your monitor, and with the support of the iCUE Nexus or Stream Deck integration, you can even switch between inputs at the press of a button. Use the 5-way physical joystick that is located behind the screen if you’d prefer. A wide brightness spectrum is provided by an HDR400 display for more realistic and spectacular in-game graphics.
Unfortunately, the Corsair XENEON 32QHD165 has weak contrast, as would be anticipated for an IPS monitor, making dark rooms’ blacks appear gray. Additionally, there is no local dimming feature to boost contrast. These results are a little higher than usual for an IPS panel and surpass Corsair’s claimed average contrast ratio of 1000:1, even though contrast can vary between individual displays. The sRGB and Adobe RGB color spaces are absolutely perfectly covered by the Corsair XENEON 32QHD165’s amazing SDR color gamut. It’s somewhat oversaturated in Adobe RGB, which may displease some people.
The HDR color volume on the Corsair 32QHD165 monitor is pleasant. Its color spectrum is somewhat incomplete, and just like SDR, it is unable to display dark rich hues. Video: YouTube/Corsair For media creators, the Corsair XENEON 32QHD165 is a fantastic monitor. It is simpler to view more of your work at once on the huge screen. As long as you select the sRGB mode, it provides great accuracy right out of the box and an exceptional SDR color gamut with full coverage of both the sRGB and the Adobe RGB color spaces. Unfortunately, the sRGB option prevents you from making the majority of image modifications, and all other picture modes have poor saturation.
The 32QHD165 supports HDR10 signals, certified with DisplayHDR 400, powered by an edge-array LED backlight. However, it lacks dynamic contrast for HDR, placing it in the category of HDR-compatible monitors without additional dynamic range.
Where the Corsair XENEON 32QHD165 truly shines is in its color reproduction. Offering exceptional accuracy, it boasts the widest gamut ever measured. Corsair’s pursuit of the Rec.2020 specification is evident, achieving over 84% of its volume. Undoubtedly, it stands as the most vibrant monitor we’ve evaluated thus far.
In terms of on-screen display (OSD) features, simplicity and efficiency define the 32QHD165. Navigation is straightforward, whether using the joystick, iCUE app, or NEXUS/Stream Deck controllers. The Picture sub-menu provides comprehensive image control, featuring six presets tailored for various tasks. Calibration options include three gamma settings, three color temperatures, and precise RGB sliders. Remarkably accurate color representation is achieved in the default Standard mode, with an additional sRGB mode available for SDR content.
The second screen within the Picture menu offers an eye saver function, akin to the prevalent low blue light feature, mitigating eye fatigue by adjusting color temperature and brightness. Additionally, three overdrive options are provided, with the Fast mode effectively reducing motion blur. For those preferring backlight strobing over Adaptive-Sync, enabling the MPRT option eliminates motion blur at the cost of a 40% brightness reduction.
Within the System Setting sub-menu, the Adaptive-Sync toggle is located, which must be disabled before activating MPRT. The LED toggle solely controls the power indicator light, as the Corsair 32QHD165 lacks additional lighting features. Finally, the Factory Reset option allows for a complete restoration to factory defaults.
Corsair XENEON 32QHD165 Monitor: Pros and Cons
Pros:
High Refresh Rate (165Hz):
Smooth performance for gaming and fast-paced tasks.
Reduces motion blur and screen tearing, enhancing the gaming experience.
QHD Resolution (2560×1440):
Provides sharp, detailed images while being less demanding on GPU than 4K.
Ideal balance between performance and visual clarity for gaming and productivity.
32-Inch Screen Size:
Offers an immersive experience, especially beneficial for gaming and multimedia.
Great screen real estate for multitasking and professional applications.
Vivid Colors with 100% sRGB and 98% DCI-P3:
Accurate and vibrant color reproduction.
Suitable for creative work like photo editing and video production.
AMD FreeSync Premium Certification:
Synchronizes the refresh rate with compatible GPUs to prevent tearing and stuttering.
Also compatible with NVIDIA G-Sync (unofficially).
Fast Response Time (1ms):
Reduces ghosting and motion blur, crucial for competitive gaming.
Enhances responsiveness in fast-action scenes.
Solid Build Quality and Aesthetics:
Sleek, modern design with a sturdy stand.
RGB lighting options to complement gaming setups.
Cons:
Price:
Relatively expensive compared to some competitors with similar specifications.
Might not be cost-effective for casual users or those on a budget.
No Full Array Local Dimming (FALD):
Lacks advanced dimming zones, which impacts HDR performance.
Blacks may not be as deep compared to high-end monitors with better HDR support.
Limited HDR Capabilities:
HDR 400 certification is basic; lacks the brightness and contrast levels of higher HDR standards (like HDR 600/1000).
Not ideal for those seeking a true HDR experience.
No Built-in Speakers:
Requires external speakers or headphones for audio output.
Could be inconvenient for users seeking an all-in-one solution.
Viewing Angles (Typical for VA Panels):
While the panel performs well, some color and contrast shifts may occur at extreme angles.
Not as consistent as IPS panels in this aspect.
Size vs. Resolution Consideration:
On a 32-inch screen, QHD might show slightly visible pixels for users sitting close.
Not as sharp as 4K at this size, which may affect productivity tasks requiring fine detail.
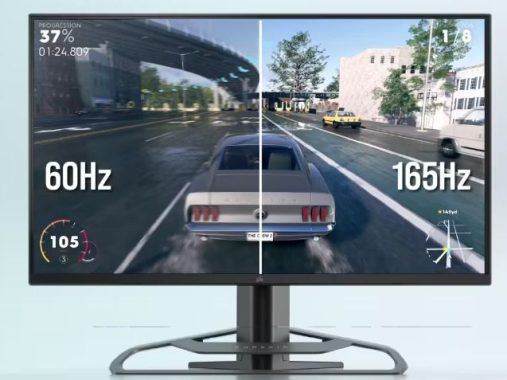
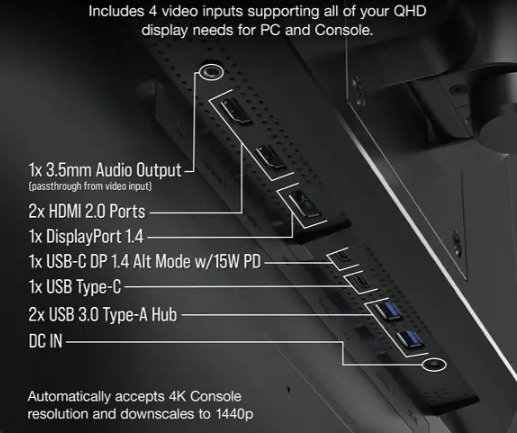
XENEON 32QHD165 from Corsair is a top-notch gaming monitor. For a responsive gaming experience, it has a quick refresh rate, excellent response time at both the maximum refresh rate and 60Hz, and outstanding input lag. It includes a Console mode that enables it to receive 4k @ 60Hz feeds despite lacking HDMI 2.1 ports. And lastly, it supports FreeSync variable refresh rates, which eliminates tearing during gaming.
For office use, the Corsair XENEON 32QHD165 is a great monitor. It is ideal for screen sharing because of the stand’s ability to swivel and its wide horizontal viewing angle. While the wide screen facilitates multitasking, it only provides acceptable text clarity. Visibility is not a problem because of its excellent peak brightness and decent control of reflections. Additionally, it boasts fantastic gray uniformity and an amazing SDR color gamut, which is perfect if your work necessitates correct color. photo: CorsairThe 32-inch, 1440p Corsair XENEON 32QHD165 monitor has an IPS panel. Overall, Corsair’s first monitor is quite outstanding. It is primarily marketed as a gaming monitor, and it offers a great gaming experience with reduced input lag, excellent response time, and FreeSync technology for almost tear-free gaming. With one of the greatest SDR color gamuts we’ve ever tested, it has striking colors and fully covers the sRGB and Adobe RGB color spaces. Even so, unless you utilize the built-in sRGB mode, the majority of content is oversaturated due to this large color range. It has poor contrast, which is typical for an IPS monitor, but wide viewing angles, therefore it doesn’t display well in low light.
If you’re looking for a well-rounded monitor with top-tier gaming performance, excellent color reproduction, and a sleek design, the Corsair XENEON 32QHD165 is a solid choice!
Corsair XENEON 32QHD165 monitor specs:
Screen Size 32”
Native Resolution 2560×1440 (16:9)
Max Resolution 2560×1440
Refresh Rate 165Hz
Response Time 1ms MPRT, <3ms GtG
Color Gamut 98% (DCI-P3), 100% (AdobeRGB), 100% (sRGB)
Dynamic Host Configuration Protocol is known as DHCP. It is a network protocol that enables a server to instantly give an IP address to a networked computer.
How does DHCP operate?
A specific “DHCP Discover” network packet must be sent to the local area network’s broadcast address for DHCP to operate correctly. The DHCP server receives this packet and replies with a “DHCP Offer” that includes the IP address it is providing to the client. The server only has this particular IP address. The client will then acknowledge to the server with a “DHCP Acknowledgment” that it has received an IP address. This will demonstrate that the server has acknowledged giving the client an IP address.
A DHCP server: What is it?
A DHCP server is a computer on a network that is configured to assign IP addresses to other computers on that network. It is possible to set up the DHCP server such that it would automatically assign IP addresses to recently connected computers and maintain track of which machines have received which IP addresses. The DHCP server is also in charge of keeping track of which computers have received which IP addresses. Automation of IP address management: Without DHCP, network managers would have to assign and remove emails by manually. When devices require network access and when they disconnect, it can be difficult to keep track of which system has which address. DHCP can streamline and unify this, allowing network specialists to manage every site from a single place.
photo: Pixabay
A DHCP client: what is it?
A DHCP client is a device that has been configured to contact a DHCP server to request an IP address. A DHCP Discover packet is sent by the DHCP client to the DHCP server to start a connection. The IP address that it is making available to the client is included in the offer packet that the DHCP server delivers to the DHCP client in response. The client then starts the process of seeking an IP address by communicating with the server via a DHCP Request packet. The server replies by sending the client a DHCP Acknowledgement packet to verify that the IP address has been properly assigned to the client.
How should a DHCP server be set up?
Although setting up a DHCP server is somewhat outside the purview of this post, in general, you must install the DHCP server software on the computer that will operate as the server and then setup the DHCP server so that it will assign IP addresses to the network’s computers.
DHCP client configuration – how to?
Although setting up a DHCP client is also somewhat outside the focus of this post, in summary, you must install the DHCP client software on the client’s computer before configuring it to lookup the DHCP server for an IP address. To put it another way, you must set up a DHCP client.
Hard drives and other storage devices are connected to computers via the SATA internal standard, and eSATA is the external variant of SATA. SATA and eSATA are fundamentally different from one another since SATA is the internal standard and eSATA is the external version.
SATA uses a data port that is not only more efficient but also more compact than the older Parallel ATA (PATA) standard, which is able of far slower data transfer rates. Thanks to eSATA, these benefits are now usable with external storage devices, such as external hard drives and optical disks.
eSATA’s Drive Cable benefits and drawbacks
eSATA
eSATA provides a number of important advantages over competing standards for external data storage, like USB and Firewire. eSATA is a great option for the storing and retrieval of large volumes of data because it is substantially faster than these other standards. In addition to being more dependable than these other standards, eSATA is also less vulnerable to issues like data corruption. There are a few disadvantages to eSATA, nevertheless, that you should be aware of. It’s conceivable that you won’t be able to use eSATA with all of the devices you own because it isn’t as widely supported as USB or Firewire. Additionally, eSATA needs a specific eSATA port, which is not always available on all PCs. This port is not always accessible.
SATA Drive Cable: benefits and drawbacks
Many advantages, like fast transfer speeds and high levels of dependability, are shared by SATA and eSATA. SATA has more compatibility than eSATA because it is the standard for internal and external hard drives. Because SATA does not require the installation of a dedicated port, it is more affordable than eSATA.
SATA, on the contrary way, does have some disadvantages to take into account. SATA is not the best choice for storing and retrieving massive amounts of data because it is slower than eSATA. SATA needs the usage of specialized cables and connectors, making installation more difficult than with eSATA.
Speed is one of the main advantages that eSATA has over USB and FireWire. SATA does not experience the overhead that the other two do when the signal is being converted between the external interface and the internal-based drives. A simple and direct converter between the internal and external connectors is needed in the housing because SATA is the industry standard interface for many new hard drives. Therefore, the speed of the external device should be equivalent to that of an internal SATA drive.
The most efficient way to decide which data storage standard is best for your business is to take into account your needs. The eSATA standard is your best choice if you need to safely and quickly store and retrieve large amounts of data. If you’re searching for something less expensive yet still fast and trustworthy, SATA is a fantastic choice. You should ask a computer-savvy person for guidance if you’re having problems choosing between two options so they can guide you in making the best decision.
Program testing is a technique used to learn more about the software and its product, in which the product is assessed and verified in relation to the intended task. It’s a platform where they can simply meet industry standards for software solutions with no flaws. It assists in system execution through a variety of automated tool platforms and operates in accordance with areas and interests. It contrasts the actual demand with the inaccuracy, gaps, or missing requirements. Through testing, software testers successfully handles software bugs. It quickly locates the mistake, locates the demand that is missing, and fixes the gap between the actual demand.
A software tester is what?
A software tester is a specialist who verifies that the system, software, and application will run on the projected platform during testing software development. It effortlessly recognizes the various test types and establishes how the system functions. It generates a document and performs numerous tests on the outcomes. This individual is in charge of keeping clients’ IT teams informed and communicating with them. It suggests modifying the software.
Photo: Pixabay
The Qualifications for Becoming a Software Tester
The most important component is that a person must have a thorough understanding and method of the field. It has various software testing platform methods, works with various criteria to take software platform into consideration, and is capable of differentiating the sector in accordance with the needs.
Updated with the most recent IT innovations, with employment requirements adapted to the position and improved technology at work.
When working with people who are aware of shifting trends and pace, it is important to keep to evaluation and work that won’t be impacted.
They must possess a bright mindset and be motivated, showing that they are carefully researching and skillfully rescuing the customers.
Benefits Of Software Testing
A smart tester must undertake consent-based testing and work on non-standard software tests. It fluidly performs testing and inspections of the product from various perspectives and spots bottlenecks. In the most recent era, when digital transformation has been popular in the upcoming decades, it is simple to build high-quality software. It enhances the software product and employs QA specialists in both large and small businesses. It offers a wide range of job alternatives, a conventional career path, and opportunities for professional advancement with subpar testing specialists and QA lead. It supports operations, software development, and business planning.
They use IT procedures and continually changing QA platforms for a variety of reasons. It is beneficial to regularly acquire new tools, literature, and knowledge in a profession, as well as to learn about new fields. It complies with employer requirements for improving the field’s capacity continuously. It has a specific background or in-depth knowledge with the right learning intensity, preparing the software tester fluently from beginning. Many businesses provide training for new employees and coordinate internships for the program. It provides an opportunity for newcomers and skillfully curates trade secrets.
The Drawbacks Of Software Testing
Professional testers are used, and the employment is passive and requires a second job in the office. IT businesses encourage sports and spend more on subscriptions at work. Remote locations can simply use it, and trends continue to be popular. It readily satisfies the criteria and organizes the workplaces. It is a field with pros and cons, as well as contentious parts of functioning where there is adequate QA testing. It is referred to as a slate area field with limited options. Monotony – It is a typical starting option for a career. It contains intricate inspections with hundreds of runs that are performed on various tests. Starting to learn while working is natural. where they experiment with new things and examine the test automation platform It combines testing and development.
Exchange of Information with Team Members – It has a communication component through better professionals and appears to be a drawback of the industry. It has experts who must be able to converse with various associates, clients, and opponents. It can easily lead to success and help people find common languages.