Home Blog Page 77

Fast, reliable, powerful – TP-Link Archer AX11000 router

0

This TP-Link Archer AX11000 router is really great. extremely quick and simple to set up. There are many ports available. practically works out of the box. With just one TP-Link box to ease maintenance and spread signal across your entire house, the range is excellent—equal to two-node ASUS mesh router.

The software’s management interface is quite decent. They came up with some really great ideas, like having the LED turn off automatically at night, using one SSID to combine and balance frequencies intelligently using both frequencies, having a hidden guest SSID and QR code for it, so that your friends can connect instantly and securely, prioritizing your streaming with the QoS setting, activating intrusion prevention, getting a free TP-Link DDNS URL to make remote connections easier, and using an optional phone app to monitor and control the router. It is responsive and simple to use the control panel. They even noticed that since there is only one user, your router does not require a user name.

TP-Link Archer AX11000 router

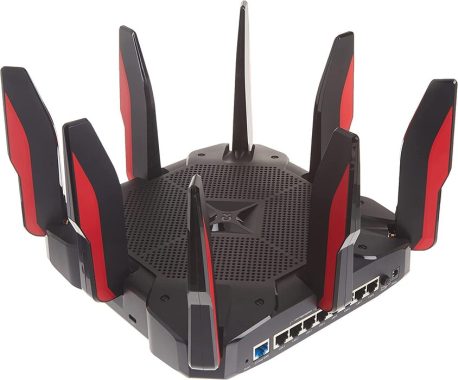
It is not surprising that the TP-Link Archer AX11000 router has a larger size because it has some real power. The square shape of this horizontally oriented router, which is made of an almost matte-black plastic, requires a significant amount of work space. It also features eight red-colored antennas in total, a massive brick-shaped power supply that occupies additional space, and more.

The AX11000 is a high-end router, thus it makes sense that the specifications are excellent. Every router has a CPU at its core, and this one features a 1.8 GHz 64 Bit Quad-Core CPU, three coprocessors, 1 GB of RAM, and 512 MB of flash storage in addition to other components.
A pair of USB 3.0 ports, one Type-C and the other Type-A, provide enough port coverage. Additionally, there are several Ethernet ports, including eight gigabyte speed LAN connectors and one 2.5 Gbps WAN port. Static Link Aggregation is another option for port pairing.
The Game Accelerator, which according to TP-Link automatically detects and optimizes gaming traffic, is one of a few features worth mentioning. It functions somewhat like a more sophisticated QoS. The second option is Game Protector, which has two parts. The first is an integrated Trend Micro-powered antivirus feature, and the second is parental controls. Overall, the UI is simple to use and navigate.

TP-Link Archer AX11000 router

Both the web-based console and the TP-Link Tether mobile app may be used to control the TP-Link Archer AX11000 router, however the web console provides more control and has a Game Center dashboard. A Home screen with buttons at the top labeled Network Map, Game Center, Internet, Wireless, and Advanced is displayed when the console first starts up. There is also a network map that shows you how many clients are connected, and below the map are panels with indicators from SpeedTest that display information about your Internet connection, like your IP address, MAC address, and type of connection.

Wi-Fi 6 is the latest generation of Wi-Fi technology, also known as IEEE 802.11ax. It is designed to provide faster and more efficient wireless connectivity for a range of devices, including smartphones, laptops, tablets, and smart home devices.

One of the main advantages of Wi-Fi 6 is its increased speed and capacity. It can provide faster download and upload speeds compared to previous generations of Wi-Fi, making it well-suited for tasks like streaming high-definition video or transferring large files. Wi-Fi 6 also has improved efficiency, which means it can support more devices on the same network without experiencing slowdowns or interference.

Wi-Fi 6 also includes a range of new features that are designed to improve performance and security. For example, it supports a technology called OFDMA (Orthogonal Frequency Division Multiple Access), which allows it to transmit data to multiple devices at the same time, improving the overall efficiency of the network. It also includes support for WPA3, the latest version of the Wi-Fi security standard, which offers improved protection against hacking and other cyber threats.

Wi-Fi 6 is backwards compatible with previous generations of Wi-Fi, so devices that support Wi-Fi 6 can connect to networks that use older technologies, although they may not be able to take advantage of all of the features of Wi-Fi 6.

The TP-Link AX11000 Next-Gen Tri-Band Gaming Router is not a cheap router when you consider that it costs just under $300 (current price $225). However, it is really quick and packed with features that will help you to improve your online gaming.

TP-Link Archer AX11000 router

Ultra-Fast Wi-Fi for Extreme Gaming – AX11000 speed machine that delivers Wi-Fi Speeds Over 10 Gbps: 4804 Mbps (5 GHz Gaming) + 4804 Mbps (5 GHz) + 1148 Mbps (2.4 GHz)1
Game Accelerator – Detect and optimize gaming streams, to ensure your gaming stays immersive
Game Protector – Keep your accounts and documents safe with a free lifetime subscription of Homecare™ security system.7
Game Statistics – Real-time latency, game duration and network resource allocation in a glance with fine-tuned UI.
Ultra Connectivity – 2.5 Gbps WAN port and eight Gigabit LAN ports, 2 USB 3.0 in Type A and Type C provide extensive connectivity.6
Powerful Processing – 1.8 GHz Quad-Core CPU and 3 coprocessors ensure your network performance always at peak run.
Highly Efficient – OFDMA increases the avg. throughput and reduces the lag.2
Easy and Smart – Link to your router via Bluetooth and set it up in minutes with the powerful Tether app.

TP-Link Archer AX11000 router also has a USB C connector, eight gigabit LAN ports with link aggregation, and an extra 2.5 Gb WAN port for users who are lucky enough to have access to a multi-gig switch or modem. Furthermore, a lifetime subscription to the TP-Link HomeCare service is provided, which offers device prioritization, parental controls with web filtering, and antivirus security.
In our review and testing, the TP-Link Archer AX11000 router has received a mixed combination of results. The integrated 8 port switch, the 5 GHz throughput, the integrated TrendNet security, and the simplicity of installation are the best features. The bulky design, poor 2.4 GHz speed, numerous dropped video frames during our congestion tests, and the hefty cost are the disadvantages. Photo: TP-Link

TP-Link Archer AX11000 router specs:

StandardsWi-Fi 6
IEEE 802.11ax/ac/n/a 5 GHz
IEEE 802.11ax/n/b/g 2.4 GHz
WiFi SpeedsAX11000
5 GHz: 4804 Mbps (802.11ax, HE160)
2.4 GHz: 1148 Mbps (802.11ax)
WiFi Range4-6 Bedroom Houses


8× Detachable High-Performance Antennas
Multiple antennas form a signal-boosting array to cover more directions and large areas

Beamforming
Concentrates wireless signal strength towards clients to expand WiFi range

High-Power FEM
Improves transmission power to strengthen signal coverage

4T4R
Multiple streams in the same band strengthen the fault tolerance in transmission

WiFi CapacityVery High


Tri-Band
Allocate devices to different bands for optimal performance

4×4 MU-MIMO
Simultaneously communicates with multiple MU-MIMO clients

OFDMA
Simultaneously communicates with multiple Wi-Fi 6 clients

Airtime Fairness
Improves network efficiency by limiting excessive occupation

DFS
Access an extra band to reduce congestion

12 Streams
Connect your devices to more bandwidth

Working ModesRouter Mode
Access Point Mode
Processor1.8 GHz 64 Bit Quad-Core CPU
Ethernet Ports1× 2.5 Gbps WAN Port
8× Gigabit LAN PortsStatic Link Aggregation (LAG) available with 2× LAN ports
USB Support1× USB-C 3.0 Port
1× USB-A 3.0 PortSupported Partition Formats:
NTFS, exFAT, HFS+, FAT32

Supported Functions:
Apple Time Machine
FTP Server
Media Server
Samba Server

ButtonsWi-Fi On/Off Button
Power On/Off Button
LED On/Off Button
WPS Button
Reset Button
Power12 V ⎓ 5 A
WiFi EncryptionWPA
WPA2
WPA3
WPA/WPA2-Enterprise (802.1x)
Network SecuritySPI Firewall
Access Control
IP & MAC Binding
Application Layer GatewayHomeCare™ Antivirus


Malicious Site Checker
Port Intrusion Prevention
Infected Device Isolation
Notification and Log

Guest Network1× 5 GHz Guest Network
1× 2.4 GHz Guest Network
VPN ServerOpenVPN
PPTP
ProtocolsIPv4
IPv6
Game CenterGame Accelerator
Detects and optimizes gaming streams to keep latency as low as possibleGame Statistics
Check real-time latency, system utilization, and game duration on a redesigned dashboard to tweak every detail

Game Protector
Keep your accounts and system safe with HomeCare™ antivirus protection

arental ControlsHomeCare™ Parental Controls


Custom Profiles
Content Filtering
App Block
URL Filtering
Time Limit
Time Schedule (Bedtime)
Log Insight

WAN TypesDynamic IP
Static IP
PPPoE
PPTP
L2TP
Quality of ServiceGame Accelerator QoS
QoS by DeviceHomeCare™ QoS


QoS by Application

Cloud ServiceAuto Firmware Upgrade
OTA Firmware Upgrade
TP-Link ID
DDNS
System RequirementsInternet Explorer 11+, Firefox 12.0+, Chrome 20.0+, Safari 4.0+, or other JavaScript-enabled browser

Cable or DSL Modem (if needed)

Subscription with an internet service provider (for internet access)

CertificationsFCC, RoHS
EnvironmentOperating Temperature: 0℃~40℃ (32℉ ~104℉)
Storage Temperature: -40℃~70℃ (-40℉ ~158℉)
Operating Humidity: 10%~90% non-condensing
Storage Humidity: 5%~90% non-condensing

Start your YouTube channel – Step-by-Step guide

0

The most popular option is YouTube, although video uploaders or creators can also create a channel on Instagram, Facebook, Twitter, etc. YouTube is your greatest option if your channel has already become well-known. Here are some suggestions to assist you expand your YouTube channel for those who are just getting started (and maybe even monetize).

Step-by-Step Instructions for Starting a YouTube Channel
Select a Video Platform
It’s crucial to pick the correct platform. There are several choices, including Pinterest, Google Adsense, Amazon Prime, Apple iTunes, Yahoo, Microsoft, Amazon Rekognition, Vimeo, and others. Because YouTube takes over if you don’t already have a reputation on Facebook, Twitter, or SEO, you should start on one of these platforms.

cbed
photo: Pixabay

Create A Community For Your Videos

Find out who is watching your videos to get started. See who is leaving comments by looking at their followers and tags. Participate in discussions, pose inquiries about peoples’ favorite subjects, and constantly adding new stuff. Share it with others if they really enjoy what you are doing and want more. Make a family out of your YouTube channel instead of just using it to make money!

Create your website

People will initially turn to your website to find the most recent information about your channel, including news, reviews, courses, events, and new features. To increase the number of people who can view your videos, use social media to connect with your audience via email, LinkedIn groups, Facebook pages, Reddit threads, and other platforms. To keep up to date, make a plan to post on all of the major social media platforms, including Facebook, Instagram, YouTube, and Twitter.

Create and edit your YouTube channel

The same thing occurs when you publish a video to YouTube; you have a set amount of time to edit your channel, if they recommend it. It can be too brief or boring to display to the public. Try this: post content that demonstrates what you’ve learnt about a subject, shares relevant facts, and tells personal experiences. Add some filters, such as music, pictures, or animated videos. Once you have their approval, upload it again, checking that everything looks fantastic and functions properly. This is effective for all types of information.

Accept sponsorship offers

There is a considerable probability that your viewers will buy things for you if they enjoy and pay attention to your videos. Check out the links in the description and the specials that display at the bottom of emails and newsletters when promoting your product. Make sure to split each deal into its own column so that everyone who watches your YouTube channel has the opportunity to read about it. In reality, every email that enters your inbox is aware of the origin of the bargain. So, if someone purchases your product, you will be able to pinpoint the location and date of delivery. Additionally, your followers will see that you have sponsored your own collection of products.

Advertise Yourself

Viewers could occasionally come upon a video you haven’t yet released named “Video Marketing Tips.” These videos may increase views and draw in new members. Most essential, you need to use social media and the internet to naturally distribute your message and promote yourself. Among the marketing strategies are writing blog entries, knowledge and teach, using hashtags while posting on social media, publishing content, and running advertisements. Continue adding new material! If your YouTube channel is still fresh and developing and the search and keyword targeting are solid, consider joining the top 500 channels. Additionally, keep in mind that YouTube only accepts 1000 comments per day. However, if you respect to specific guidelines, such as posting only videos to 100000+ subscribers, uploading unique content, producing high-quality videos, using 360° panorama, and boosting technical elements like lighting, color saturation, backdrop, and music, you can grow your account. If your audience like your channel, it shows that they care about your private label.

Keep an eye on the reviews

Reviews are trusted by some of the greatest names in business and technology. Reviews that consumers can rely on have helped them build their reputation. Before a review to be considered a complete proof that the author has actually worked on the product, it must first be supported by facts. The reviewers are knowledgeable about the products before they submit a review. It’s acceptable as long as you pay attention to the little things and always give honest, helpful comments on your application. Just keep in mind that reviews are frequently produced by experts who invest thousands of dollars in evaluating a product, so it would be preferable if you used honest reviews and tried to avoid delivering negative reviews.

Make your YouTube channel Search Engine Engagement Friendly

“SEO does not guarantee ranking leading position in SERPs,” goes a common phrase. Without an optimized channel and quality material, it is impossible to rank well in search engines.
Therefore, if you design your profile professionally and constantly updating your channel as it rises, YouTube is a good place to begin. Use the knowledge you’ve gained from now to produce amazing content that you hope will be seen by millions of people, and if at all feasible, monetize it fairly quickly.

Free ScreenRec – take screenshots and record videos

0

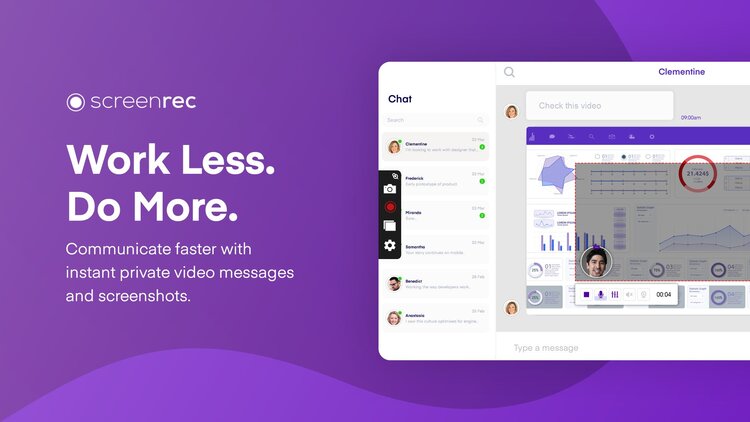
Screenrec app makes it simple to take screenshots and record videos directly from your desktop and share them immediately via created links. One of the most crucial components for many content producers and those who use computers on a regular basis is screen recording.

Screenrec
Photo: ScreenRec

One of the better utility apps is Screenrec, which enables you to take high-resolution screenshots and videos directly from your screen. Additionally, it enables you to quickly and easily share those pictures and videos with other people.
Capturing Images Effortlessly
You must to register an account in order to use the app, at least if you want to share your captures with others. You won’t need to get an account only for taking pictures or videos and saving them on your PC.

The good news is that signing up with your Google account is simple to do. You only need to carry out a few easy steps in order to start screen-capturing. To capture a portion of your screen, simply right-click the taskbar icon, choose Image Capture, and then choose the area you wish to capture. The only thing left to do is to make the capture.
The process of recording video is equally simple. The only options you need to choose from are the screen you want to capture and the time of the capture.
When recording a video, you can choose whether to use your microphone or not.Screenrec

Personal Data Exchange
Via privately secured links, you can distribute the captures to other people. The software will create a private sharing link when you click the share icon.
You may then share the capture with anybody and anywhere you choose by pasting the link the program provided.
In order to download the file you’ve added to their computer, the receiver only needs to type the URL into their browser. It is completely secure.
Summary
For quick and simple screen captures that you may share, Screenrec is one of the simplest and safest image and video capturing programs you can acquire.

Get More Done With ScreenRec – Free Download

Underwater digital cameras – Capture the perfect photos

0

Some professional marine photographers use underwater digital cameras as part of their field of work in addition to using them to capture photos & memories underwater. Even marine biologists and experts use underwater digital cameras to record marine life so they may learn more about its characteristics and study it. However, We believe it is safe to presume that neither you, our reader, nor I are either marine scientists or seasoned photographers. Like me, you’re a photo enthusiast who loves to catch underwater moments but is unable to do so without damaging their cameras.

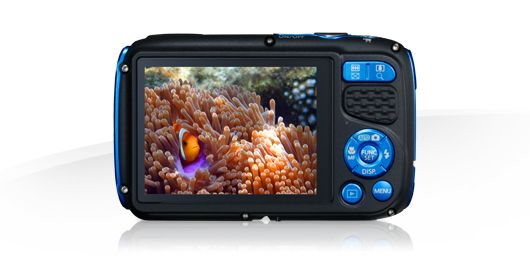
Submerging it under water to get the perfect image is equivalent to throwing it out the window in the hopes that a pick-up truck will drive by and run it over since to be waterproof is to resist the water to a certain extent.Canon PowerShot D30

Now, I advise you to purchase specialised cameras if you’re really serious about using an underwater digital camera to document those weird and wonderful moments underwater.

Since digital cameras are electrical and cannot tolerate water and water pressure, underwater digital cameras are uncommon. Manufacturing underwater cases for digital cameras is the closest electronics has ever come to manufacturing underwater digital cameras. Your standard digital camera will become an underwater digital camera with the help of these casings.
To get the greatest underwater photos when using your underwater digital camera, there are a few things you should keep in mind.

Keep in mind that light diffuses as you go deeper under the sea. The red spectrum appears darker due to light diffusion, therefore your underwater digital camera will capture photographs that are darker than those you captured on land. Use white balance to create colors that are natural to avoid this. Additionally, photos taken underwater with the same zoom effect will appear larger than photos taken on land. Make careful to check the desired image angle and size in the viewfinder of your underwater digital camera.
With its built-in flash, an underwater digital camera may capture marine show phenomena. It is recommended to use an external flash with your underwater digital camera to prevent the situation where your photos appear fuzzy and have white particles floating above them.

underwater digital camera
underwater digital camera – photo: Canon

Check for leaks through the case by submerging your underwater digital camera in water for a few seconds before using it. To ensure that water does not seep through the seal and saturate your camera, make sure that there are no sand or hair particles stuck there.
As long as they don’t interfere with the camera’s functionality, it’s also a good idea to place a piece or two of silica gel inside the case of your underwater digital camera. (Silica gel will prevent condensation within your camera case.)

The majority of underwater digital cameras have add-on lenses. Add these lenses to your collection of underwater digital cameras without hesitation. You can take pictures of little objects using macro lenses without approaching too closely and frightening your subject.
Keep in mind to always wash your equipment after using salt water. If the salts aren’t removed, they will eventually crystallize, act like sand, and leak into your camera cover.
For information on available underwater cases for your digital cameras, visit the websites of Sony, Nikon, and Canon.

With its sophisticated professional waterproof sports camera, the Olympus Tough TG-6 is ideally suited for underwater photography. Its sensor is the biggest in its class and can satisfy demands beyond routine usage, even though it is five years old. Despite the discontinuation of the product line, the TG-6 is still a good option for taking photos with underwater lenses.

Olympus Tough TG-6
Olympus Tough TG-6

Specifications

  • 12MP, 1/2.3″ BSI-CMOS sensor
  • 25-100mm equivalent F2.0-4.9 stabilized lens
  • Waterproof to 15m (45ft), shockproof from 2.1m (7ft), crushproof to 100kgf (220lbf), freezeproof to -10°C (14°F), dustproof
  • 3″, 1.04M-dot display (non-touch)
  • Raw support
  • 1cm (0.4″) minimum focusing distance
  • 20 fps burst shooting
  • Pro Capture mode saves photos before and after the shutter release is pressed, to help you capture the right moment
  • 4K/30p video
  • Built-in GPS, altimeter, compass, thermometer and accelerometer
  • Optional conversion lenses and flash accessories

The TG-6 comes in black or red and is priced at $379.

What Is RAM & How does it work?

0

Anyone who uses their own computer as a PC geek may be really curious about what RAM is. It is an essential component of a computer system. The application software, operating system, and data that are now in use are stored in Random Access Memory-RAM. This allows the computer’s processor to temporarily access them as needed. The other types of storage inside a computer system are nothing compared to RAM. Even faster than a hard drive, CD-ROM, or a floppy disk. Only when a computer is running can information that is kept in RAM be accessed. When a computer is turned off, data previously kept in RAM is lost.RAM - Random Access Memory

When the computer is restarted, data from the hard drive is retrieved to bring RAM back into focus. RAM is similar to main memory in that it may be accessed by programs.

RAM – Random Access Memory – How does it work?

RAM works quite similarly to short-term memory in humans. RAM can access the computer’s long-term memory to retrieve data, much like the human brain can. When short-term memory is exhausted, this is frequently necessary. Most computers have a hard drive that can store 40 billion bytes in addition to at least 256 million RAM bytes. Data is stored on a record-like magnetized surface.
Without accessing the other bytes, each byte of RAM can be determined independently.
RAM comes in two variations. SRAM stands for static random access memory, while DRAM stands for dynamic random access memory. The more widely known of the two is DRAM. DRAM needs to be refreshed at a rate of several thousand times per second. Information access in DRAM takes 60 nanoseconds. SRAM is more expensive but performs at a significantly faster rate than DRAM. A memory cell is created when a transistor and a capacitor interact. This is a single piece of data. Additionally, SRAM permits access in as little as 10 nanoseconds at times.

RAM has been around for many years and has changed over time. DDR-RAM is currently the most widely used type of computer memory (Double Data Rate Random Access Memory). With each successive DDR RAM generation, some advancements are made. For instance, DDR5 uses less power than DDR4, giving mobile devices longer battery life. Additionally, the newest memory is twice as quick as DDR4.

Your motherboard must be compatible with the type of memory you buy. To obtain the details, speak with the maker of your motherboard. The most recent RAM will not function with a motherboard from a previous generation, like any other technological advancement.

This is a brief definition of how RAM works in a computer system.

Subwoofer ELAC Debut 2.0 SUB3030 12″ specs & review

0

With the ground-breaking ELAC Debut 2.0 SUB3030 12″subwoofer , you can enjoy powerful bass all while controlling it from your smartphone or tablet.

Bluetooth Advanced Control
The subwoofer features the cutting-edge digital control technology from Elac in place of the conventional analogue controls. You may take full control by simply downloading the SUB Control 2.0 app for your smartphone or tablet (Apple iOS or Android). You may now fully operate the subwoofer from the comfort of your couch without having to fumble around the subwoofer’s rear.ELAC Debut 2.0 SUB3030 12″The new SUB3030 subwoofer from ELAC is made to be the ideal match for the brand-new Debut 2.0 loudspeakers, giving music and soundtracks a powerful bass foundation that transforms your system into an experience you can very well hear and feel. The SUB3030 was designed and developed, like Debut, to offer incredible performance at a low cost. Since it is so small, it can be placed practically anywhere in your home, and the powerful app-controlled EQ and DSP software ensures that your system is seamlessly integrated.
For a response customized for your room, use auto EQ.
The subwoofer will automatically equalize itself to your room’s specific features utilizing a 12-Band parametric equalizer using the SubEQ app and the microphone on your smartphone. Full manual EQ is also available if you’d prefer a distinctive sound that’s customised to your preferences.

Special driver for extended, deep bass
The clarity and quantity of bass required to faithfully reproduce today’s demanding movie soundtracks and music are provided by a personalised 12-inch long-throw driver. A 12 inch passive radiator boosts the system’s efficiency and transient response for greater bass at all volume levels. The ELAC Debut 2.0 SUB3030 subwoofer provides bass that is both deep and extensive, as well as both quality and volume. photo: ELAC

Amplifier BASH for precise control
BASH tracking amplifiers are used by all Elac subwoofers. BASH amplifiers, in contrast to conventional amplifiers, track the input signal and adjust the supply voltage to a normal Class AB amplifier. This not only increases the amplifier’s efficiency but also gives dynamic music and movies the on-demand power they require.ELAC Debut 2.0 SUB3030 12″

Automatic On/Off
When an audio signal is being transmitted to the amplifier, the subwoofer will recognize it and turn on. The subwoofer will also shut off after a long time of inactivity in order to save electricity.

The ELAC Debut 2.0 SUB3030 subwoofer may completely change your home theater experience with its powerful bass that is completely under control.

ELAC Debut 2.0 SUB3030 subwoofer specs:

  • Speaker Type:   Powered subwoofer, with passive radiator
  • Woofer:   1 x 12″ high-excursion doped paper cone
  • Passive Radiator:   1 x 12″ high-excursion doped paper cone
  • Frequency Response:    25 to 150 Hz
  • Crossover Frequency:   50 – 150 Hz, continuously adjustable
  • Amplifier Type:   BASH-Tracking
  • Maximum amplifier power:    1,000 Watts peak / 500 Watts RMS
  • Standby power consumption:    0.5 Watt
  • Inputs:     L/R/LFE RCA
  • Cabinet finish:   Black Ash Vinyl
  • Accessories included:   AC Power Cable
  • Dimensions (WxHxD):   17.63in, 19.19in, 17.63in
  • Weight:    50.16lb

Monitor Sony INZONE M9 – specs & Review

0

Excellent gaming performance is provided by the Sony INZONE M9 monitor. Amazingly low input lag makes for an extremely responsive gaming experience. With the optimal settings, it also offers an excellent response time at the maximum refresh rate, with very little overshoot and very little blur around quickly moving objects. Since you can see more fine details in graphically demanding games, the wide, high-resolution screen is excellent for gaming. Finally, it’s a fantastic option for console gamers because it supports HDMI 2.1 bandwidth on both HDMI inputs, allowing you to play games in 4k @ 120Hz on the Xbox Series X and PS5 without having to switch out the connections.

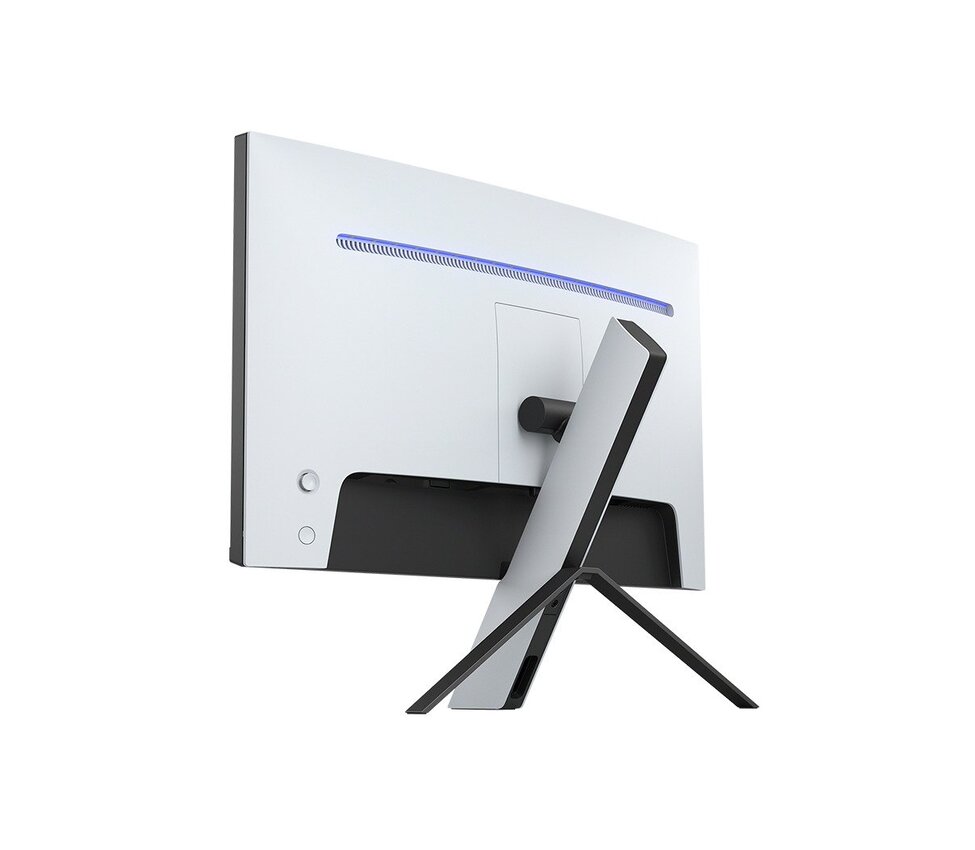
The Sony M9 monitor has a specific look that is obviously targeted for gamers. There is very little dead space between the sides of the screen and the first pixels on the front of the monitor, which has a straightforward design. The PS5 and other Sony INZONE devices, such as the Sony INZONE H7 Wireless, have a number of design features in common with the monitor’s back. With three legs that support the monitor like a tripod, the stand has a beautiful design.

Monitor Sony INZONE M9

The build quality of the Sony M9 is only correct. Most of it is made of plastic, and some of it feels rather inadequate. For a monitor at this price point ($899.99), the stand doesn’t perform as well as it ought to; it wobbles a lot and takes a while to stabilize.
Sadly, the stand’s distinctive form also restricts the extent of its ergonomic modifications. It cannot swivel or rotate into portrait mode, and the height adjustment range is disappointing. Fortunately, it can be VESA mounted, so if you’re having trouble positioning it in an optimal viewing position, you can install it to a different stand or wall mount.

It’s best enjoyed immediately in front at a convenient viewing distance because the horizontal viewing angle is just fine. The Sony M9 monitor is not a good option for co-op gaming on one screen because the image degrades and fades when seen at an angle, and the sides worsen if you are seated too closely.
The image gets worse if you’re looking at it from above or below, and the vertical viewing angle is just passably good. Sharing the screen with someone nearby will make it particularly obvious because they will see a different image from you.

The Sony M9’s accuracy is passable right out of the box. The gamma follows the sRGB standard curve well for the most part, and the white balance is great with no noticeable problems in shades of gray. However, darker scenes are slightly overdarkened. The major problem is that there is no sRGB clamp to artificially restrict colors to the sRGB color space, so colors appear poorly oversaturated. Despite these problems, there is no red or blue tint to the image right out of the box, and the color temperature is close to the calibration expectation.

Monitor Sony INZONE M9

Office users can get a lot out of the Sony INZONE M9. With many windows open and a huge, high-resolution screen that makes multitasking simple, you can produce text with exceptional clarity. Due to its high peak brightness and effective control of reflections, it offers good visibility in bright spaces and doesn’t cause glare. Unfortunately, it’s difficult to adjust it to an appropriate viewing position due to poor ergonomics, so you might want to think about VESA attaching it instead of using the provided stand.
A excellent HDR experience is provided by the Sony INZONE M9 monitor. Bright scenes almost exactly match how the content developer intended them to because of the device’s outstanding peak HDR brightness. Unfortunately, the contrast ratio is weak, and the local dimming feature is just acceptable. As a result, the bright specular highlights don’t really stand out from the background. HDR content appears vibrant and natural because to its excellent color volume and amazing HDR color gamut.Monitor Sony INZONE M9

The Sony INZONE M9, also known as the M9 for short, is the company’s first monitor and a member of the new INZONE series of gaming accessories, which also includes the Sony INZONE H9 Wireless headphones. It is a high-end gaming monitor that supports both FreeSync and G-SYNC Compatible variable refresh rate technologies, has a native 4K resolution, and a high refresh rate. It is a member of Sony’s “Perfect For PS5” series, which includes products with special features created with PS5 gamers in mind. In contrast to some of its rivals, such the Samsung Odyssey Neo G8 S32BG85, it does not use a Mini LED backlight, although it does offer full array local dimming capability.  Photo: Sony

27” Sony INZONE M9 4K HDR 144Hz Gaming Monitor specs & review:

SCREEN SIZE (DIAGONAL)   – 27 in (68.4 cm)

Aspect Ratio   16:9

PANEL TYPE   IPS LCD

DISPLAY RESOLUTION (PIXELS, H X V)  3840 x 2160

REFRESH RATE  DisplayPort: 24–144 Hz, HDMI: 24–120 Hz

VARIABLE REFRESH RATE TECHNOLOGY  Adaptive-Sync (VESA DP), NVIDIA G-SYNC Compatible, Variable Refresh Rate (HDMI 2.1)

RESPONSE TIME     1ms (Faster Mode)

ALLM (AUTO LOW LATENCY MODE)   Yes (HDMI 2.1)

BACKLIGHT TECHNOLOGY   Full Array Local Dimming, Direct Lit LED

HDR (High Dynamic Range) –   HDR10, HLG

VESA DISPLAY  HDR™    Display  HDR 600

BRIGHTNESS (TYPICAL)   400 cd/m²

PEAK BRIGHTNESS (TYPICAL)    600 cd/m²

STATIC CONTRAST RATIO (TYPICAL)   1,000:1

DYNAMIC CONTRAST RATIO (TYPICAL)   80,000:1

COLOUR GAMUT    95%+ (DCI-P3 Coverage)

COLOUR SUPPORT   1.07 Billion Colours

VIEWING ANGLE (H/V)   178°

SCREEN COATING    Anti-glare

Rotel C8+ Class AB Custom Installation Amplifier

0

The powerful C8+ amplifier from Rotel is designed specifically to supply massive amounts of power to specially configured audio systems. Four separate audio output zones and eight channels of pure Class AB amplification are present. Matrixed digital and analog inputs are also available on the C8+ back panel for connecting other sources. Your speakers are in safe hands with this amplifier thanks to its unique design and high-current power supply.

Rotel C8+
Rotel C8+ Class AB Custom Installation Amplifier

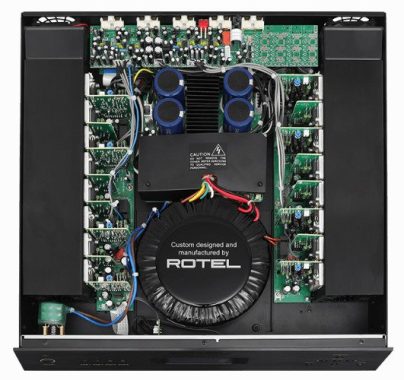
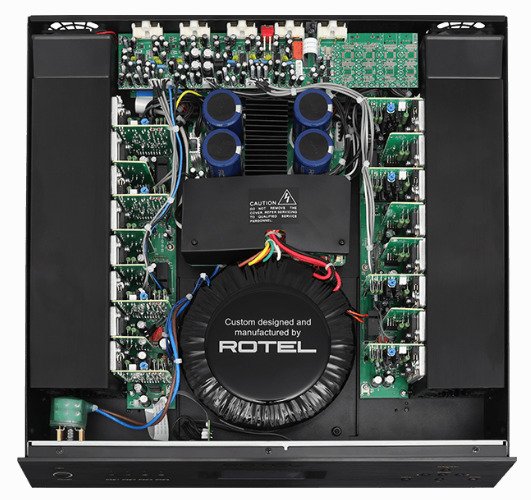
Rotel has experience in producing powerful amplifiers. In fact, they create a large portion of their own internal parts and circuitry. For clean, reliable power, the Rotel C8+ uses a specially created, larger toroidal transformer. Bulk storage smoothing capacitors are another component that gives the C8+ precise control over bass frequencies.

Inside the C8+, Rotel decided to use four high-performance digital-to-analog converter chips from Texas Instruments. When you’re using a digital source, such as a CD player, those processors are in charge of managing the challenging conversion from digital to analog. The maximum resolution supported by each of the amplifier’s two optical and two coaxial digital inputs is 24-bit/192kHz.Rotel C8+This amplifier uses some creative methods to send signal across your house. Its four RCA analog inputs as well as the digital inputs described before are matrixed to all zones. This implies that you can separately allocate the inputs (for instance, assigning digital input A to Zone 1) or have any input play across any zone or zones.

Even better, you may simultaneously broadcast crucial announcements from your PA system across all zones using the Priority Zone PA Override option. photo: Rotel

While that may seem like a lot to keep track of, switching between zones and sources is simple thanks to the front panel display. You may identify each input and zone on the C8+’s user-friendly interface to make it easier to remember what’s connected. Additionally, you can change the volume of each zone and the bass and treble settings for each zone separately.

Rotel C8+ features:
8-channel multi-zone Class AB amplifier driving all channels at 150 watts per channel into 4 ohms at 0.1% THD and 100 watts per channel into 8 ohms (20-20,000 Hz) (300 watts per channel when bridged)
oversized toroidal transformer custom-designed for clean power
four Texas Instruments 24-bit/192kHz digital-to-analog converter chips
frequency response: 10-100,000 Hz (± 0.5 dB)
signal-to-noise ratio: 100 dB (102 dB for digital section)
detachable power cord
rack-mounting hardware includedRotel C8+

Connections:
four pairs of unbalanced stereo RCA inputs
two optical digital inputs
two coaxial digital inputs
all inputs are matrixed across all zones
one pair of unbalanced stereo RCA line outputs for feeding signal to another amplifier
3.5mm 12-volt trigger in/out for power control by external components
RS-232 port allows integration with compatible home automation products
Ethernet port for network connection, software updates, and integration with home audio products

Front-panel:
front-panel display shows selected source, volume level, settings, and more
menu navigation and setting selection via function buttons on the right-hand side of the front panel
labeled zone buttons for turning speaker zones on and off
Rear-panel:
bridge switches on the rear panel for bridging channels together
input “A” can be set to stereo or mono by using the rear-panel switch
when set to “mono”, the left and right signals are combined and each speaker using input A as a source receives a mono signal

Main definitions and differences between HDR10+ and Dolby Vision

0

The High Dynamic Range classic HDR10, which is used on all HDR streaming services, downloads, and Ultra HD Blu-rays, is probably already familiar to you.
Therefore, all content providers and companies that support high dynamic range use HDR10. HDR10 uses static metadata, therefore even though it is required, it has some drawbacks. With regard to the black level and the peak brightness that characterize the gamma curve, HDR10 material has a single set of information (metadata) that relates to the entire movie.

Samsung, Panasonic, and 20th Century Fox worked together to develop HDR10+, an open source and royalty-free dynamic metadata platform. Unlike HDR10, which uses static metadata and can only apply one gamma curve for the entire movie, HDR10+ enables content creators to produce HDR video with the full benefits of dynamic metadata, allowing TVs to alter the tone mapping gamma curve on a scene-by-scene approach.

A superior HDR watching experience is delivered by dynamically adjusting the tone mapping curve scene by scene to optimize the appearance of the movie for the TV’s capabilities. The initial HDR10+ announcement by Samsung was made in cooperation with Amazon, however it was based on the dynamic metadata industry standard SMPTE 2094-40.

In order to appeal to studios and manufacturers, this new version of HDR10+, which is based on SMPTE 2094-40, has been enhanced and given additional flexibility.

How do Dynamic Metadata function?
For the black level and maximum brightness, HDR10+ uses dynamic metadata, which enables the technology to apply a variable tone mapping curve from scene to scene. The same contrast, gradation, brightness, and color enhancement are applied consistently throughout an entire piece of HDR10 content thanks to static metadata and tone mapping. However, with HDR10+, dynamic metadata combined with tone mapping enables each scene to be uniquely color optimized for a specific TV, resulting in a superior HDR experience that more closely resembles the original goals of the content creators.
Currently, Samsung, Panasonic, and 20th Century Fox are the main supporters of HDR10+. These companies have partnered to create and promote HDR10+ through a certification and logo program. To formalize and regulate the licensing process and entice new partners like content producers and consumer electronics companies, the three companies have established a licensing corporation.
Philips, Hisense, and TCL have also openly stated their desire to embrace HDR10+ in addition to Samsung and Panasonic. The only studios that presently support HDR10+ are 20th Century Fox and Warner Bros., though we haven’t seen much stuff from either of them in terms of their content.

Do 4K Ultra HD Blu-ray Disc standards include HDR10+?

Yes, at the start of 2018, HDR10+ was added to the requirements for 4K Ultra HD Blu-ray, and the first 4K discs to use the format were two IMAX Enhanced releases. In early 2019, 20th Century Fox also intends to start producing 4K discs with HDR10+, despite the fact that no other studio has made any public declarations to that effect. Samsung, Panasonic, and Oppo all produce players that support HDR10+.

Dolby Vision
Dolby Vision

Dolby Vision definition

Another HDR with dynamic metadata is called Dolby Vision. It is based on the SMPTE 2094-10 industry standard and, in most ways, it is quite similar to HDR10+. The primary distinction is that Dolby Vision has a closed-source architecture and licensing costs because it is a technology that belongs exclusively to Dolby. Similar to HDR10+, Dolby Vision uses an HDR10 base layer and adds a second layer of dynamic metadata. However, Dolby Vision uses 12-bit video depth rather than HDR10+ 10-bit’s video depth and can be provided over HDMI 1.4 and above.

What are the main differences between Dolby Vision and HDR10+?

Considering that HDR10+ is open-source, manufacturers are able to create the technology on their own and integrate dynamic metadata according to their own knowledge. Others prefer the Dolby approach, which provides some consistency in the grading, distribution, and display of HDR video with dynamic metadata in the absence of any agreed-upon industry standardization.
Another major difference between HDR10+ and Dolby Vision is that the former does not require the payment of royalties, whilst the latter does. Dolby Vision does use 12-bit video depth as opposed to HDR10+ 10-bit video, but it’s important to note that 12-bit displays are neither now offered nor anticipated for release for some time.
As was already mentioned, both technologies use dynamic metadata in addition to the same HDR PQ curve, but the methods used to accomplish this are different. Since Dolby’s technology is a closed-source platform, all TVs must be centrally calibrated and approved by Dolby. Some TV manufacturers are unwilling to give Dolby such a large amount of control because they believe it stifles innovation.
While HDR10+ can be provided via HDMI 2.0, Dolby Vision can be delivered over HDMI 1.4 or above. There is enough space in HDMI 2.0 to handle both Dolby Vision and HDR10+, even though HDMI 2.1 enables dynamic metadata.
In terms of video streaming, Dolby Vision has more support than HDR10+, with Netflix, Amazon, Vudu, and iTunes all supporting this technology. At the moment, only Amazon supports HDR10+. The same is true for studio support, with only 20th Century Fox presently supporting HDR10+, while Sony, Warners, Disney, Universal, Paramount, and Lionsgate all provide Dolby Vision material. With the exception of Samsung, who only supports HDR10+, all TV manufacturers currently support Dolby Vision. Dolby Vision gives visual creators the ability to enhance your favorite films, TV shows, and video games with deeper depth, better contrast, and more colors than you could ever imagine. By dynamically adjusting the image quality based on your service, device, and platform to produce stunning visuals every time, it unlocks the full potential of HDR technology. photo: Dolby Vision

Extremely fast SSD – SK Hynix Platinum P41

0

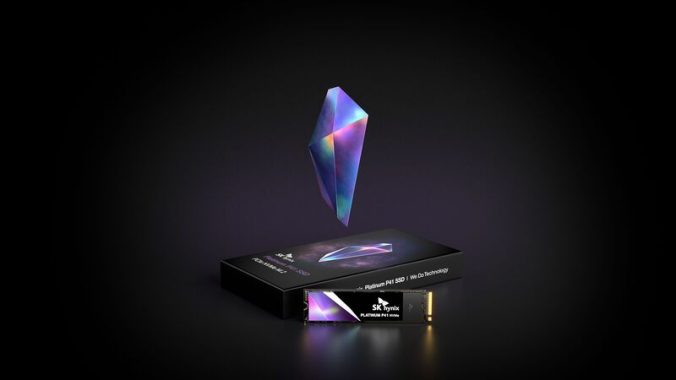
The Platinum P41 PCIe Gen4 NVMe SSD from SK Hynix combines performance, durability, and technical power. The company’s premier retail offering is the Platinum series, which targets PC gamers and multimedia producers. Amazon now sells the Platinum P41, SK Hynix’s first PCIe 4.0 SSD with superior 176-layer NAND flash memory, in capacities of 500 GB, 1 TB, and 2 TB. The Platinum P41 is made to outperform other PCIe 4.0 SSDs with sequential read and write speeds of up to 7,000 and 6,500 MB/s, respectively, and an industry-leading endurance rating of up to 1,200 TBW. The Platinum P41 also features an internal “Aries” controller made by SK Hynix, which helps to the quicker read/write rates.Platinum P41 ssd

The SK Hynix Platinum P41 costs approximately $105 (500GB), $150 (1TB), and $260 (2TB)., and has a 5-year warranty. We will concentrate on the 2TB capacity model in this review.
This device offers adequate durability levels and PCIe 4.0 performance levels exceeding 7 GB/sec because it has its own NAND and PCIe Gen 4.0 controller. Although the P41 is a premium drive with premium rates, the 2 TB variant only costs 13 cents per GB. The ACNS075 PHC631.00S-1 controller and capacities of up to 2TB were also designed with power efficiency and consistent performance in mind. 176-layer TLC NAND and the “Aries” controller from SK Hynix are both found onboard. Details about the P41’s controller are scant, however it appears to have a 4-channel design that is quite similar to the P31. Additionally, a 1GB DDR4 DRAM cache is incorporated into the disk. The Platinum P41 can accomplish sequential read rates of up to 7,000 MB/s and sequential write speeds of up to 6,500 MB/s, according to SK Hynix. IOPS values for random reads and writes are 1,400K and 1,300K, respectively. The NAND density of the P41, which is impressively greater at 176 layers, has already been mentioned. A desirable endurance rating has been achieved by the SK Hynix Platinum P41 after 1,000 hours of high-temperature operating life (HTOL) testing.
A desirable endurance rating has been achieved by the SK Hynix Platinum P41 after 1,000 hours of high-temperature operating life (HTOL) testing. The 2 TB model’s TBW rating is 1200 TBW, while the 1 TB model’s TBW rating is 750 TBW. TBW stands for TeraBytes Written, which is the total amount of data that a company is willing to guarantee will be written to the SSD. The performance will vary slightly with volume size; however, the faster it is, the more volume there really is. The SSD is an M.2 2280 form factor Non-Volatile Memory Express (NVMe 1.4) SSD. A decent SATA3 SSD today delivers performance numbers that are simply excellent, but with the more specialized NVMe SSDs, performance may be multiplied by 14x, which offers impressive numbers.

SK Hynix Platinum P41

Are 7000MB/sec storage devices truly necessary?
To get the most out of this high-performance product, which is frequently measured synthetically, you’d need to put it through rigorous workloads. Your PC won’t start up any faster because your operating system is usually the bottleneck, but your PC games will load a little bit quicker and your programs will start up just as fast as an NVMe SSD with read/write speeds of around 2 GB/sec.

It’s fair to say that the SK Hynix P41 is a performance beast. True, there are a few somewhat faster solutions if you look at raw, sustained performance measures. But when access times are taken into account, we now have a new top contender. A five-year warranty and excellent TBW values make this a very intriguing offer. For the 1TB and 2TB variants, SK Hynix offers 750 TBW and 1200 TBW (Terabytes Written), along with an MTBF of up to 1,500,000 Hours (Mean(ingless) Time Between Failures). We’ve already discussed endurance a lot, or how many times NAND cells can be written before they burst and split into little fragments. More NAND cells result from larger volume sizes, which increases endurance. The question is, how long will a 1200 TWB storage unit last before NAND flash cells become unusable? Well, if you’re an extremely serious user, you might be writing 50 GB per day (regular users probably won’t even write that much in a week), but based on that number, 50 GB x 365 days is 18.25 TB written annually. Thus, the 1TB SSD will only be used for half as long, or more than 65 years. Again, 50 GB of writing is a really serious value. photo: SK hynix

The SK Hynix Platinum P41 is an extremely fast product. The range of the overall read performance is between 3GB and well over 6.5 GB/sec. Performance was really strong, and access times (latency) was extremely high, according to trace testing. You may contest some of the continuous workloads, but would you ever distinguish between 6 and 7 GB/s? It seems that access times slow down when there are additional NAND layers. We’re talking millisecond intervals here. Larger volume size SSDs are beneficial in this situation since more NAND channels can be used.
The Platinum P41 2TB SSD drive from SK Hynix is really fantastic. The company’s first 176-layer NAND drive, the Platinum P41, has entered a somewhat crowded market. Although performance results were inconsistent throughout our tests, there appears to be a new king in town when it comes to access times and real-world traces. At times, it was by far the highest performing drive. The P41 has a good price/performance ratio while not being the best in terms of continuous performance, costing about $105 (500GB), $150 (1TB), and $260 (2TB). At 13 cents per GB, the 2TB model is the most cost-effective. The thermal testing results are satisfactory; however, if you intend to run heavy workloads, make sure you place this device underneath a heatsink.

Form Factor   M.2 2280 Single Side

Capacity   2TB, 1TB, 500GB

NAND Technology    SK hynix 176L 3D TLC NAND Flash

Interface   PCIe 4.0 NVMe, up to 4 lanes

Sequential Performance (up to)

2TB

Read : 7,000 MB/s

Write : 6,500 MB/s

1TB

Read : 7,000 MB/s

Write : 6,500 MB/s

500GB

Read : 7,000 MB/s

Write : 4,700 MB/s